Web Service
Web services are continuously running services that handle HTTP-based interactions, such as serving web pages, processing API calls, or managing user authentication. In Kubernetes, each Web Service runs in one or more pods that stay active to respond to external requests at any time.
FAQs
What is the difference between Public, Private, and Internal service schemas?
- Public: Accessible over the internet and is open to anyone.
- Private: Restricted access, available only when connected to the VPN.
- Internal: Only accessible within the same Kubernetes cluster and is used for internal communication between services.
How do I set up auto-scaling for my Web Service?
To enable auto-scaling, you can set the Autoscaling option to enabled and define the Memory Target and CPU Target. These targets determine the resource usage thresholds that trigger auto-scaling. You must also specify the minimum and maximum number of replicas to be maintained when auto-scaling is enabled.
What are the default success codes for a Web Service, and can I change them?
The default success code is 200, indicating the service is healthy. You can change this code based on your application’s requirements, as some services might return different success codes based on specific actions.
What happens if my health check fails repeatedly?
If the health check fails consecutively and reaches the Failure Threshold (default is 60), the service is marked as unhealthy, and Kubernetes might restart or terminate the service instance to attempt a recovery.
How can I configure memory and CPU settings for my Web Service?
You can configure the CPU Request and CPU Limit values to set the minimum and maximum CPU resources each instance in your cluster can use. Similarly, you set Memory Request and Memory Limit for memory allocation per instance.
What are some best practices when configuring a Web Service in SleakOps?
- Always set a minimum of 2 replicas to avoid downtime.
- Ensure your health check paths and success codes are correctly configured to reflect the true health of your service.
- Use auto-scaling where possible to optimize resources dynamically based on demand.
- Review and set memory and CPU usage targets appropriately to prevent overloading your infrastructure.
What should I do if my service shows response times longer than 10 seconds?
Long response times may indicate issues such as resource constraints, application inefficiencies, or network problems. You should check your service logs, ensure your resources (CPU, memory) are adequately allocated, and review your application code for potential optimizations.
How can I deploy my static web service?
At the moment, Sleakops doesn’t natively support static sites, but you can still deploy them using the same flow as other sites, by containerizing them with a web server like Nginx. Below is a simple example of a Dockerfile and the corresponding nginx.conf to serve your static content.
FROM node:20.11.0-alpine AS base

WORKDIR /app

FROM base AS build

ARG BACKEND_URL

WORKDIR /app

COPY package.json package-lock.json ./

RUN npm install

COPY . ./

RUN npm run build

FROM nginx:1.25.3-alpine AS production

COPY --from=build /app/config/nginx.conf /etc/nginx/conf.d/default.conf
COPY --from=build /app/dist /usr/share/nginx/html

EXPOSE 80
CMD ["nginx", "-g", "daemon off;"]
And here is a sample config/nginx.conf:
server {
    listen 80;

    location = /health {
            access_log off;
            add_header 'Content-Type' 'application/json';
            return 200 '{"status":"OK"}';
    }

    location / {
        root /usr/share/nginx/html;
        index index.html index.htm;
        try_files $uri $uri/ /index.html =404;

        add_header Last-Modified $date_gmt;
        add_header Cache-Control 'no-store, no-cache';
        if_modified_since off;
        expires off;
        etag off;
    }
}
Using this Docker-based approach, you can serve your static site with Nginx, all within a container.
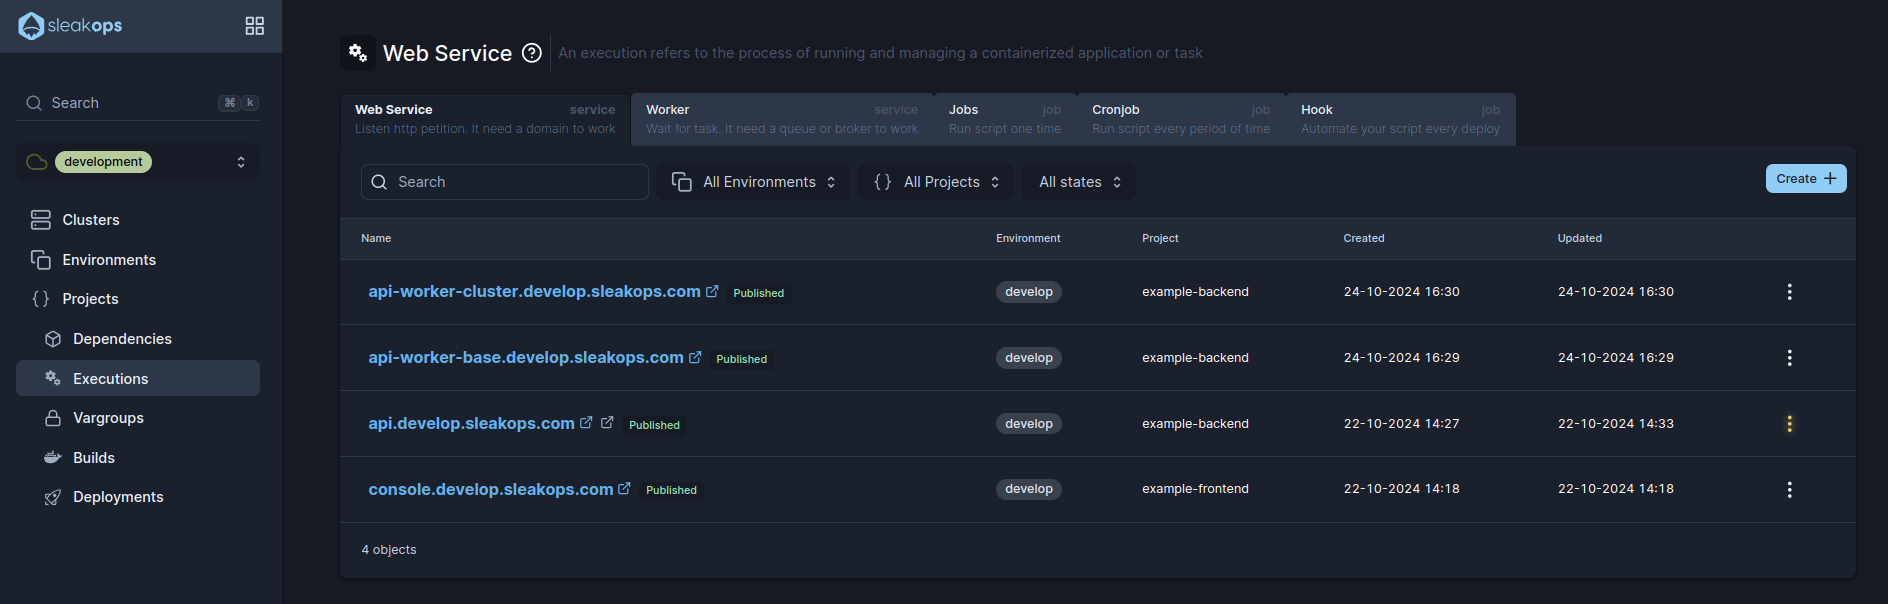
Lets add a Web Service for your Project
1. Navigate to create Web Service section
Into the Left Pane, access Workloads. Then select the Web Services tab and then, at the top right corner, click on the Create button.
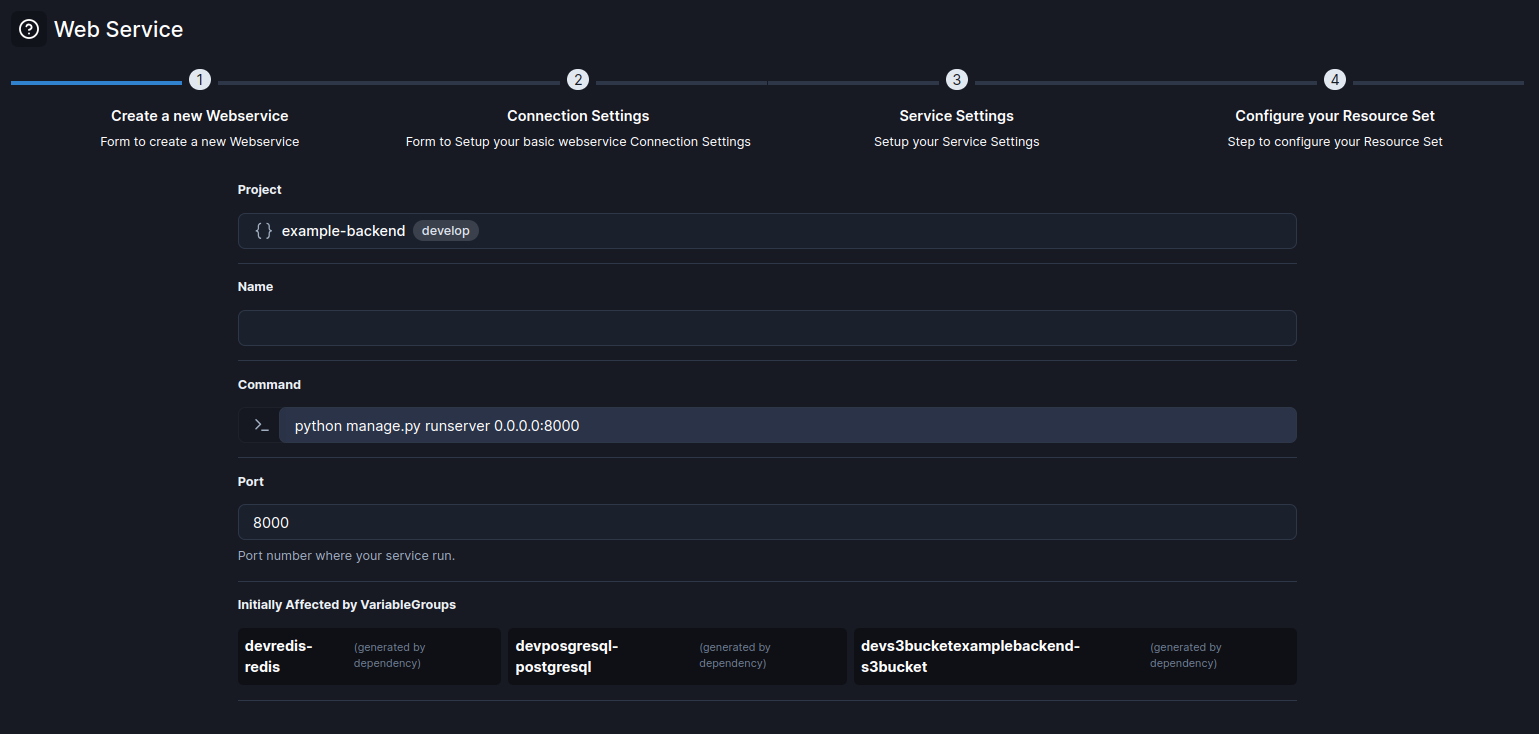
2. Select a Project and a Name for the web service
Start with the basic information, complete these attributes and click Next to continue.
| Attribute | Description |
|---|---|
| Name | Identify your web service. |
| Project | Select between the existent projects. |
| Command | The command that runs the service. |
| Port | The port number where the service runs. Default: 8000 |
Once those attributes are completed, click the Next button to move forward.
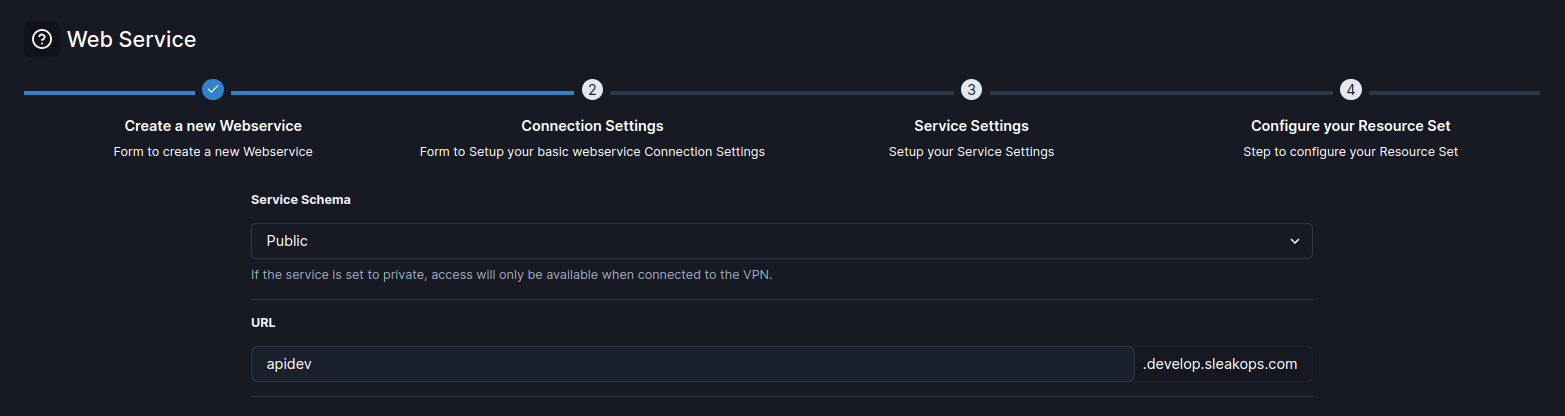
3. Define the connection
Select how will be your connection and click on Next.
| Attribute | Description |
|---|---|
| Service Schema | Defines the accessibility of the service: public, private, or internal. |
| URL | The URL assigned to the service based on the environment and project settings. Format: name.myenv.sleakops.com. |
4. Specify your workload settings
You’ll see the following for to specify the conditions.
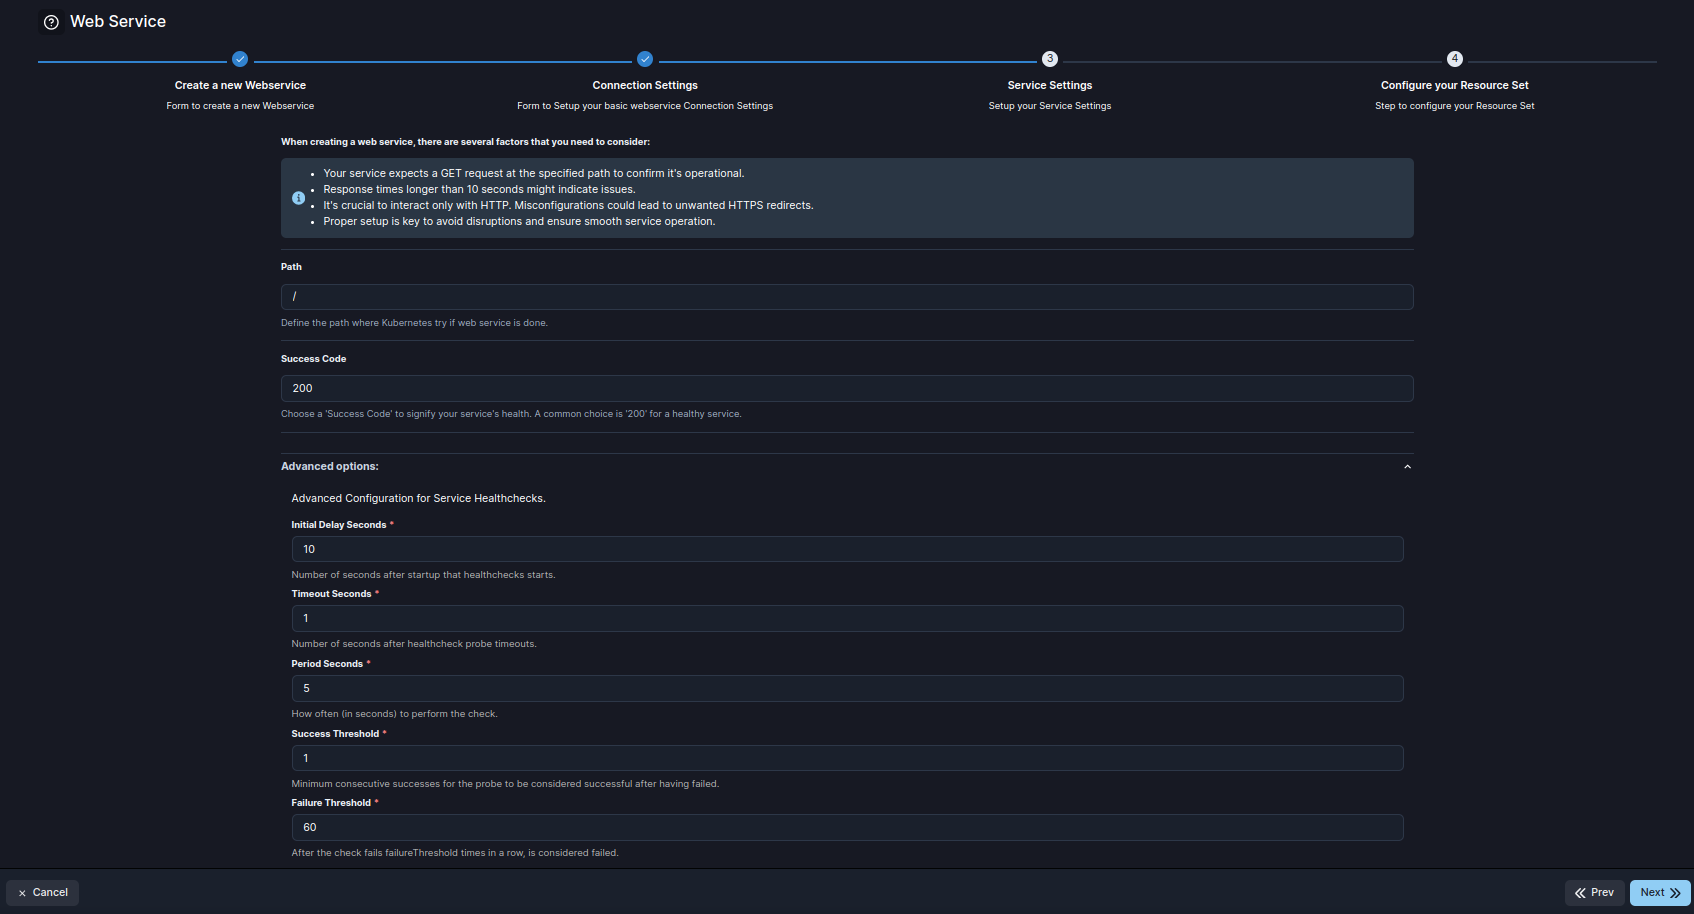
| Attribute | Description |
|---|---|
| Path | The path where Kubernetes checks if the web service is operational. Default: / |
| Success Code | The HTTP success code indicating the service’s health. Default: 200. |
| Initial Delay Seconds | Number of seconds after startup before health checks begin. Default: 10. |
| Timeout Seconds | Number of seconds after startup before health checks begin. Default: 1. |
| Period Seconds | Interval (in seconds) between each health check probe. Default: 5. |
| Success Threshold | Minimum number of consecutive successes required for the probe to be considered successful after it has failed. Default: 1. |
| Failure Threshold | Number of consecutive failures before the probe is considered to have failed. Default: 60. |
Once those attributes are completed, click the Next button to move to the next step.
5. Finish the set up
This step outlines the key attributes for configuring the resources of a Web Service in SleakOps, allowing for flexible management of CPU, memory, and scaling behaviors.
| Attribute | Description |
|---|---|
| CPU Request | The minimum amount of CPU resources allocated for each instance in the cluster. This ensures that each instance always has this amount of CPU available. |
| CPU Limit | The maximum CPU resources that each instance in the cluster can use. This cap helps prevent any single instance from consuming too much CPU. |
| Memory Request | The minimum amount of memory allocated for each instance in the cluster. This guarantees that the instance has enough memory to operate efficiently. |
| Memory Limit | The maximum amount of memory each instance in the cluster can utilize. It limits the memory usage to prevent any single instance from overconsuming resources. |
| Autoscaling | Toggle to enable or disable auto-scaling. When enabled, it allows the service to adjust the number of replicas based on demand and resource usage. |
| CPU Target | The CPU usage percentage target that initiates auto-scaling. If usage exceeds this target, additional replicas may be deployed to balance the load. |
| Memory Target | The memory usage percentage target that triggers auto-scaling adjustments. When instances exceed this target, the system scales up to accommodate demand. |
| Replicas Min | The minimum number of replicas to maintain when auto-scaling is active. A minimum of 2 replicas ensures high availability and prevents downtime. |
| Replicas Max | The maximum number of replicas that can be deployed when auto-scaling is enabled. It sets an upper limit on the number of instances to avoid over-provisioning. |
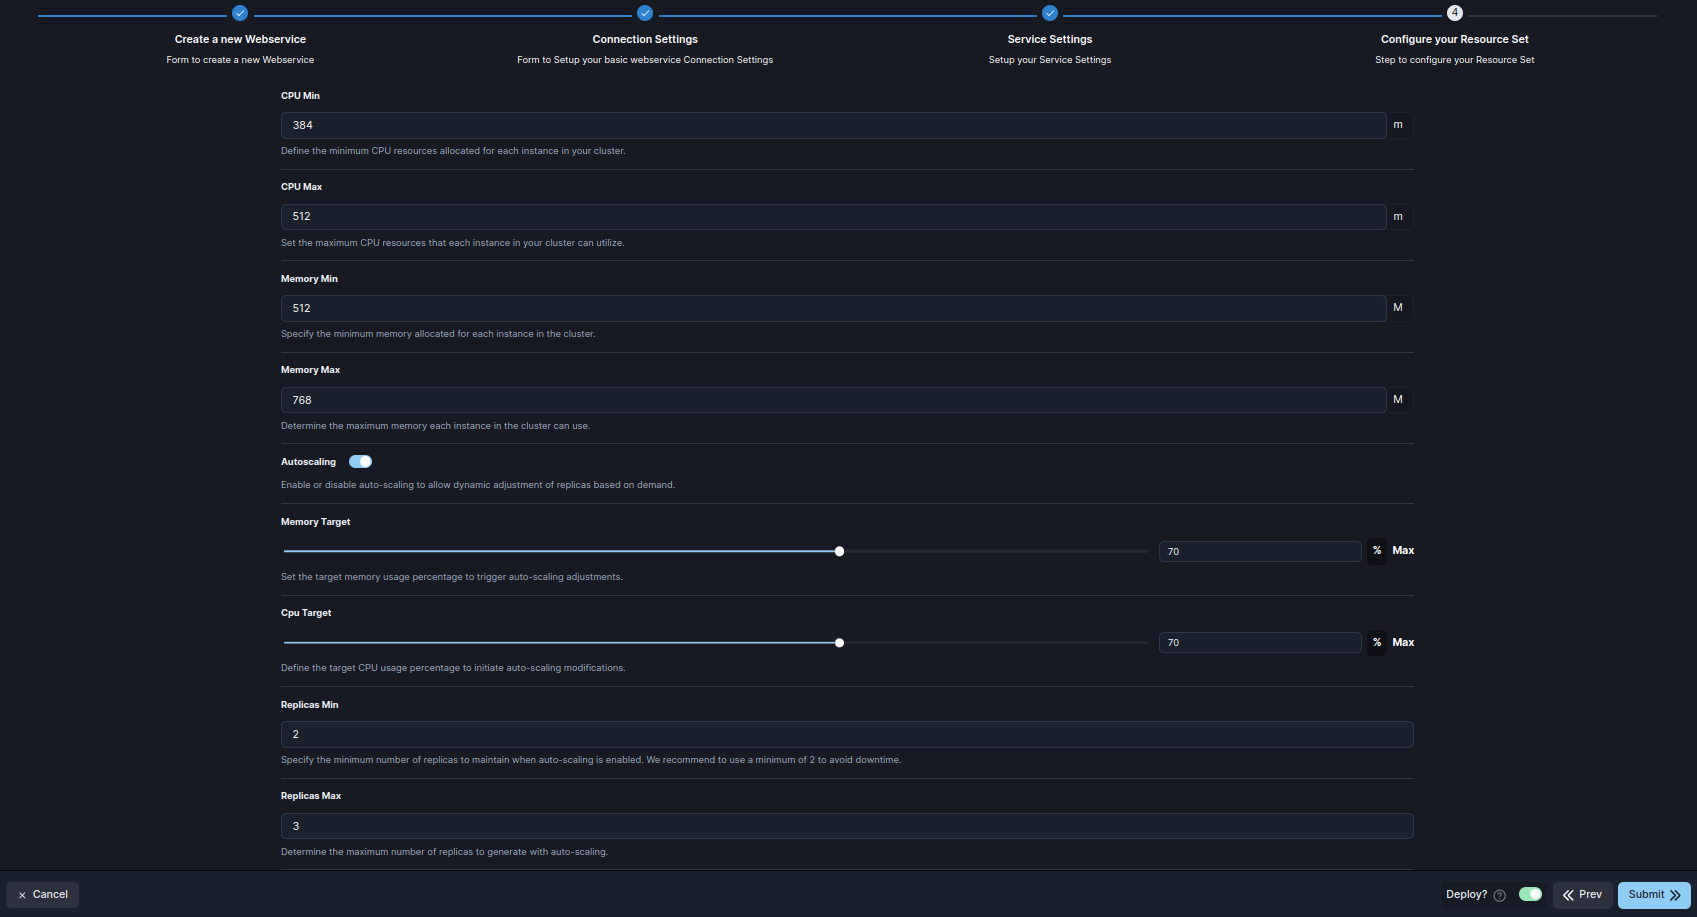
Submit to create and Deploy your web service.