n8n + Worker Mode
Learn how to deploy your n8n project with distributed and scalable worker mode on Kubernetes using Sleakops.
Why Self-Hosted n8n?
Self-hosting n8n provides numerous advantages over cloud-hosted solutions:
🔒 Security and Privacy
- Complete Data Control: Your workflows, credentials, and sensitive data never leave your infrastructure.
- Customized Security Policies: Implement your organization's specific security requirements.
- Network Isolation: Keep n8n within your private network, reducing external attack vectors.
- Compliance: Meet strict regulatory requirements (GDPR, HIPAA, SOC2) with on-premises deployment.
💰 Cost Optimization
- No limits per run: Run unlimited workflows without usage-based pricing
- Predictable costs: Fixed infrastructure costs regardless of usage volume
- Resource efficiency: Scale resources based on actual needs, not vendor pricing tiers
- Long-term savings: Significant cost reductions for high-volume automation scenarios
⚡ Performance and Scalability
- Custom Resource Allocation: Allocate CPU and memory based on your specific workload requirements
- Low Latency: Direct access to internal systems without internet roundtrips
- High Availability: Design redundant systems with multiple replicas and failover mechanisms
- Custom Integrations: Connect to internal APIs and systems not accessible from cloud providers
🎛️ Total Control and Customization
- Version Control: Choose when to update and test new versions in your environment
- Custom Nodes: Install and develop proprietary nodes for your specific use cases
- Environment Variables: Full access to system-level configurations and secret management
- Backup Strategies: Implement your own backup and disaster recovery procedures
Benefits of Scaling in Kubernetes
Deploying n8n on a Kubernetes cluster with Sleakops provides enterprise-level scalability:
🚀 Horizontal Scaling
- Worker Pods: Automatically scale worker instances based on queue depth and CPU usage
- Load Distribution: Distribute workflow execution across multiple worker nodes
- Auto-Scaling: Kubernetes HPA (Horizontal Pod Autoscaler) automatically adjusts worker count
- Resource Optimization: Scale different components independently (web UI vs. workers)
🏗️ Infrastructure Resilience
- High Availability: Multiple replicas ensure zero downtime during node failures
- Continuous Upgrades: Deploy new versions without service interruption
- Health Checks: Kubernetes automatically restarts failed pods and routes traffic to healthy instances
- Multi-Zone Deployment: Distribute workload across availability zones for disaster recovery
📊 Monitoring and Observability
- Real-time metrics: Monitor workflow execution, queue depth, and resource usage
- Centralized logging: Aggregate logs from all n8n components in one place
- Performance insights: Track execution times, error rates, and throughput
- Alerts: Proactive notifications for system issues and performance bottlenecks
🔧 DevOps Integration
- GitOps Workflows: Version control of your n8n infrastructure as code
- CI/CD Pipelines: Automated testing and deployment of n8n configurations
- Secret Management: Integrates with Kubernetes secrets and external secret managers
- Network Policies: Fine-grained network security controls
Prerequisite
- A Sleakops account
- A cluster in this account. If you don't have one, here's the documentation on how to create one.
- A configured environment. If you don't have one, here's the documentation on how to create one.
- An n8n project configured with Docker. If you don't have it, you can fork or copy n8n-code. This project includes a Docker Compose package so you can also deploy it locally, allowing you to have distributed environments as you wish.
Let's begin
For this example, we'll deploy an n8n project in distributed mode with worker processes. This configuration includes the main n8n service (web interface) and worker processes to execute workflows. We'll also configure a PostgreSQL database and Redis for queue management, which are necessary for this project.
Create Project
Projects are our code repositories. All Sleakops needs to run commands is a Dockerfile.
For more information, see our project documentation.
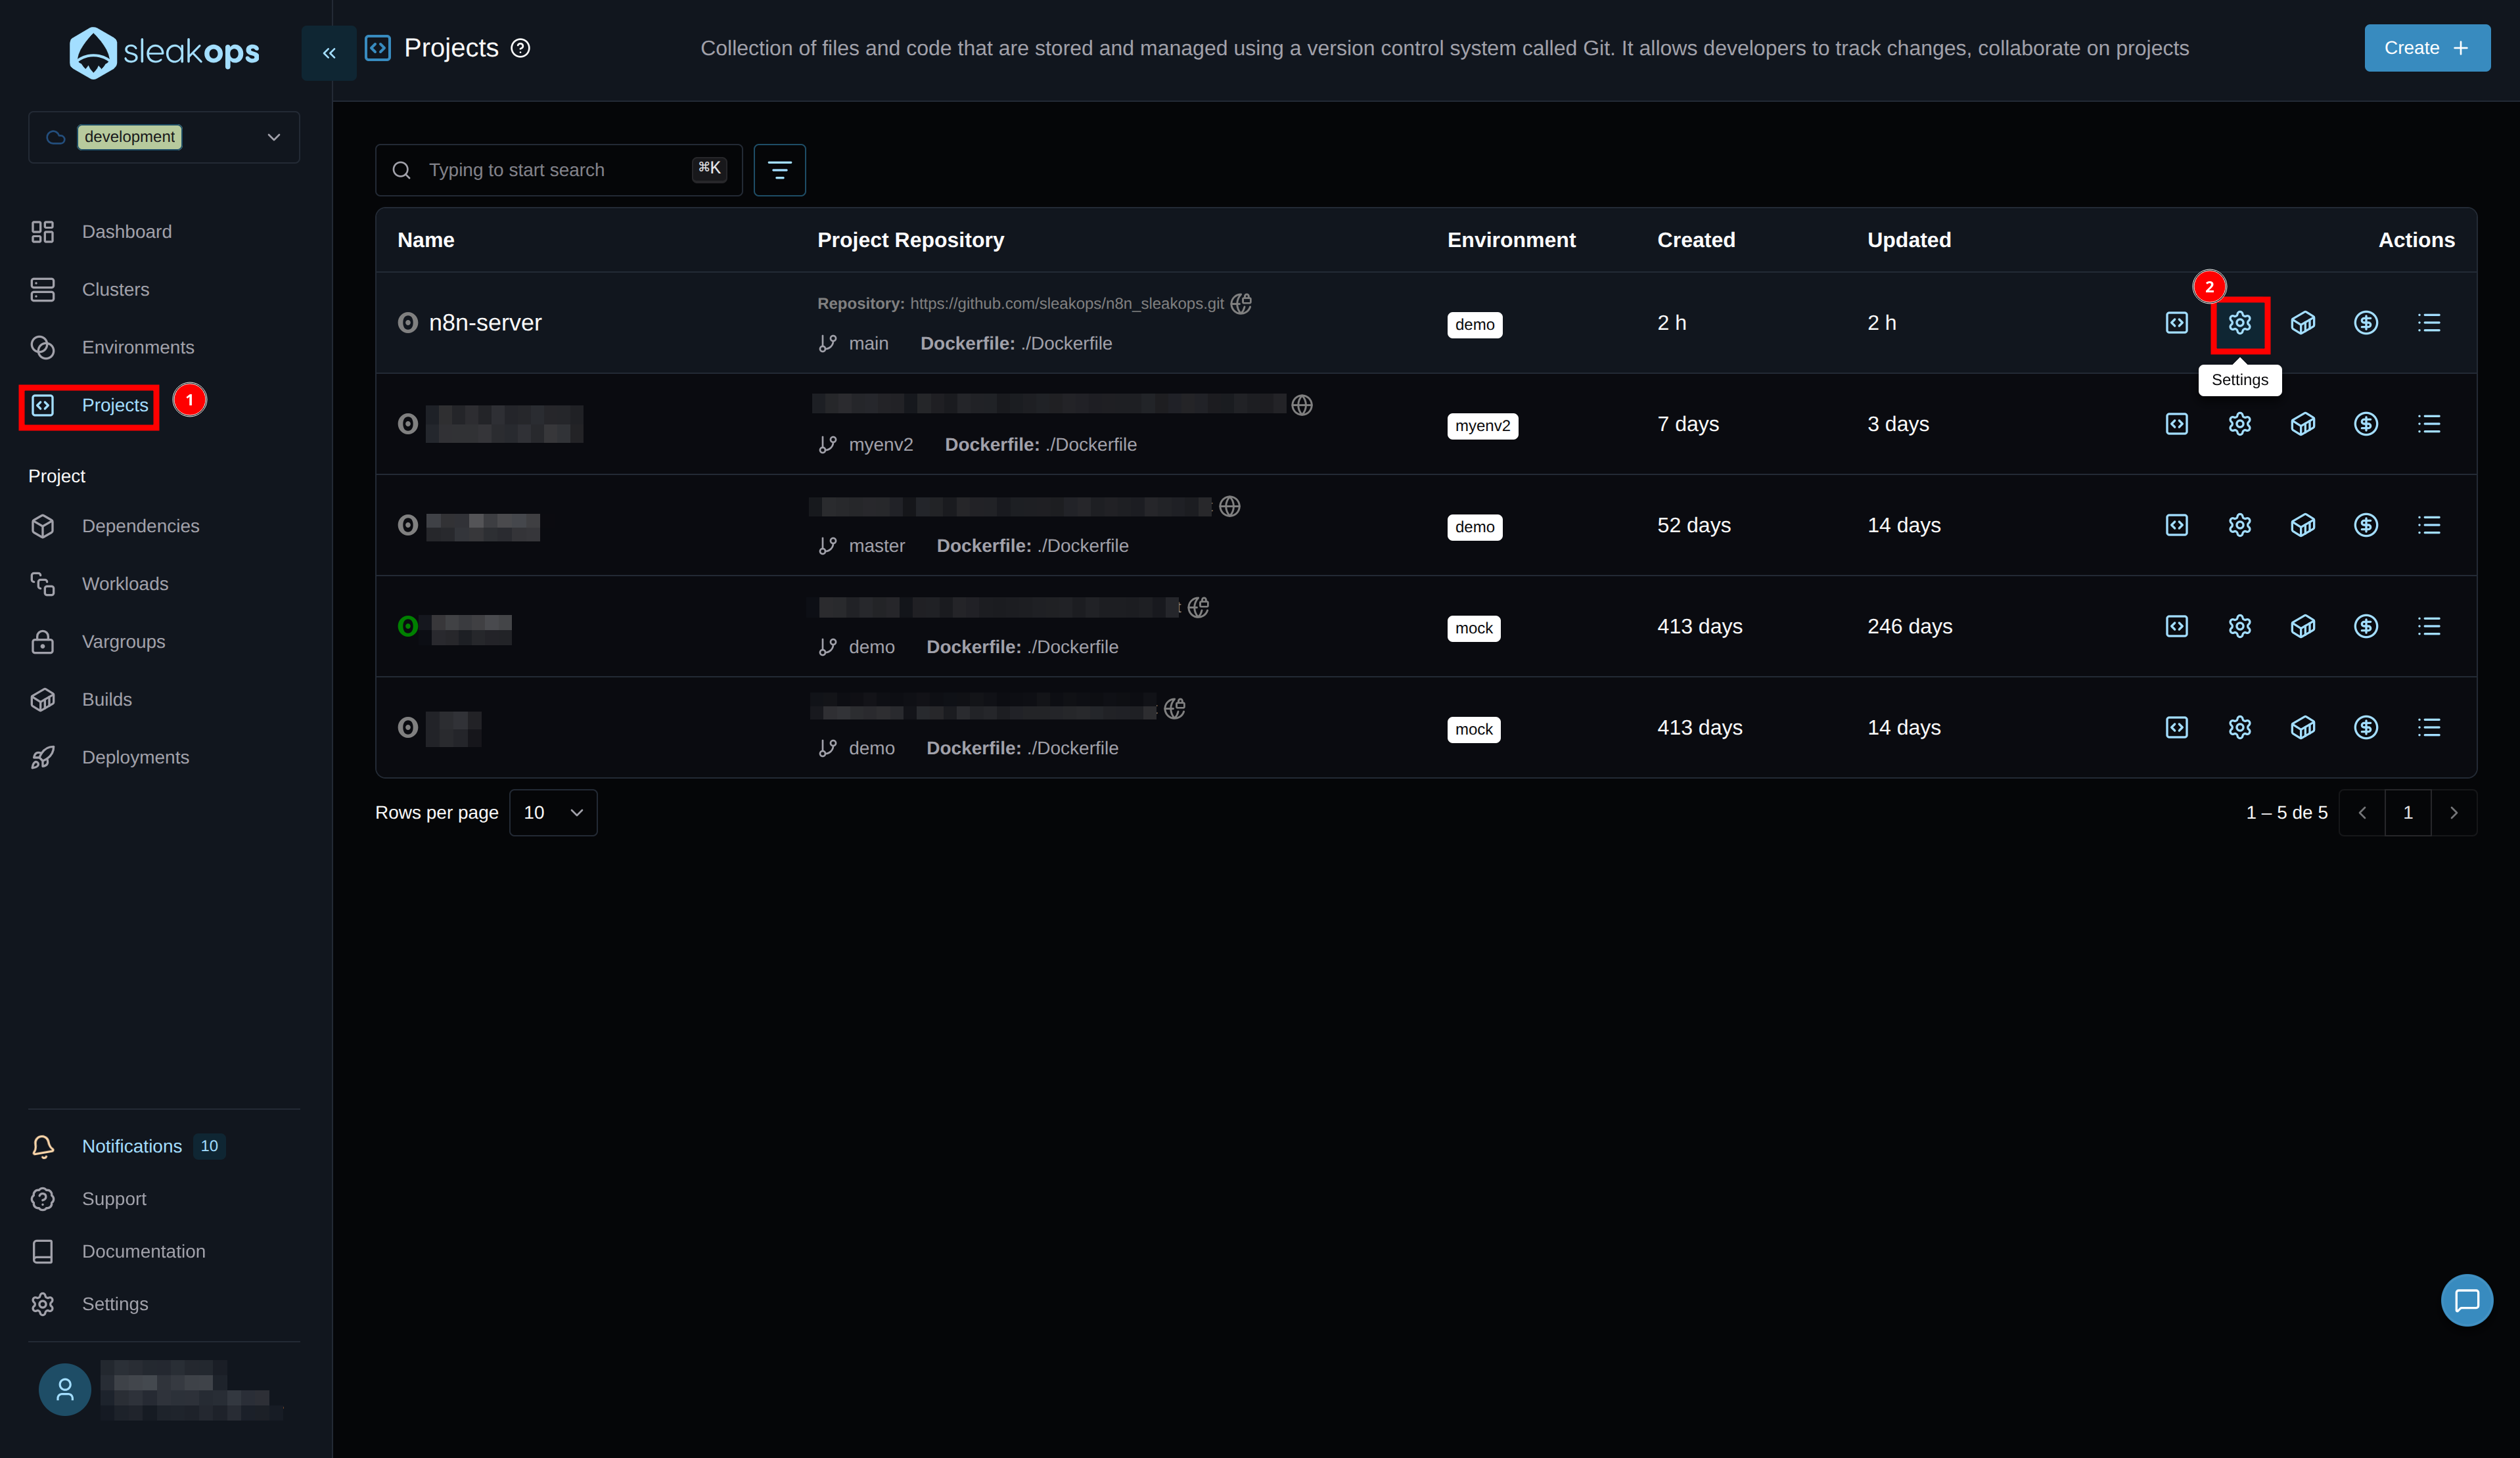
To begin, we will create a new project:
- Click the "Projects" button in the left panel.
- Then click "Create" in the upper right corner.
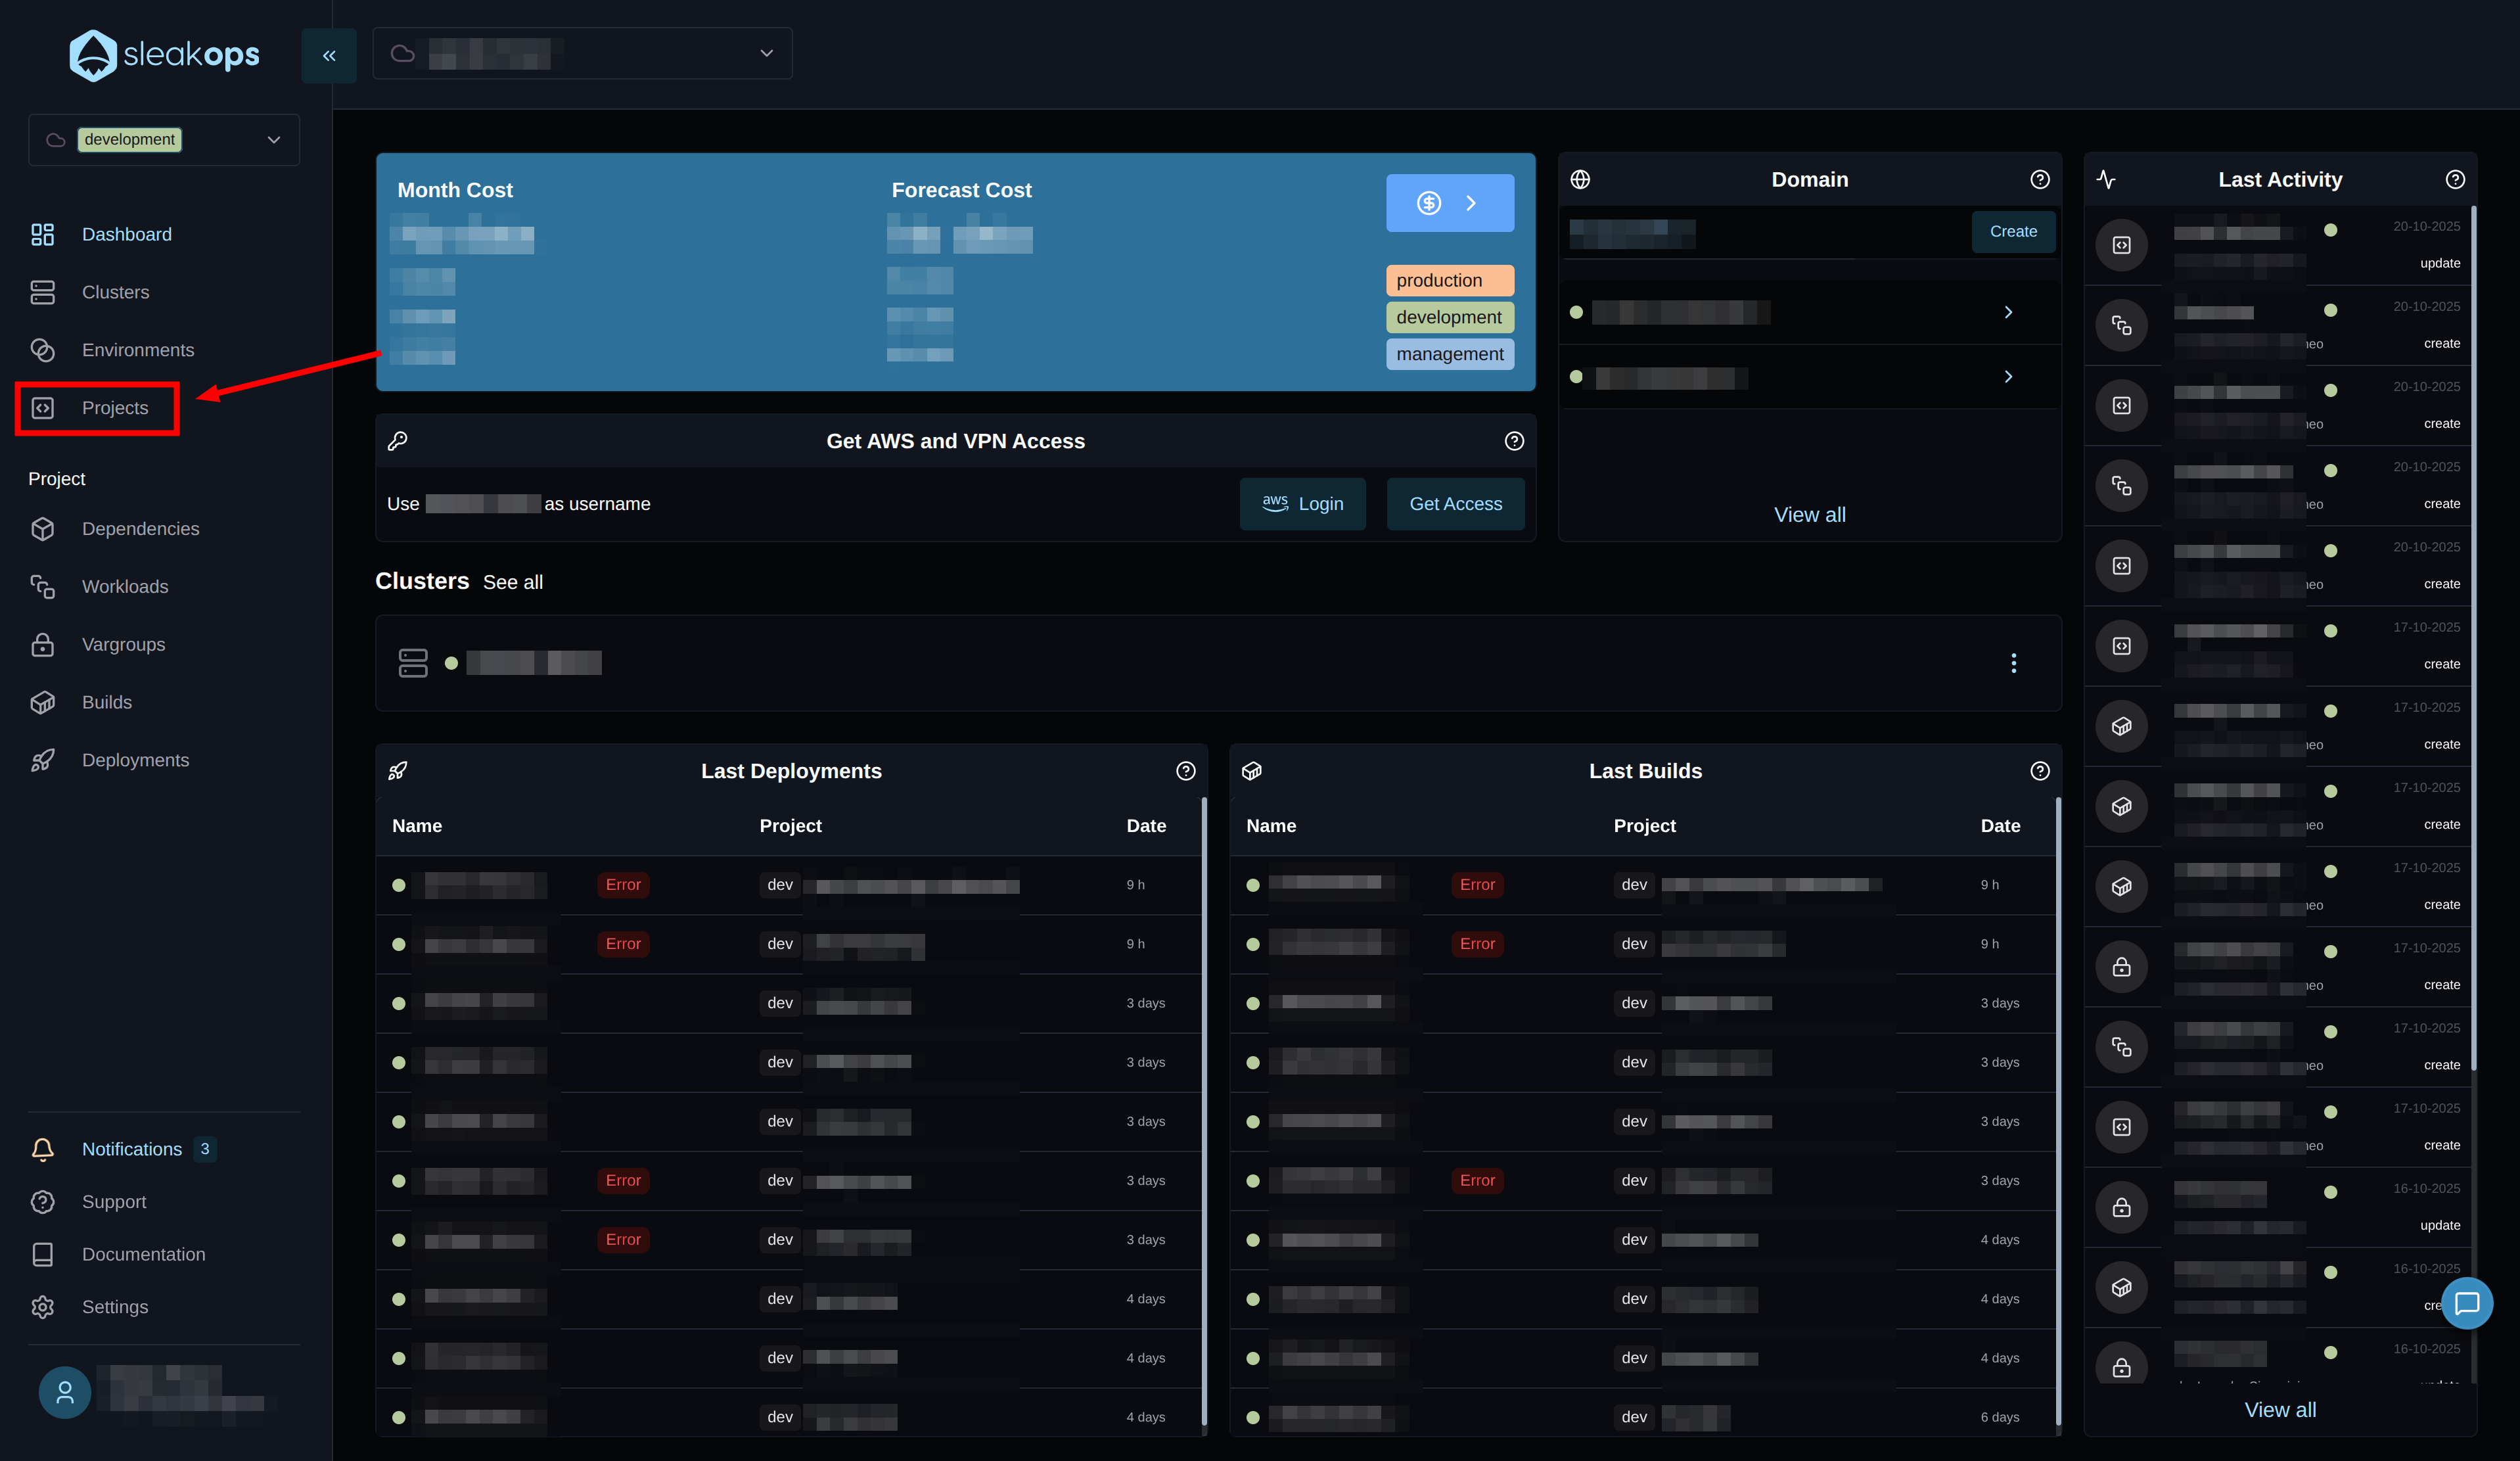
Within the Projects panel, you can see all your projects and manage them from here. We want to create a new one, so let's click the "create" button in the upper right corner.
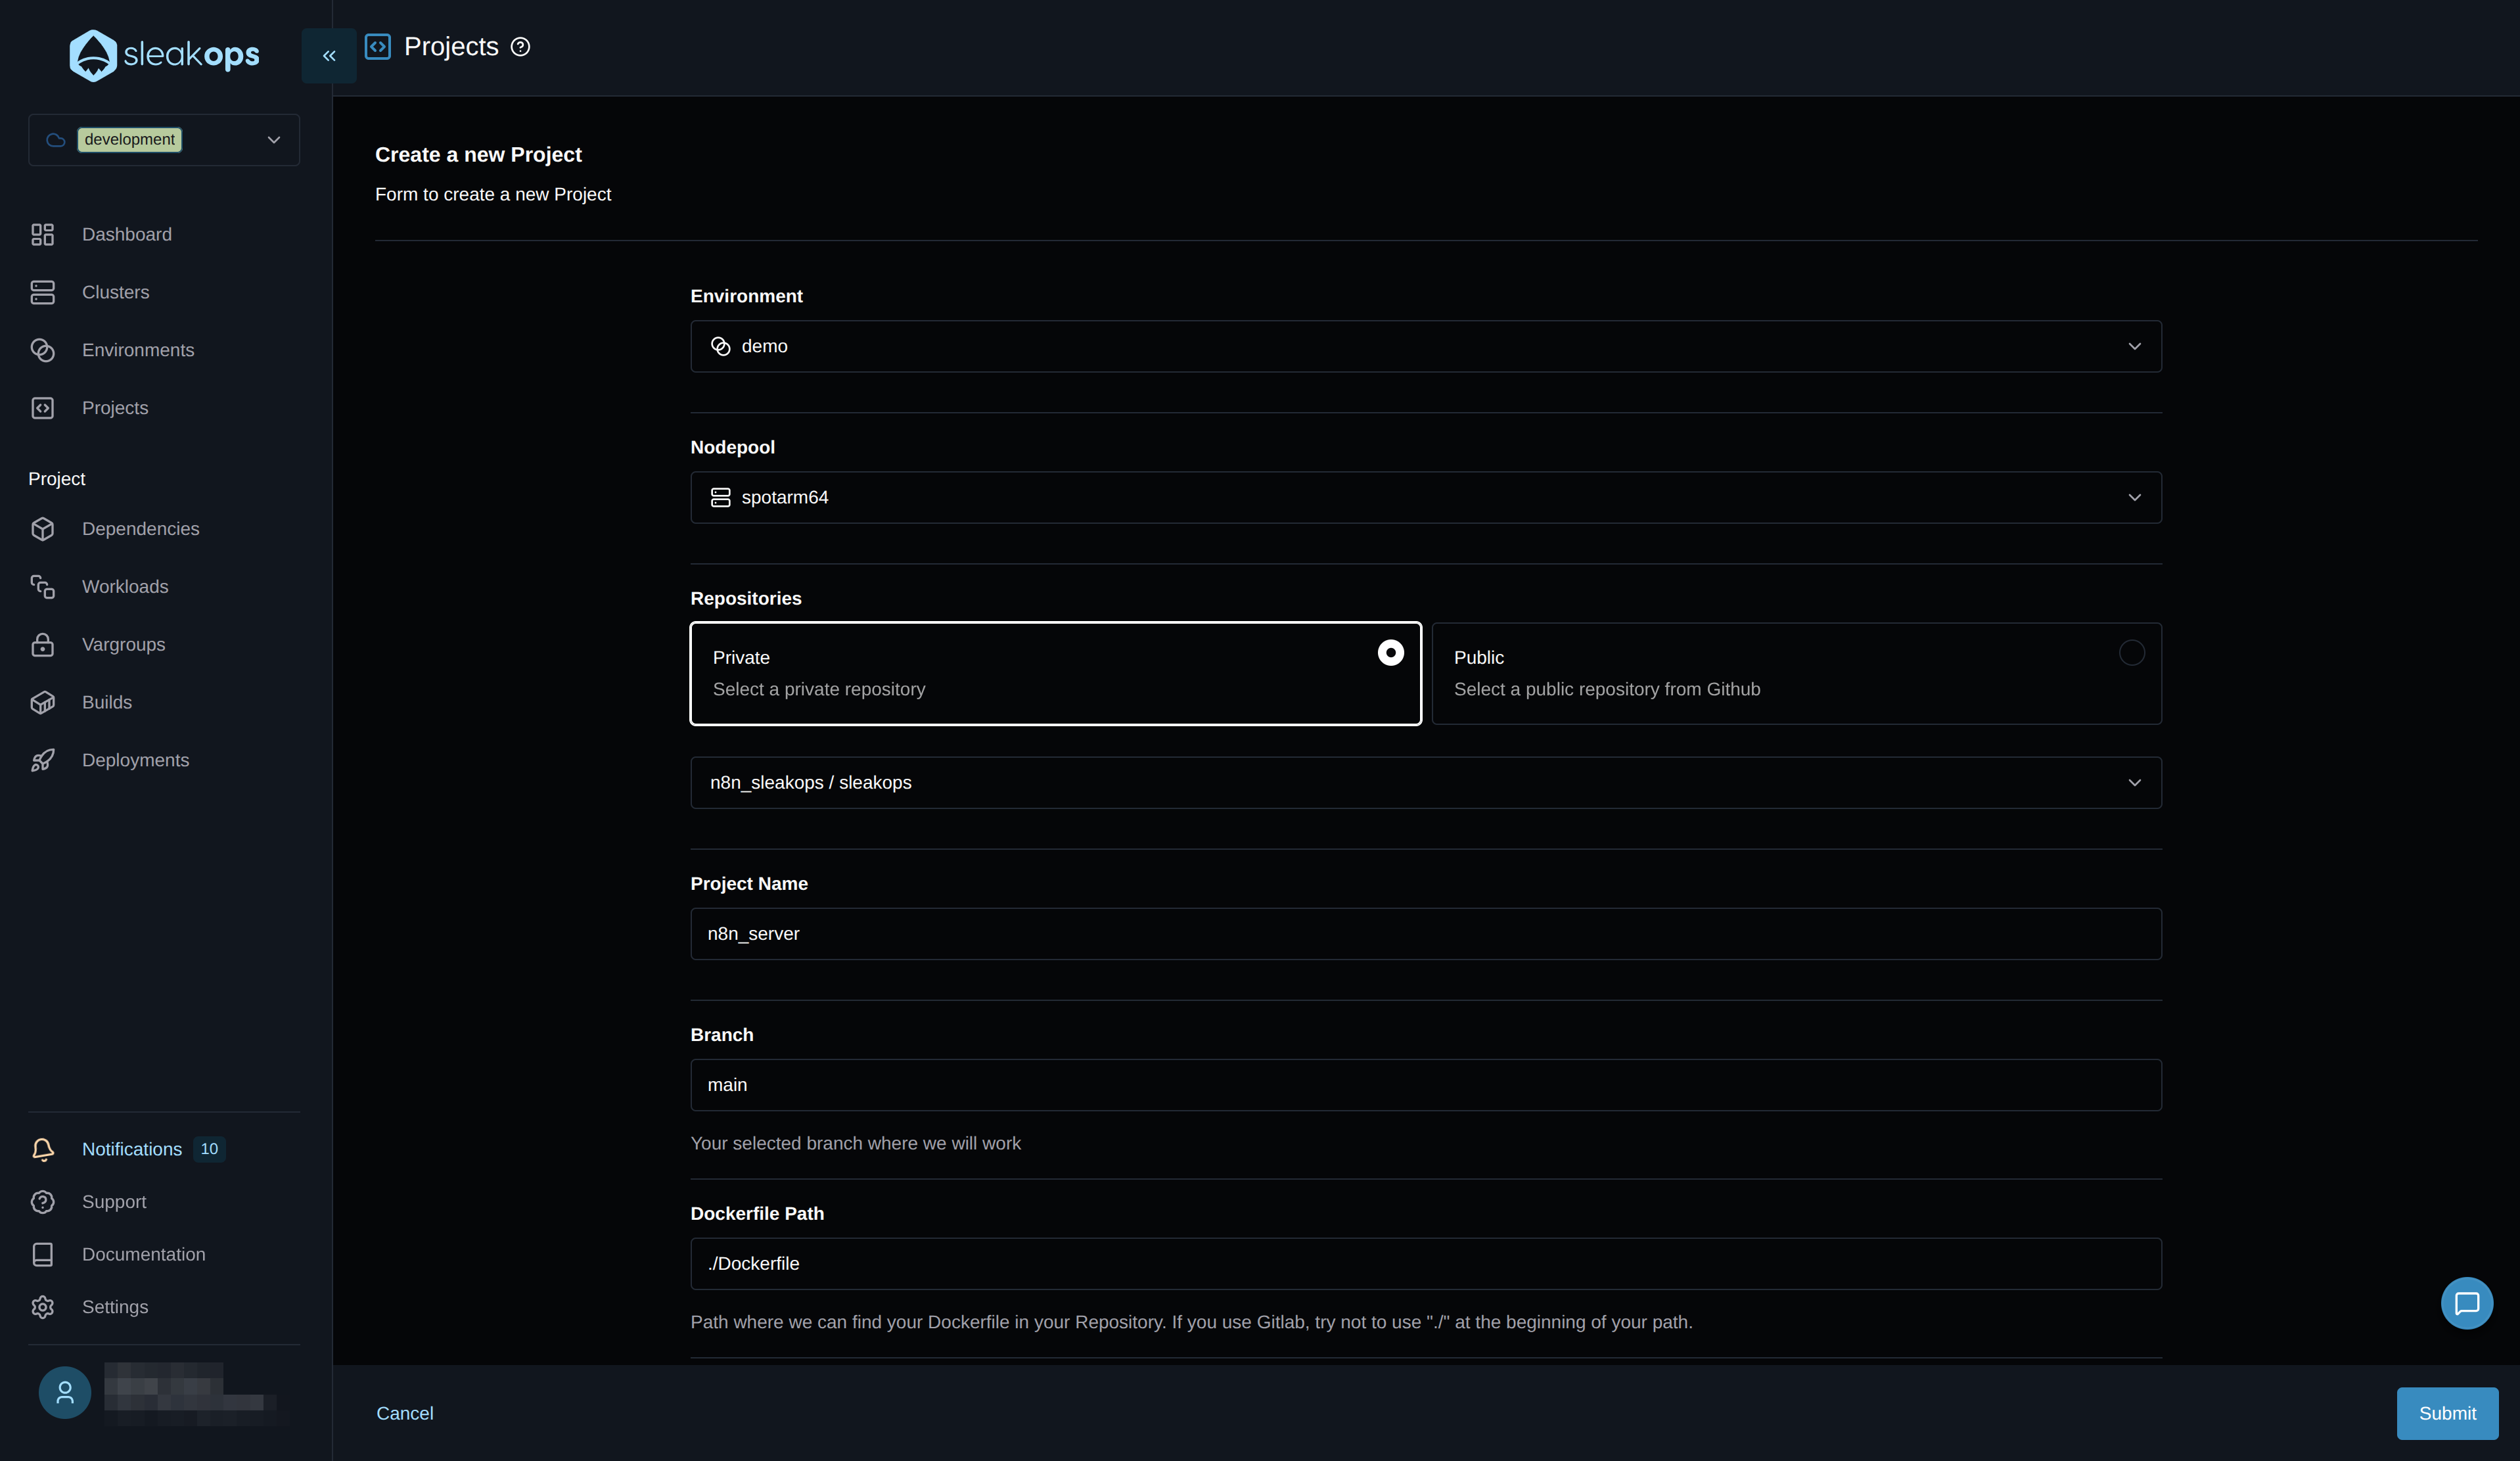
On the project creation screen, we have the following fields:
| Configuration | Description |
|---|---|
| Environment | We need to select the previously created environment. |
| Nodepool | We'll leave the default. |
| Repositories | We'll select our repository that contains the n8n project. |
| Project Name | We can define a project name. For example, "n8n-server". |
| Branch | It must match the branch in our project. In our case, it's "main". |
| Dockerfile path | This is the relative path to the Dockerfile in your project. |
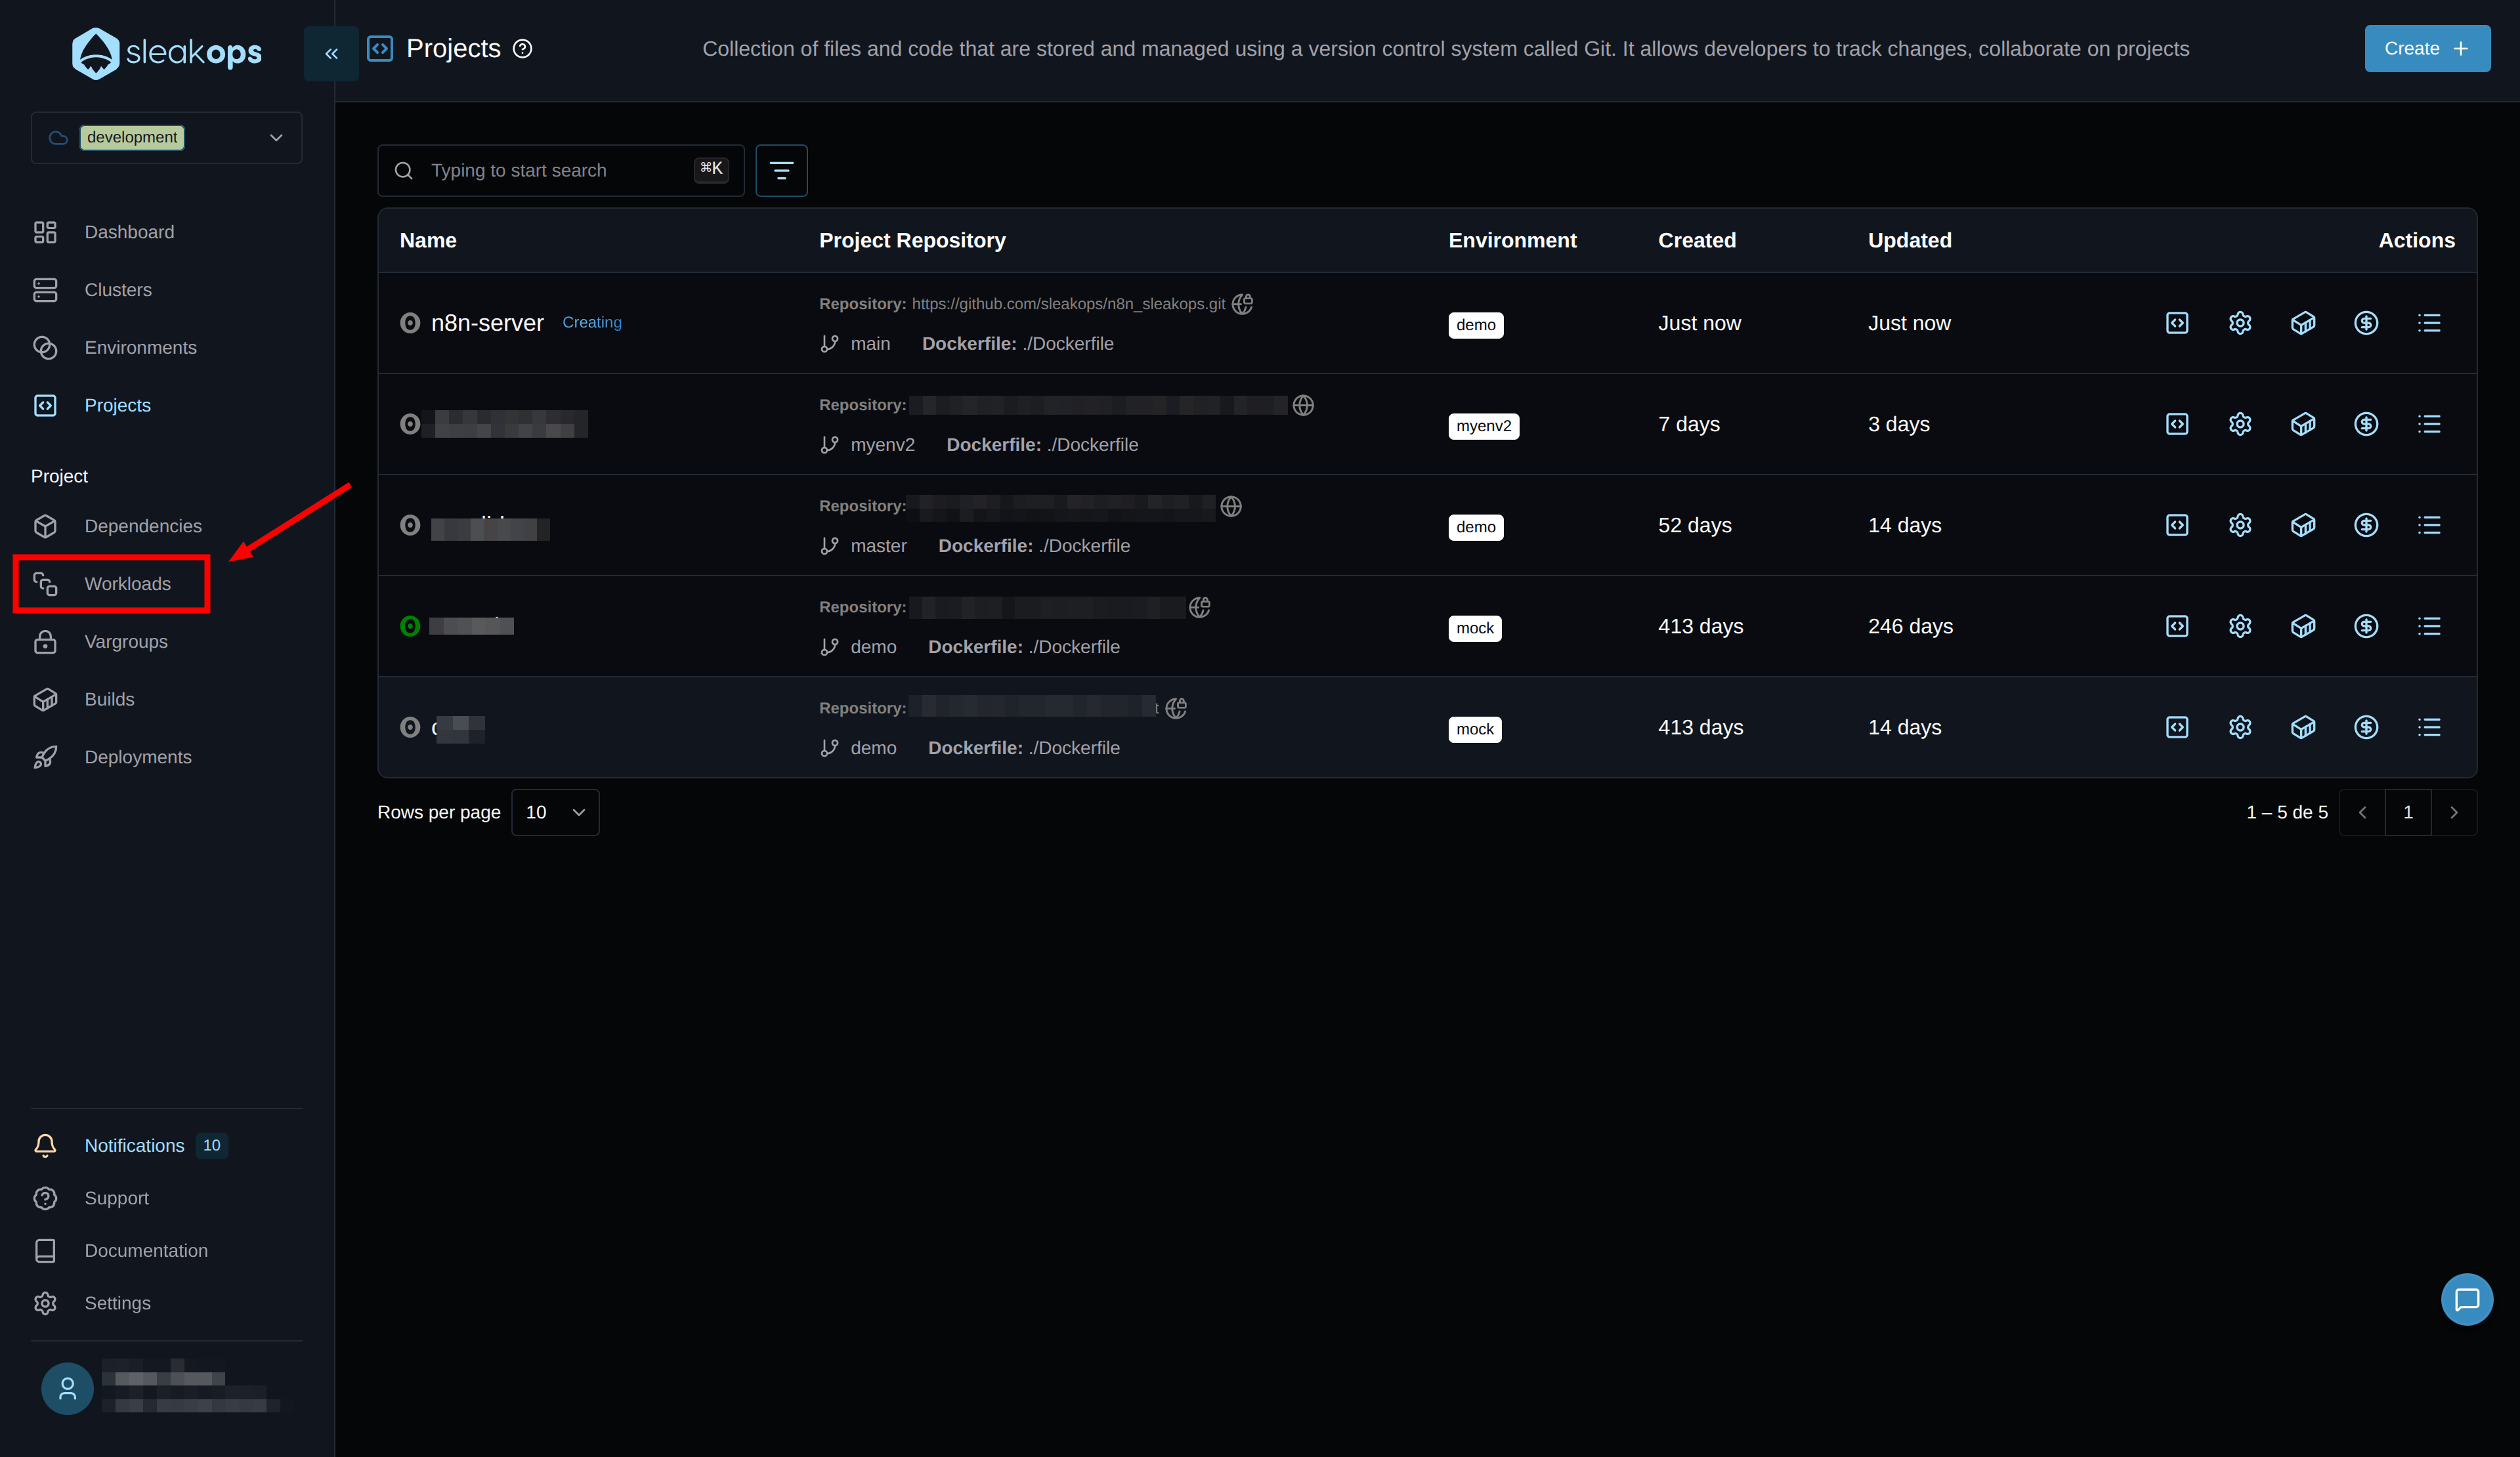
Once all that is configured, we create the project using the "Submit" button in the bottom right corner:
With that, the project begins to be created. In the meantime, let's go to the workloads using the "Workloads" button in the left panel:
Create Workloads
Workloads are the processes that your project runs. In the case of n8n, which we'll run in queue mode, we'll create a web service for the web interface and a worker. For more information, see our workloads documentation
Create the Web Service
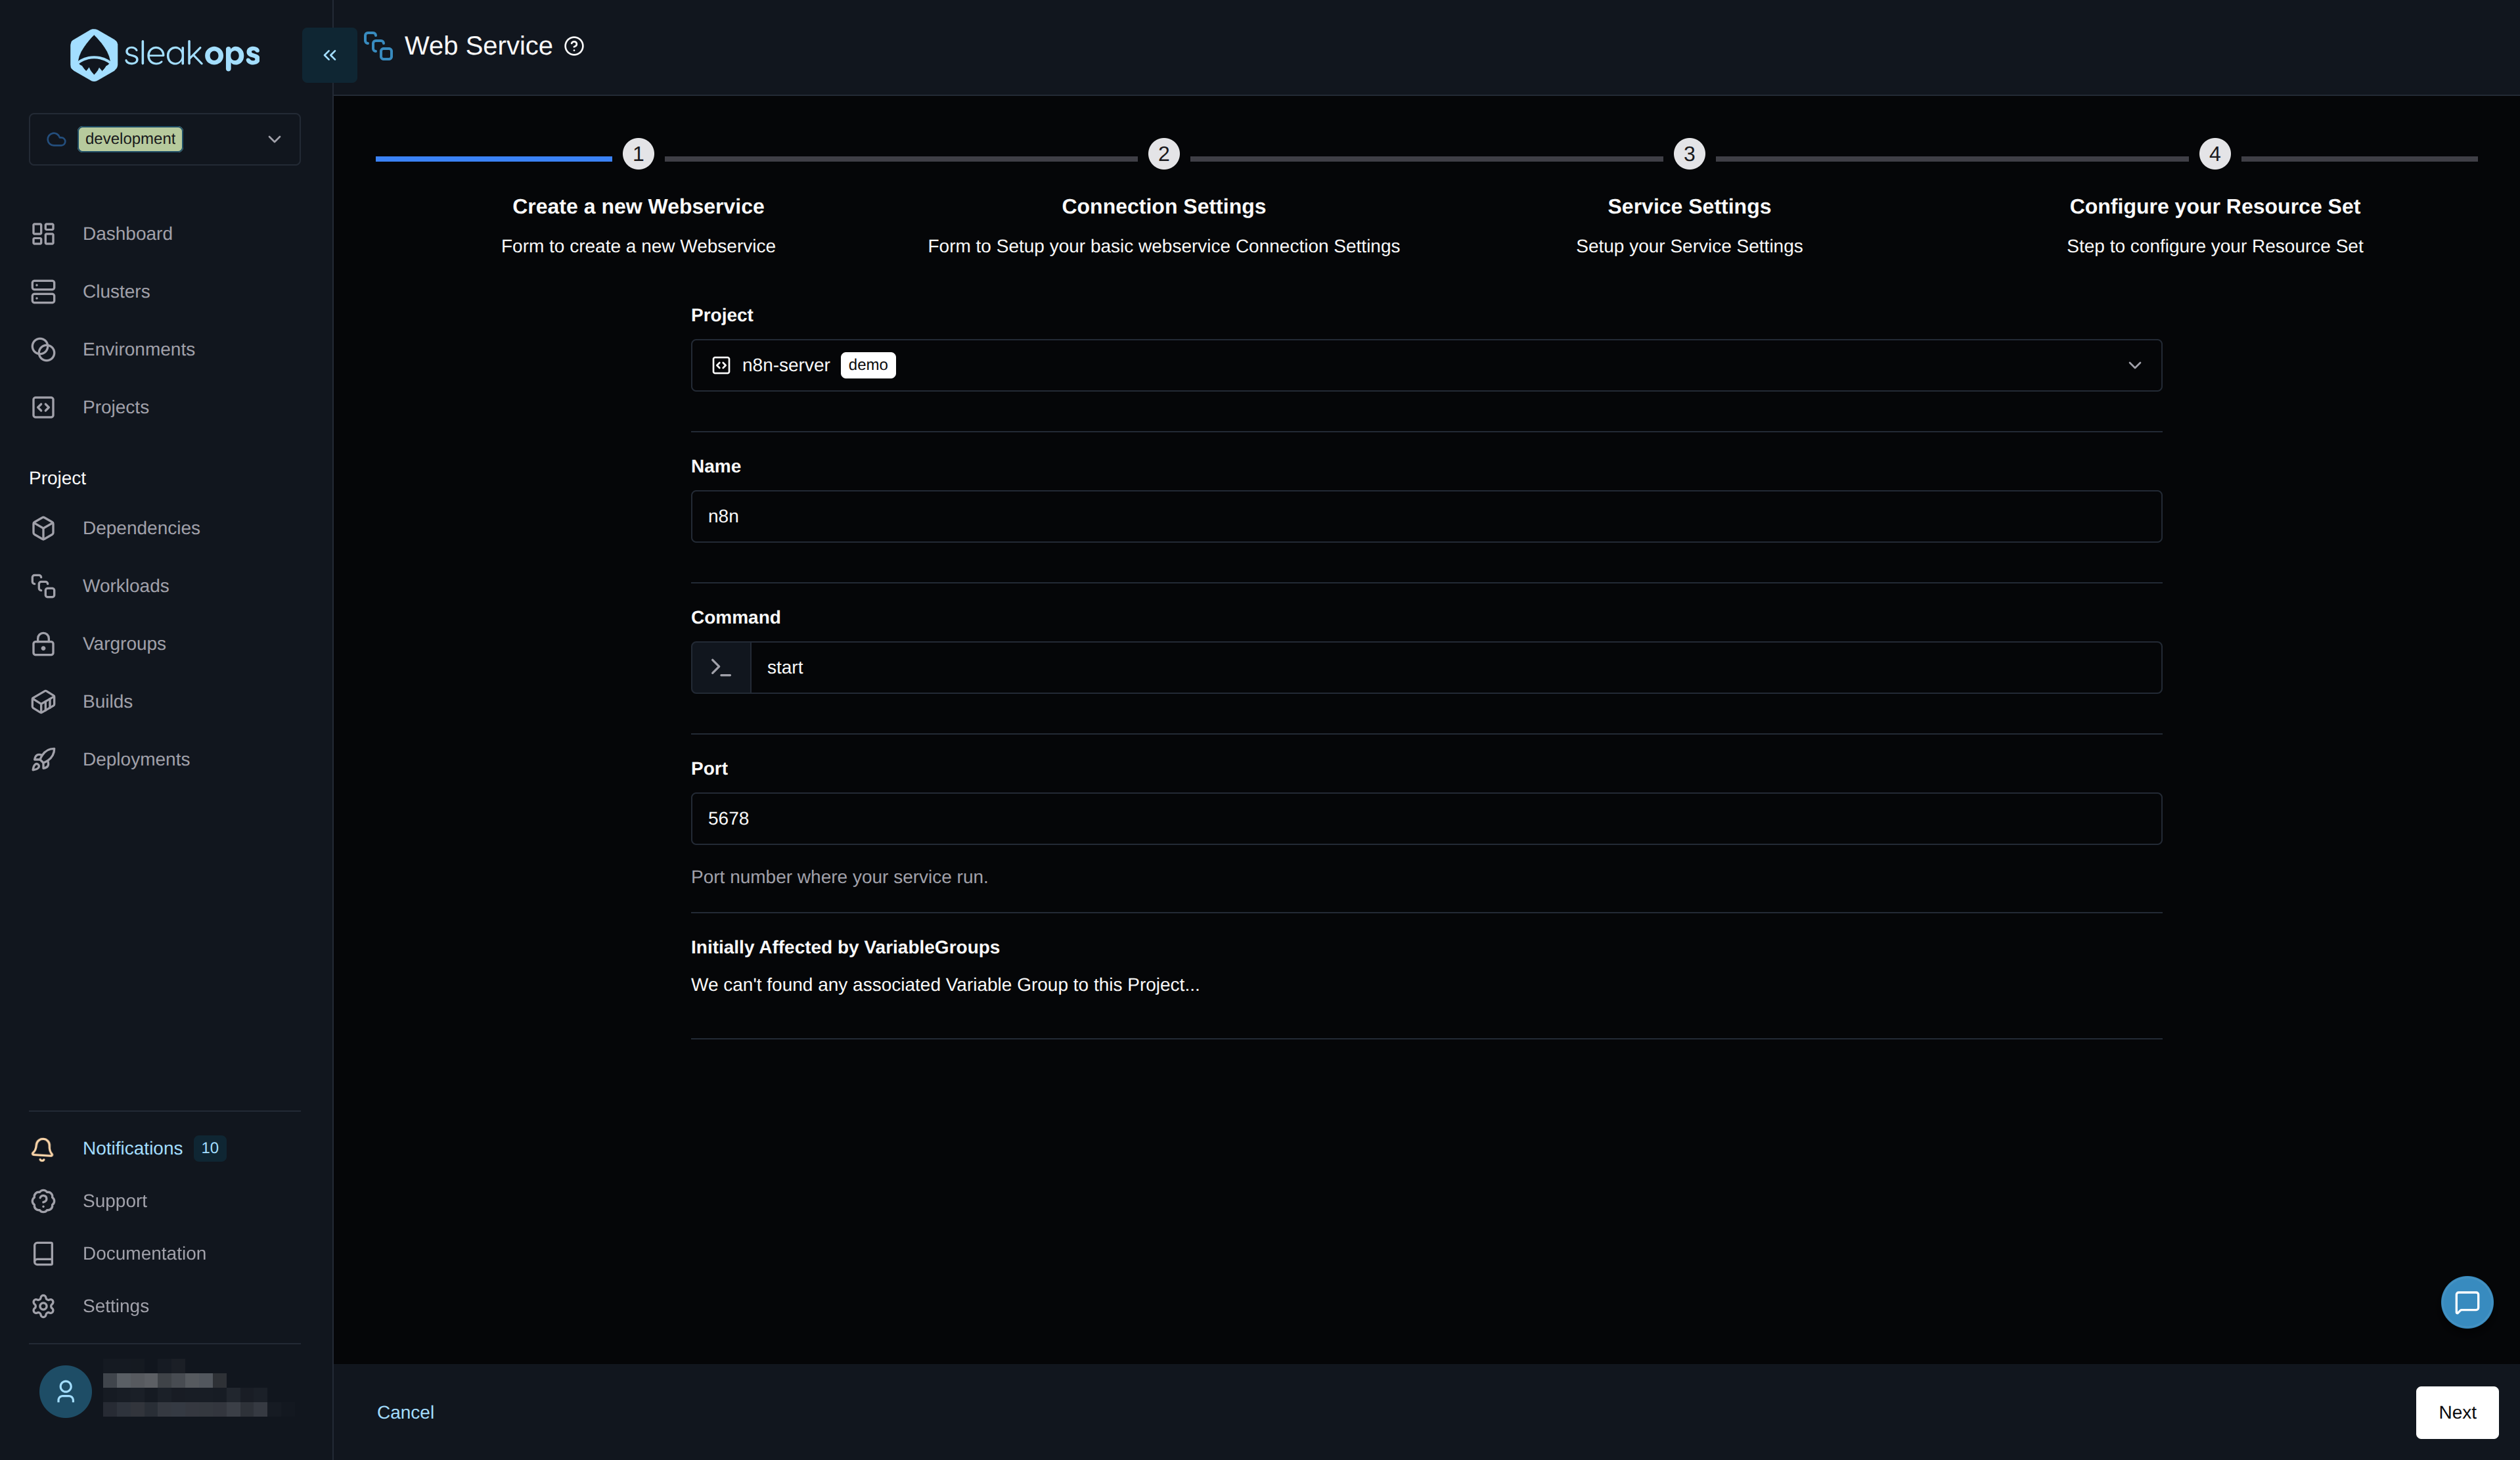
Here we will create the main n8n web service that will handle the user interface and API:
On this page, we will complete the first form with the following fields:
| Configuration | Description |
|---|---|
| Project | Select the project we created previously, in our case "n8n-server". |
| Name | Define a name for the web service, for example "n8n-main". |
| Command | Default command from the Dockerfile (usually n8n start). |
| Port | Port 5678 (n8n's default port). |
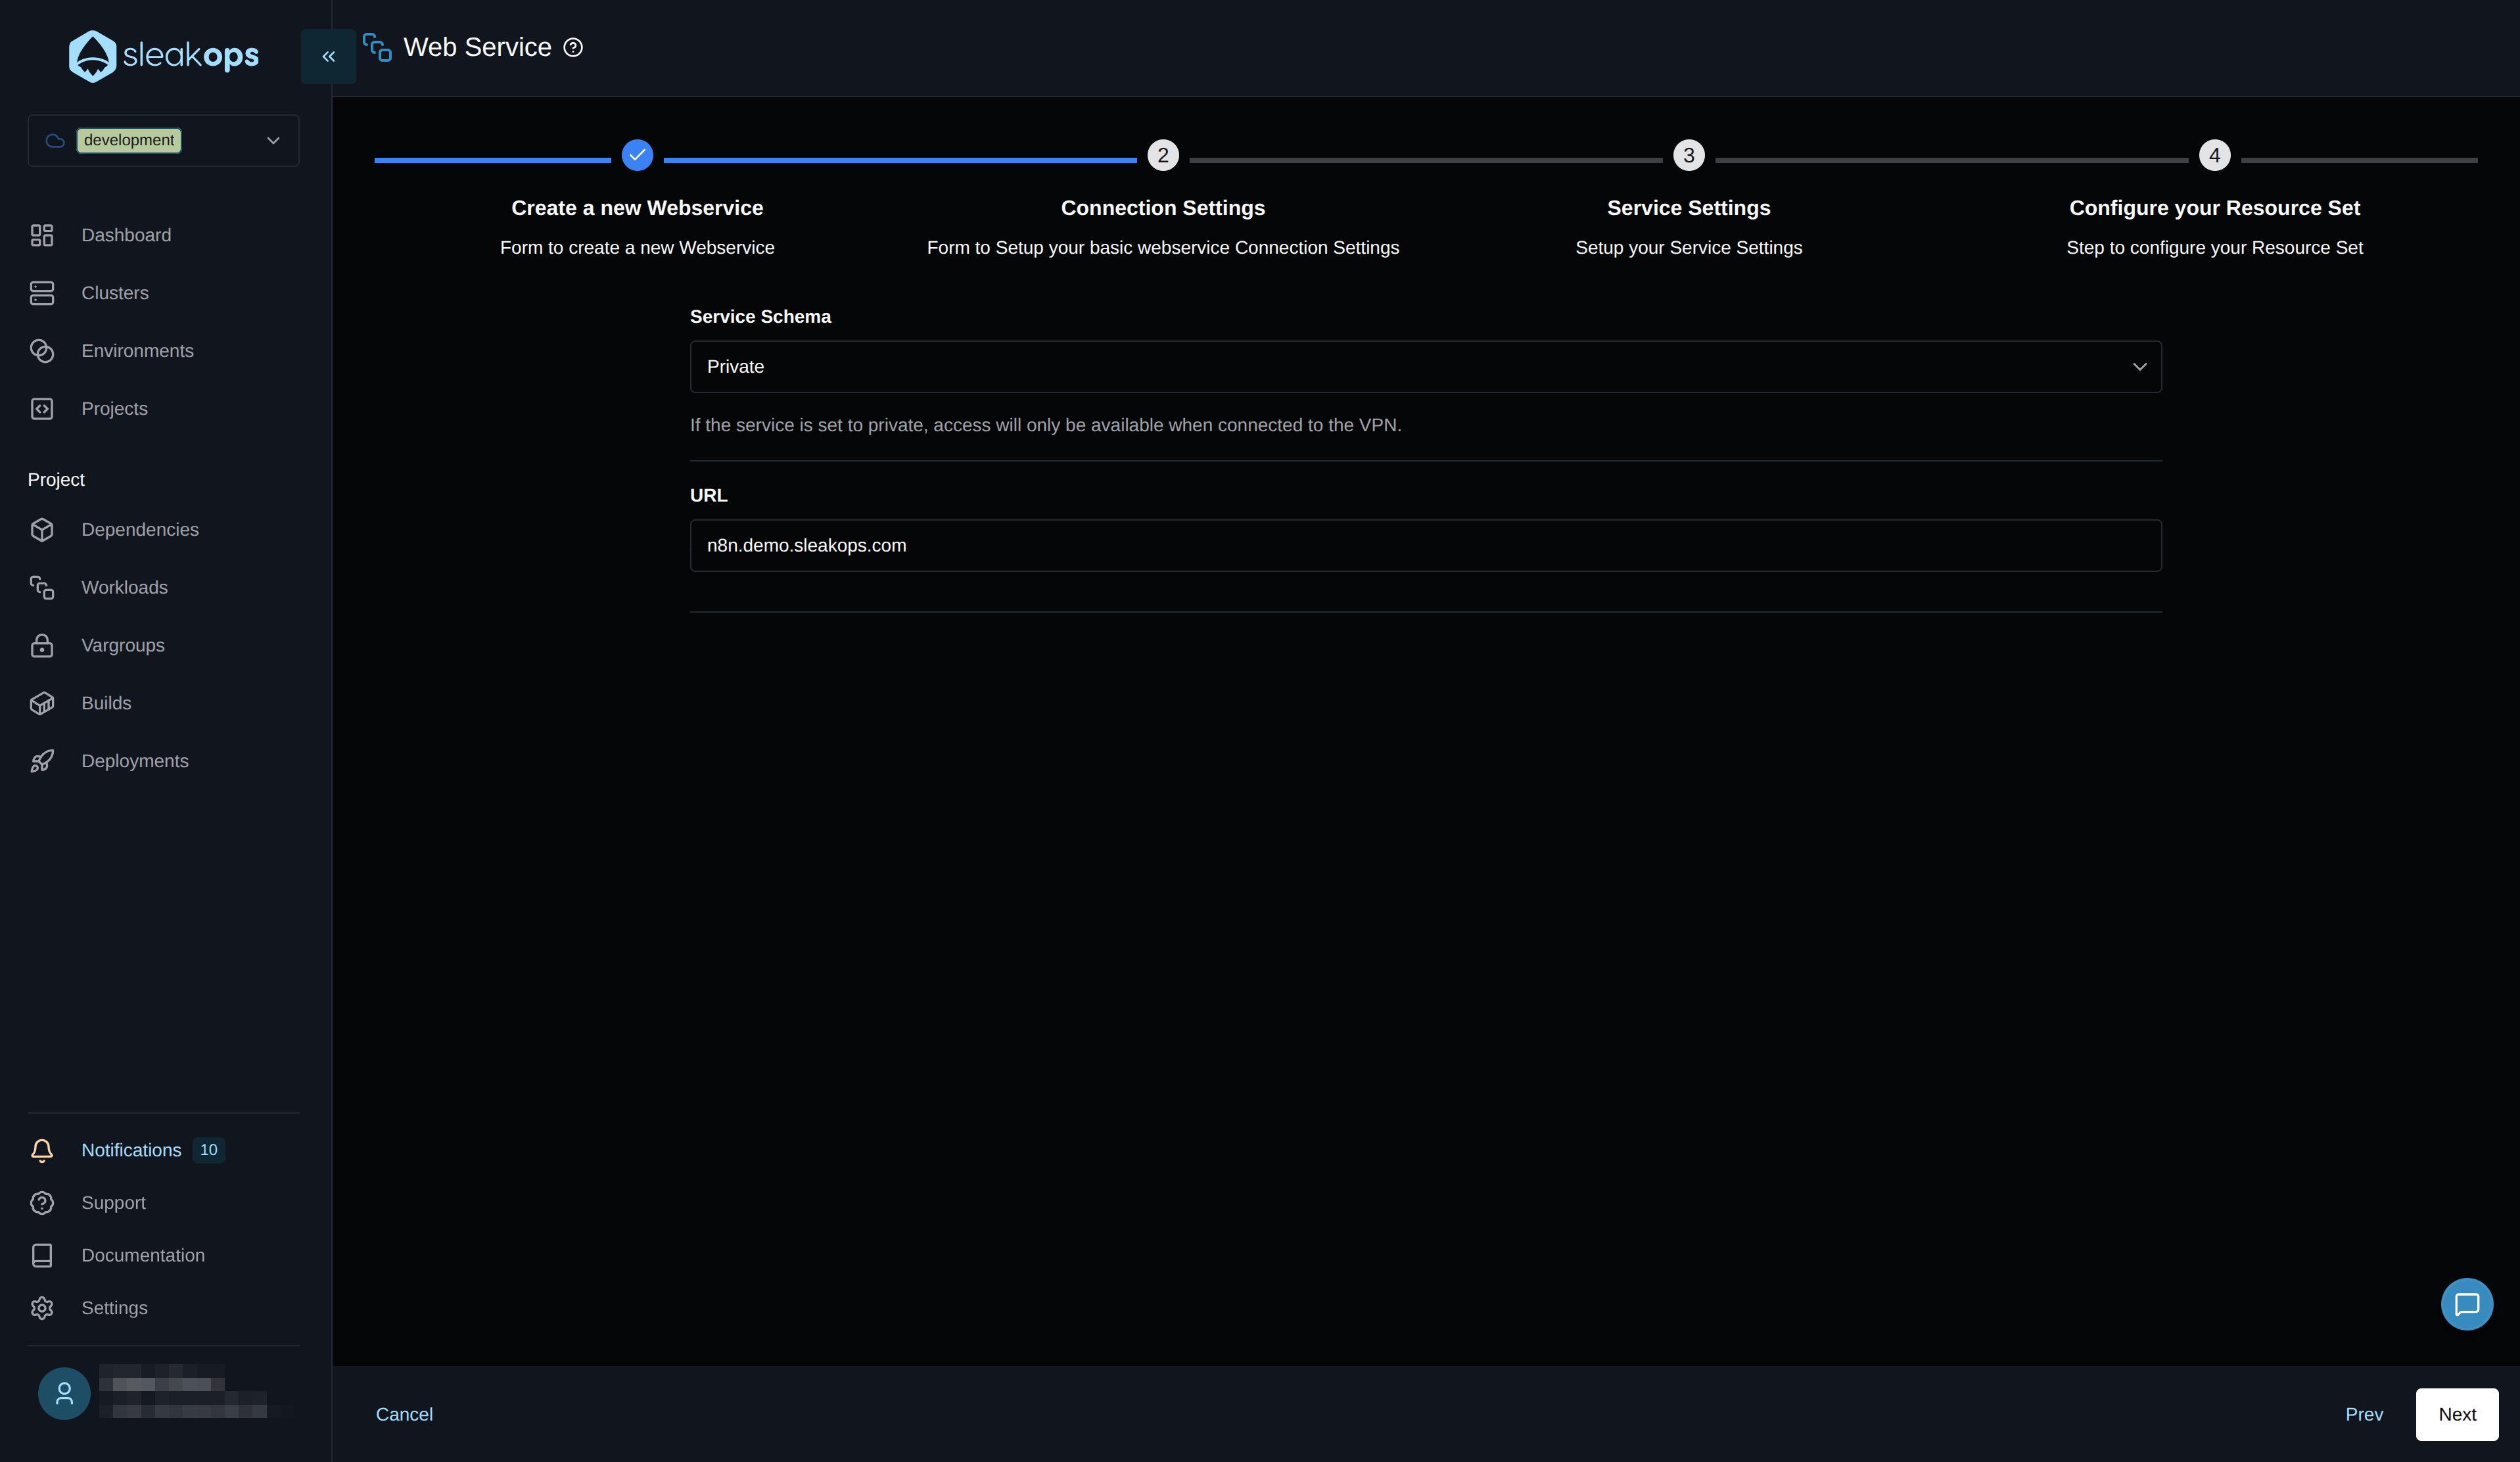
In the second step, we'll configure the web service as private:
What does this mean?
- The n8n service will be inside the VPC
- It will only be accessible from services on the same network
- It requires a VPN for external access
Alternative for public webhooks: If you need to connect to public webhooks (Jira, Slack, Google Drive, etc.), you can:
- Leave this service as public, OR
- Create an additional public web service using the
webhookcommand
Continue to step 3, "Service settings," and configure the health check.
To do this, simply define the path for the health check, which comes with n8n /healthz, and click "Next" until the flow is complete and the web service is created.
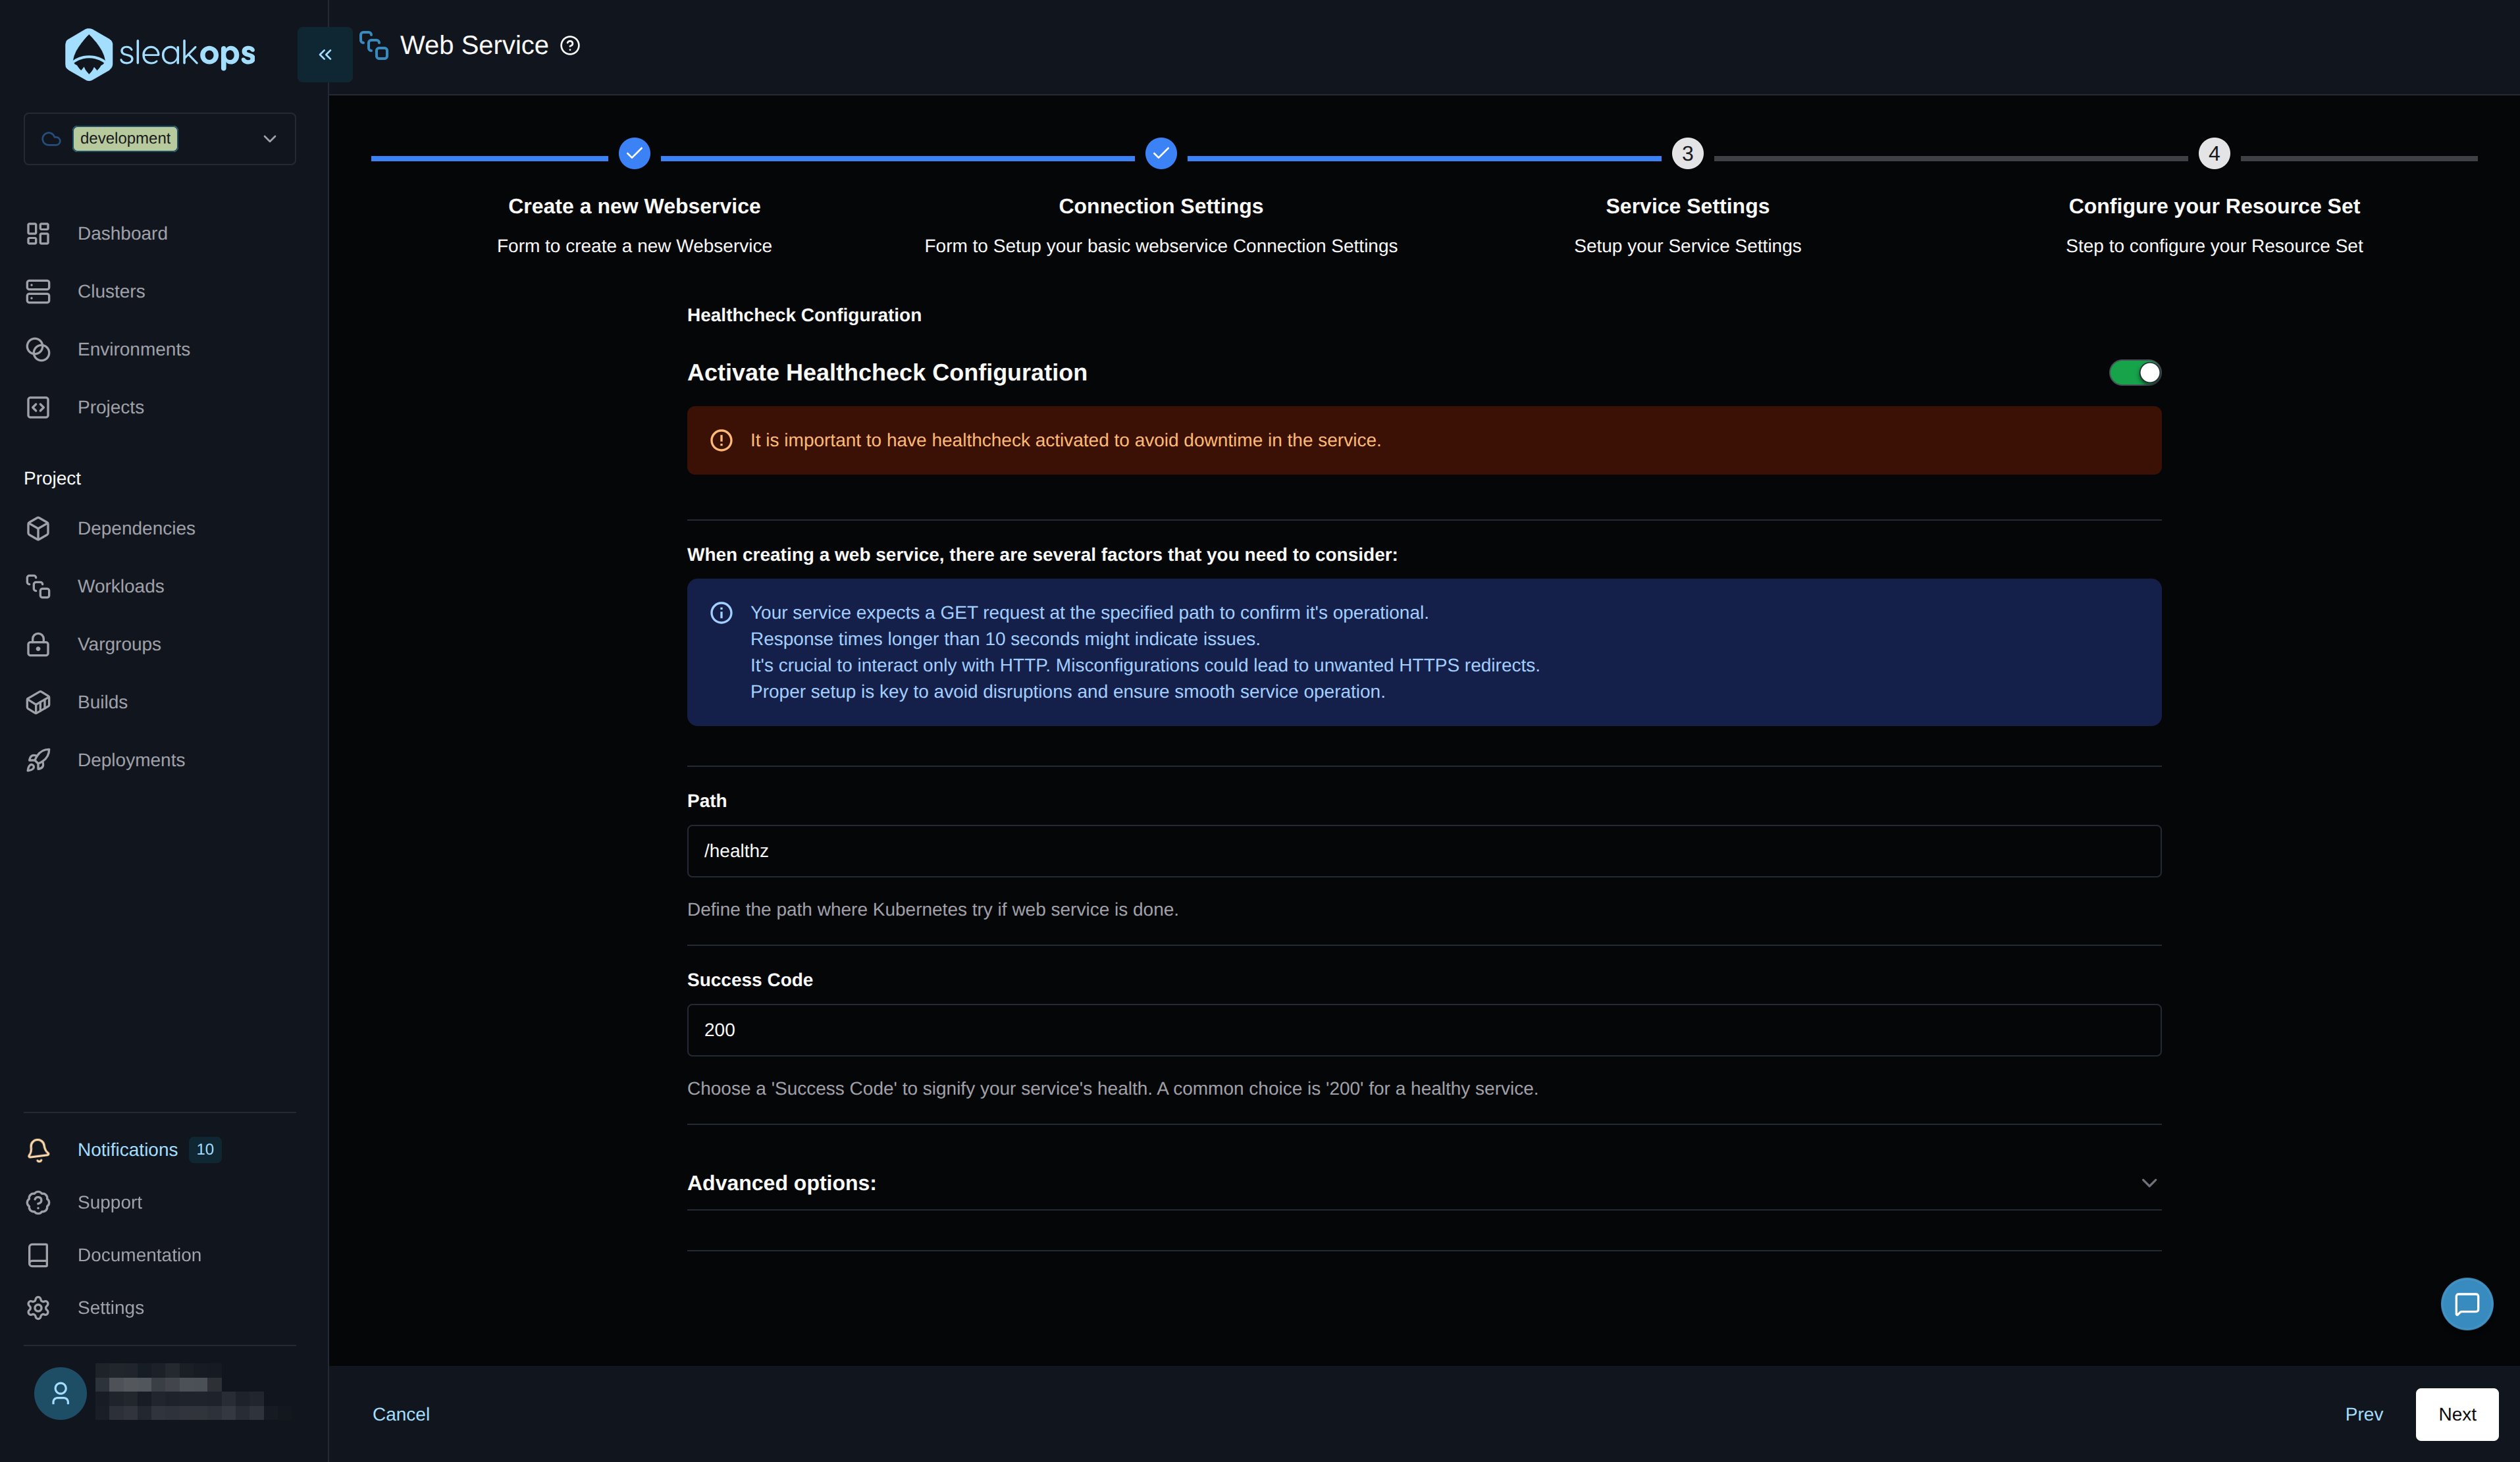
This health check is important so Kubernetes knows when the service is ready to start delivering HTTP traffic. This is useful for avoiding downtime between deployments or node rotations.
We won't modify the last step of the form, where we define memory, CPU, and scaling conditions, for now; we'll leave it as the platform provides.
Creating the n8n Worker
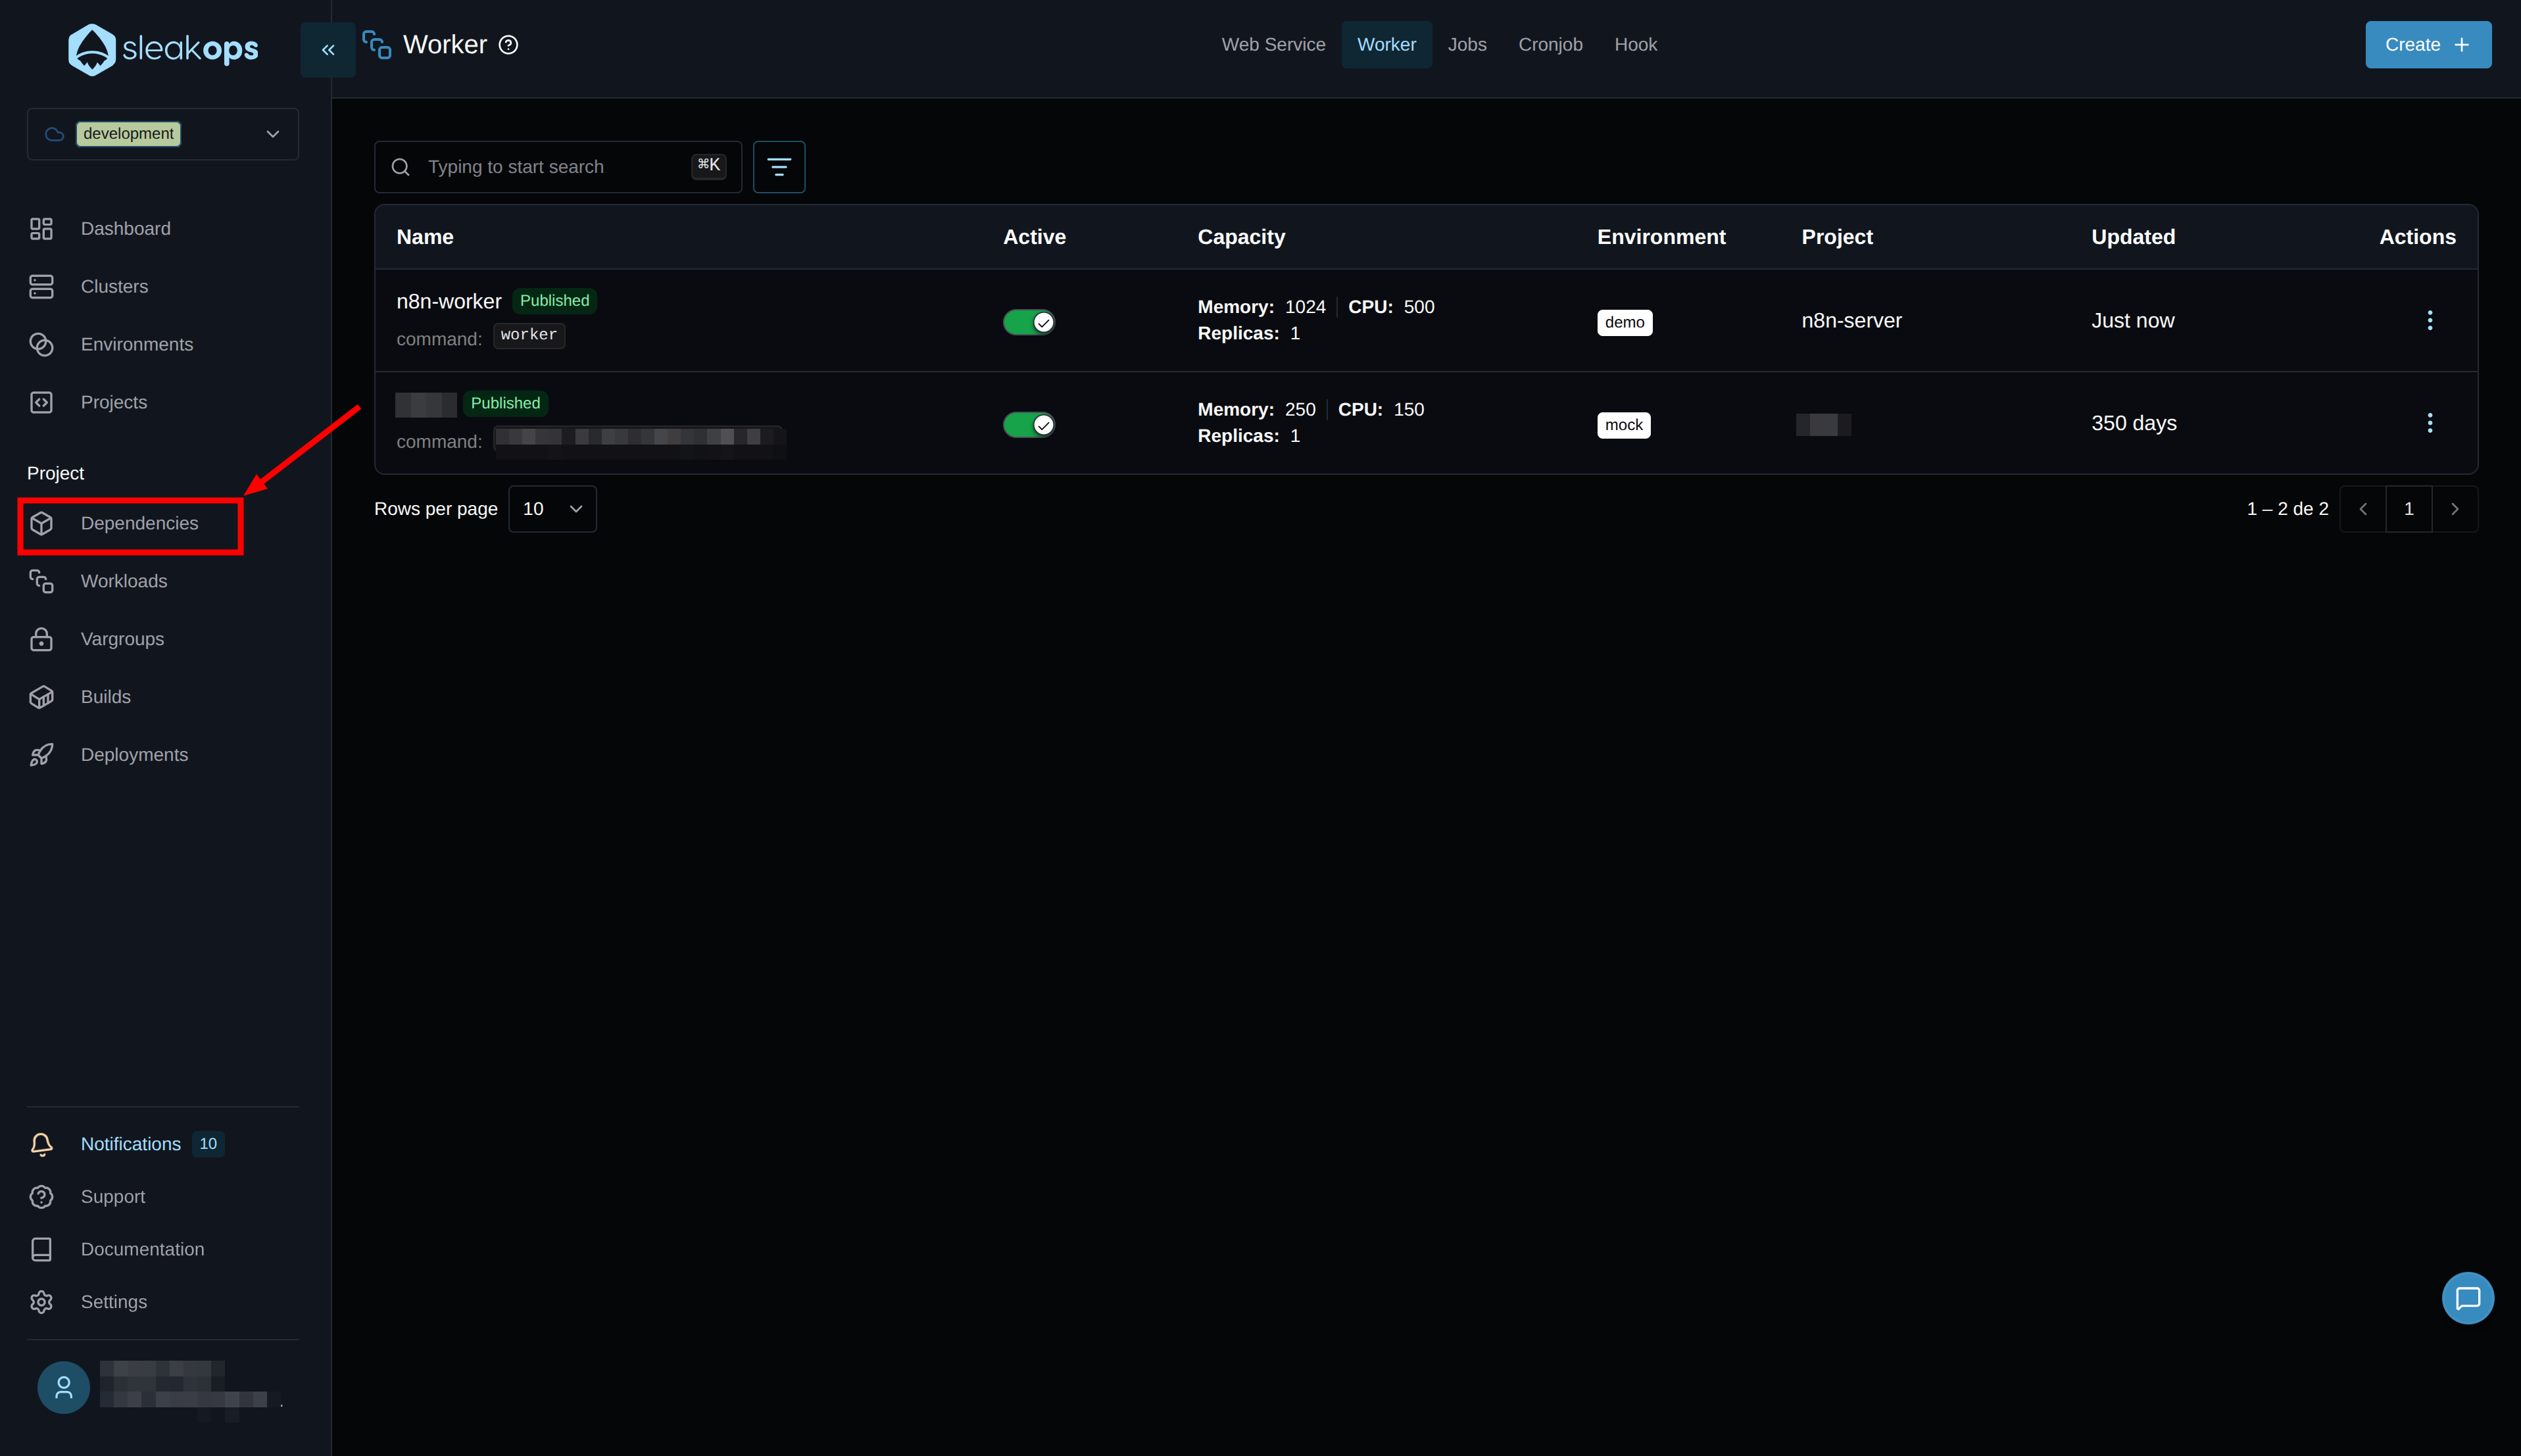
Great, with this we can see our web service being deployed. Now let's deploy the n8n worker for distributed execution. To do this, we need to go to the Workers section within the same Workloads screen and click the "Create" button.

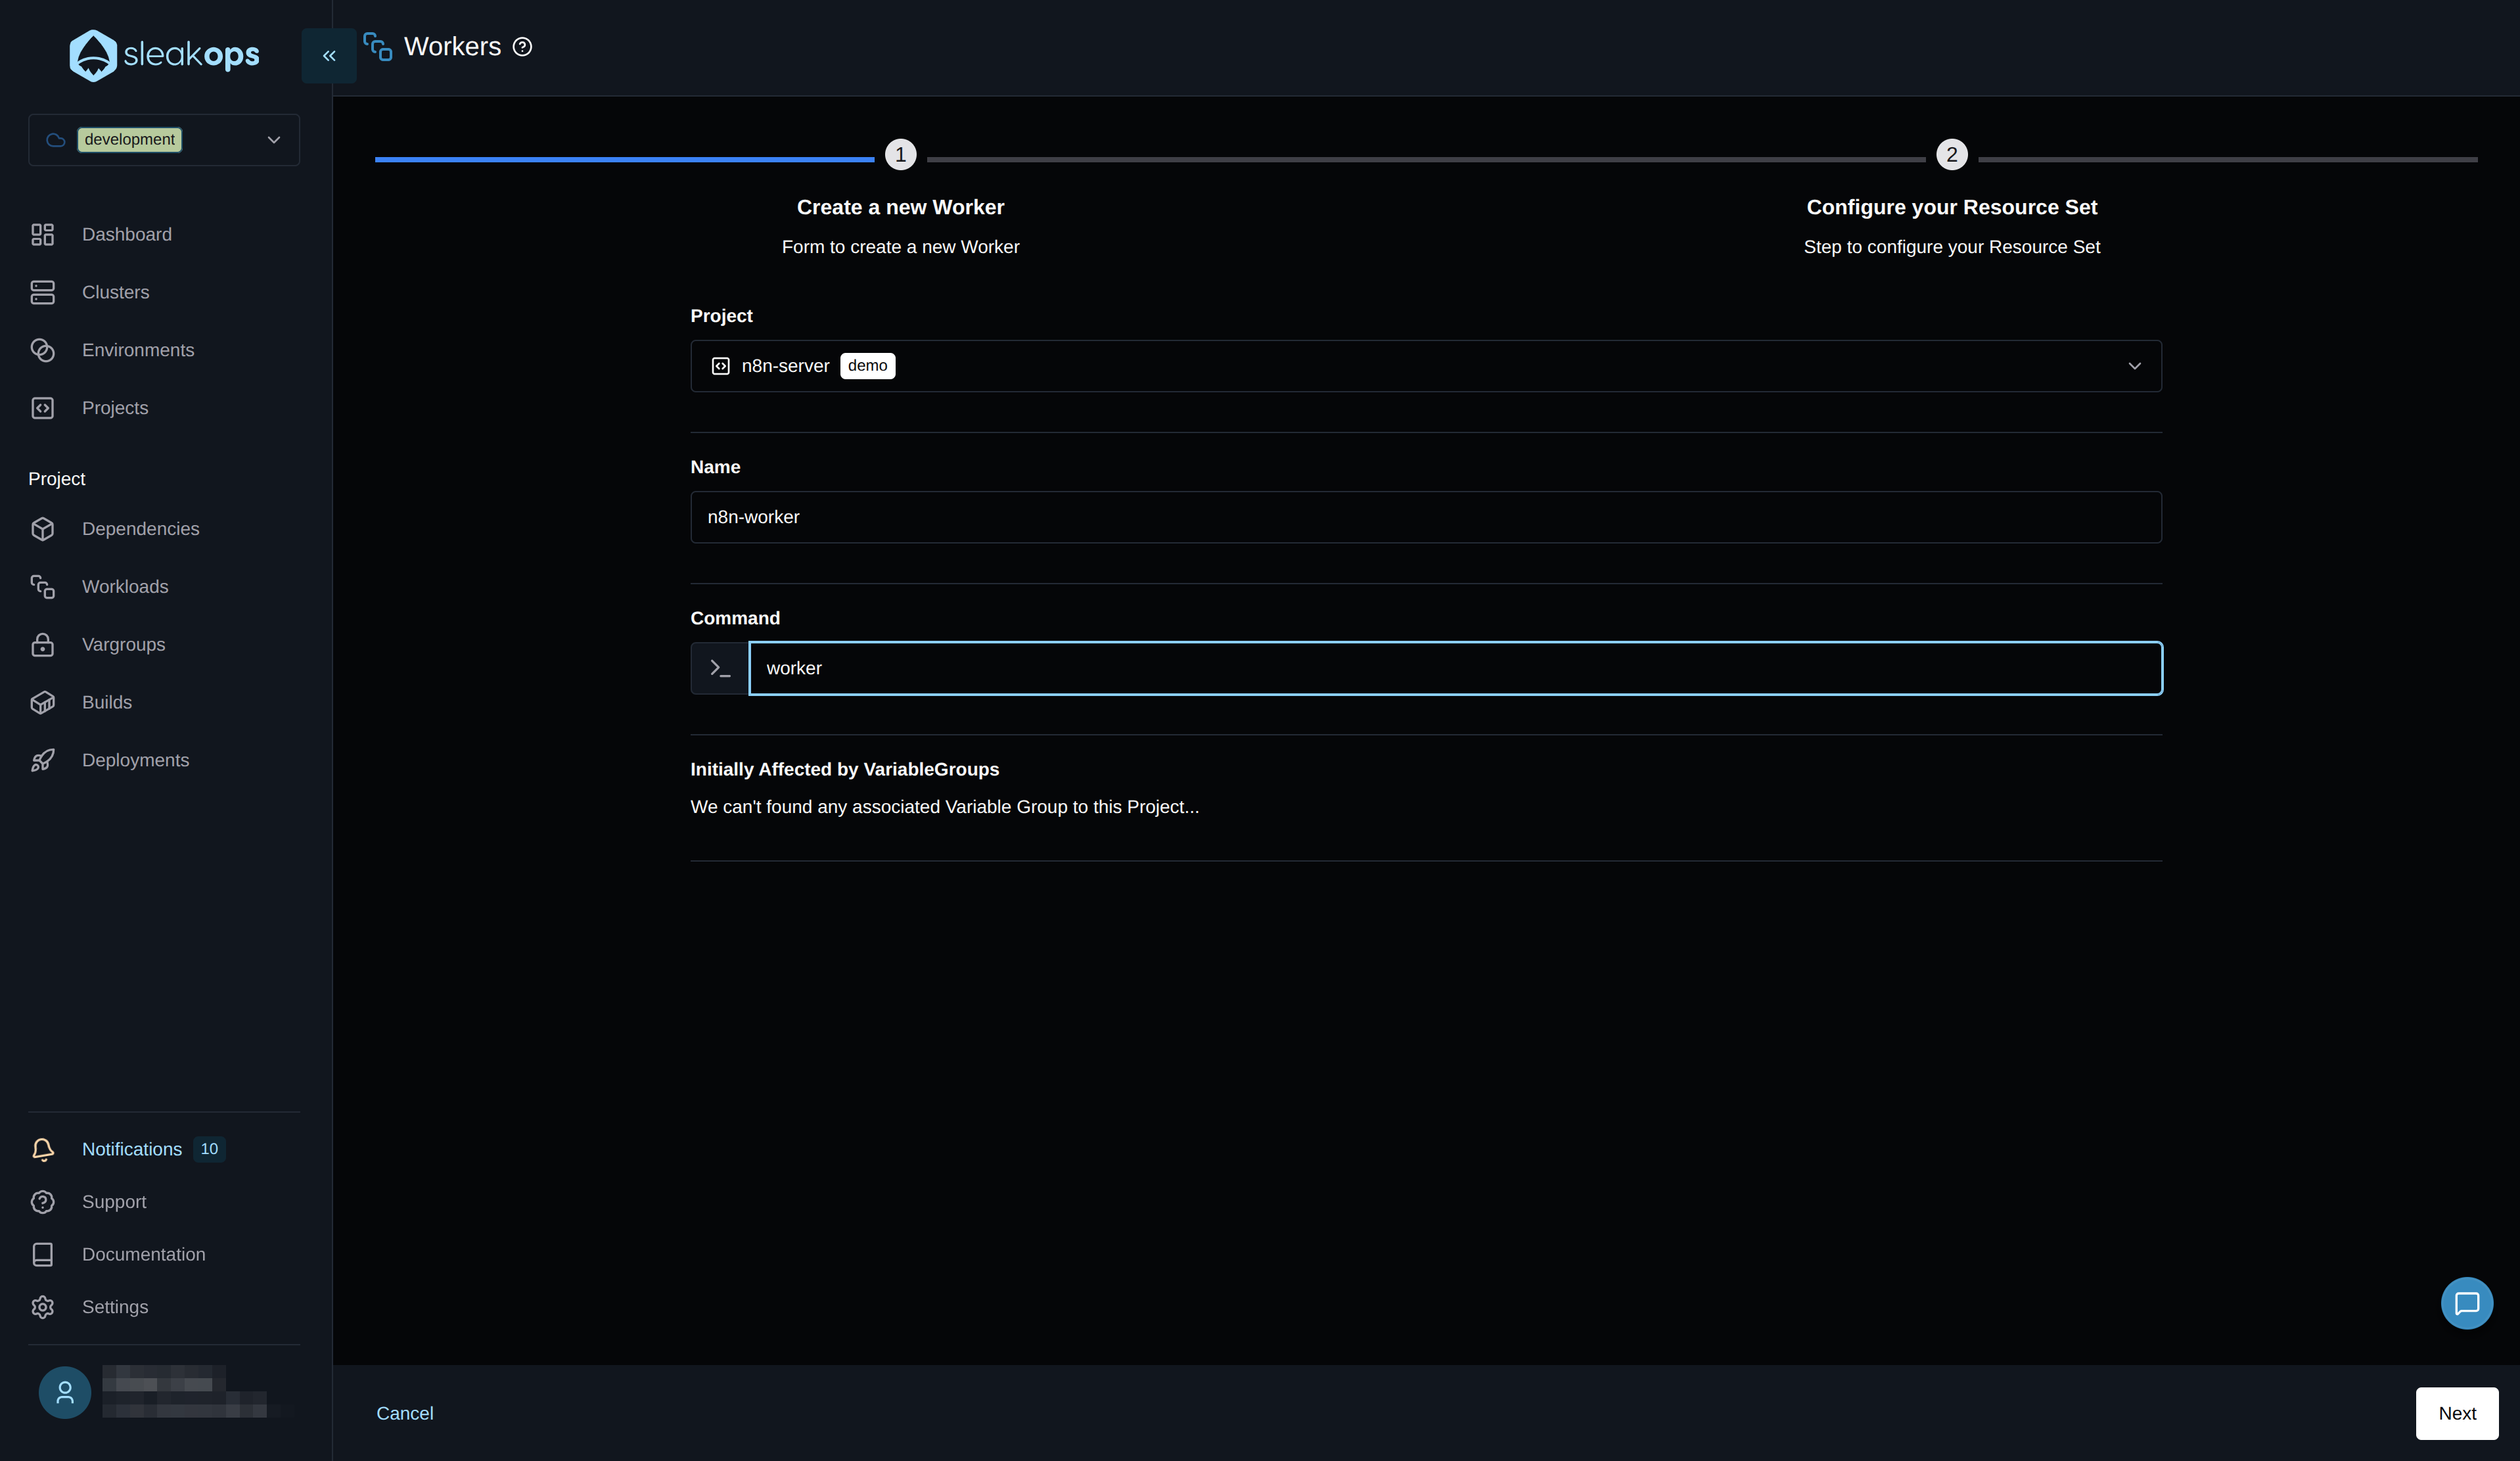
On the worker creation screen, we will need to complete the following fields:
| Configuration | Description |
|---|---|
| Project | Select the previously created project. In our case, "n8n-server". |
| Name | Define the name we will give to the worker. In our case, "n8n-worker". |
| Command | Here we set the command to run the n8n worker: worker |
With these fields completed, we will click the "Next" button in the lower right corner and then "Submit," as we do not need to edit anything else.
This will show our n8n worker deployed.
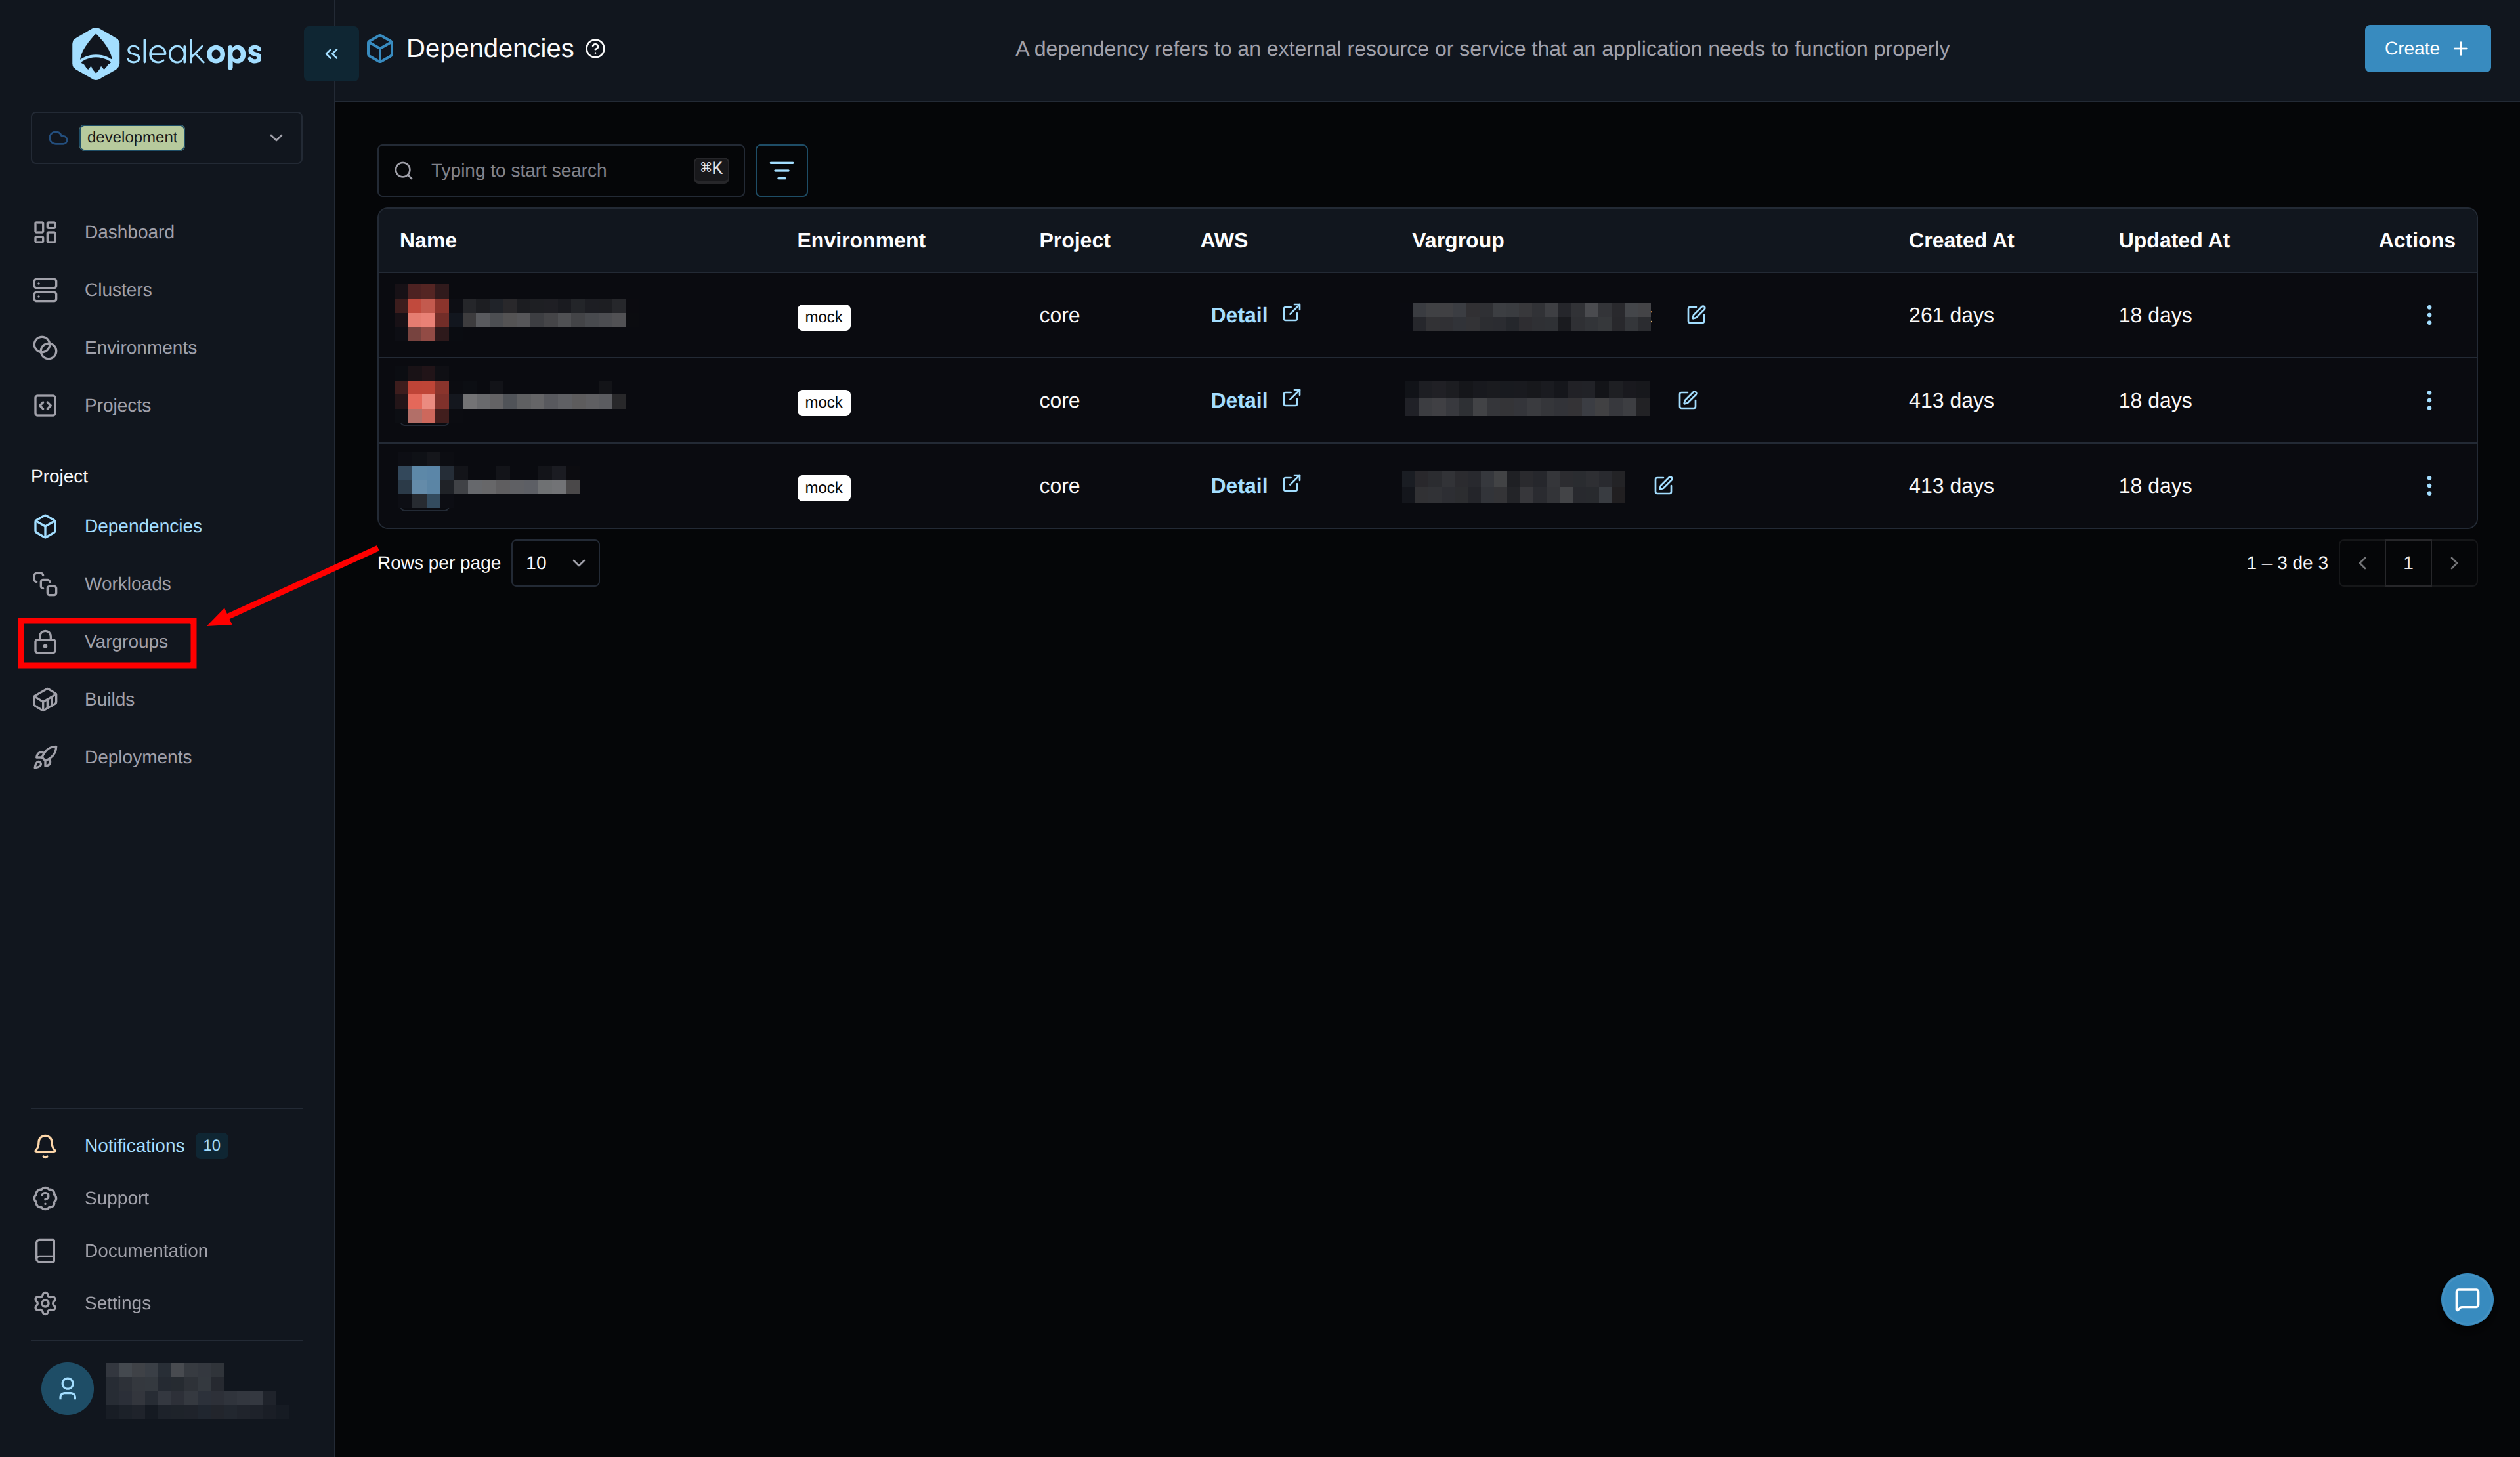
Create dependencies (Redis and PostgreSQL)
Dependencies are resources necessary for your application to function. In the case of n8n in queue mode, it needs a database and Redis. Sleakops leverages AWS services to provide you with alternatives. You can find more information in the dependencies documentation (/docs/project/dependency).
Let's go to the dependencies section:
Creating a Redis Dependency
First, we need to create a Redis dependency for the task queue. On the dependency creation screen, select Redis, and you will see the following fields:
| Configuration | Description |
|---|---|
| Dependency Type | Select "Redis" from the available options. |
| Project | Select the previously created project. In our case, "n8n-server". |
| Name | Define the name for Redis. In our case, "n8n-redis". |
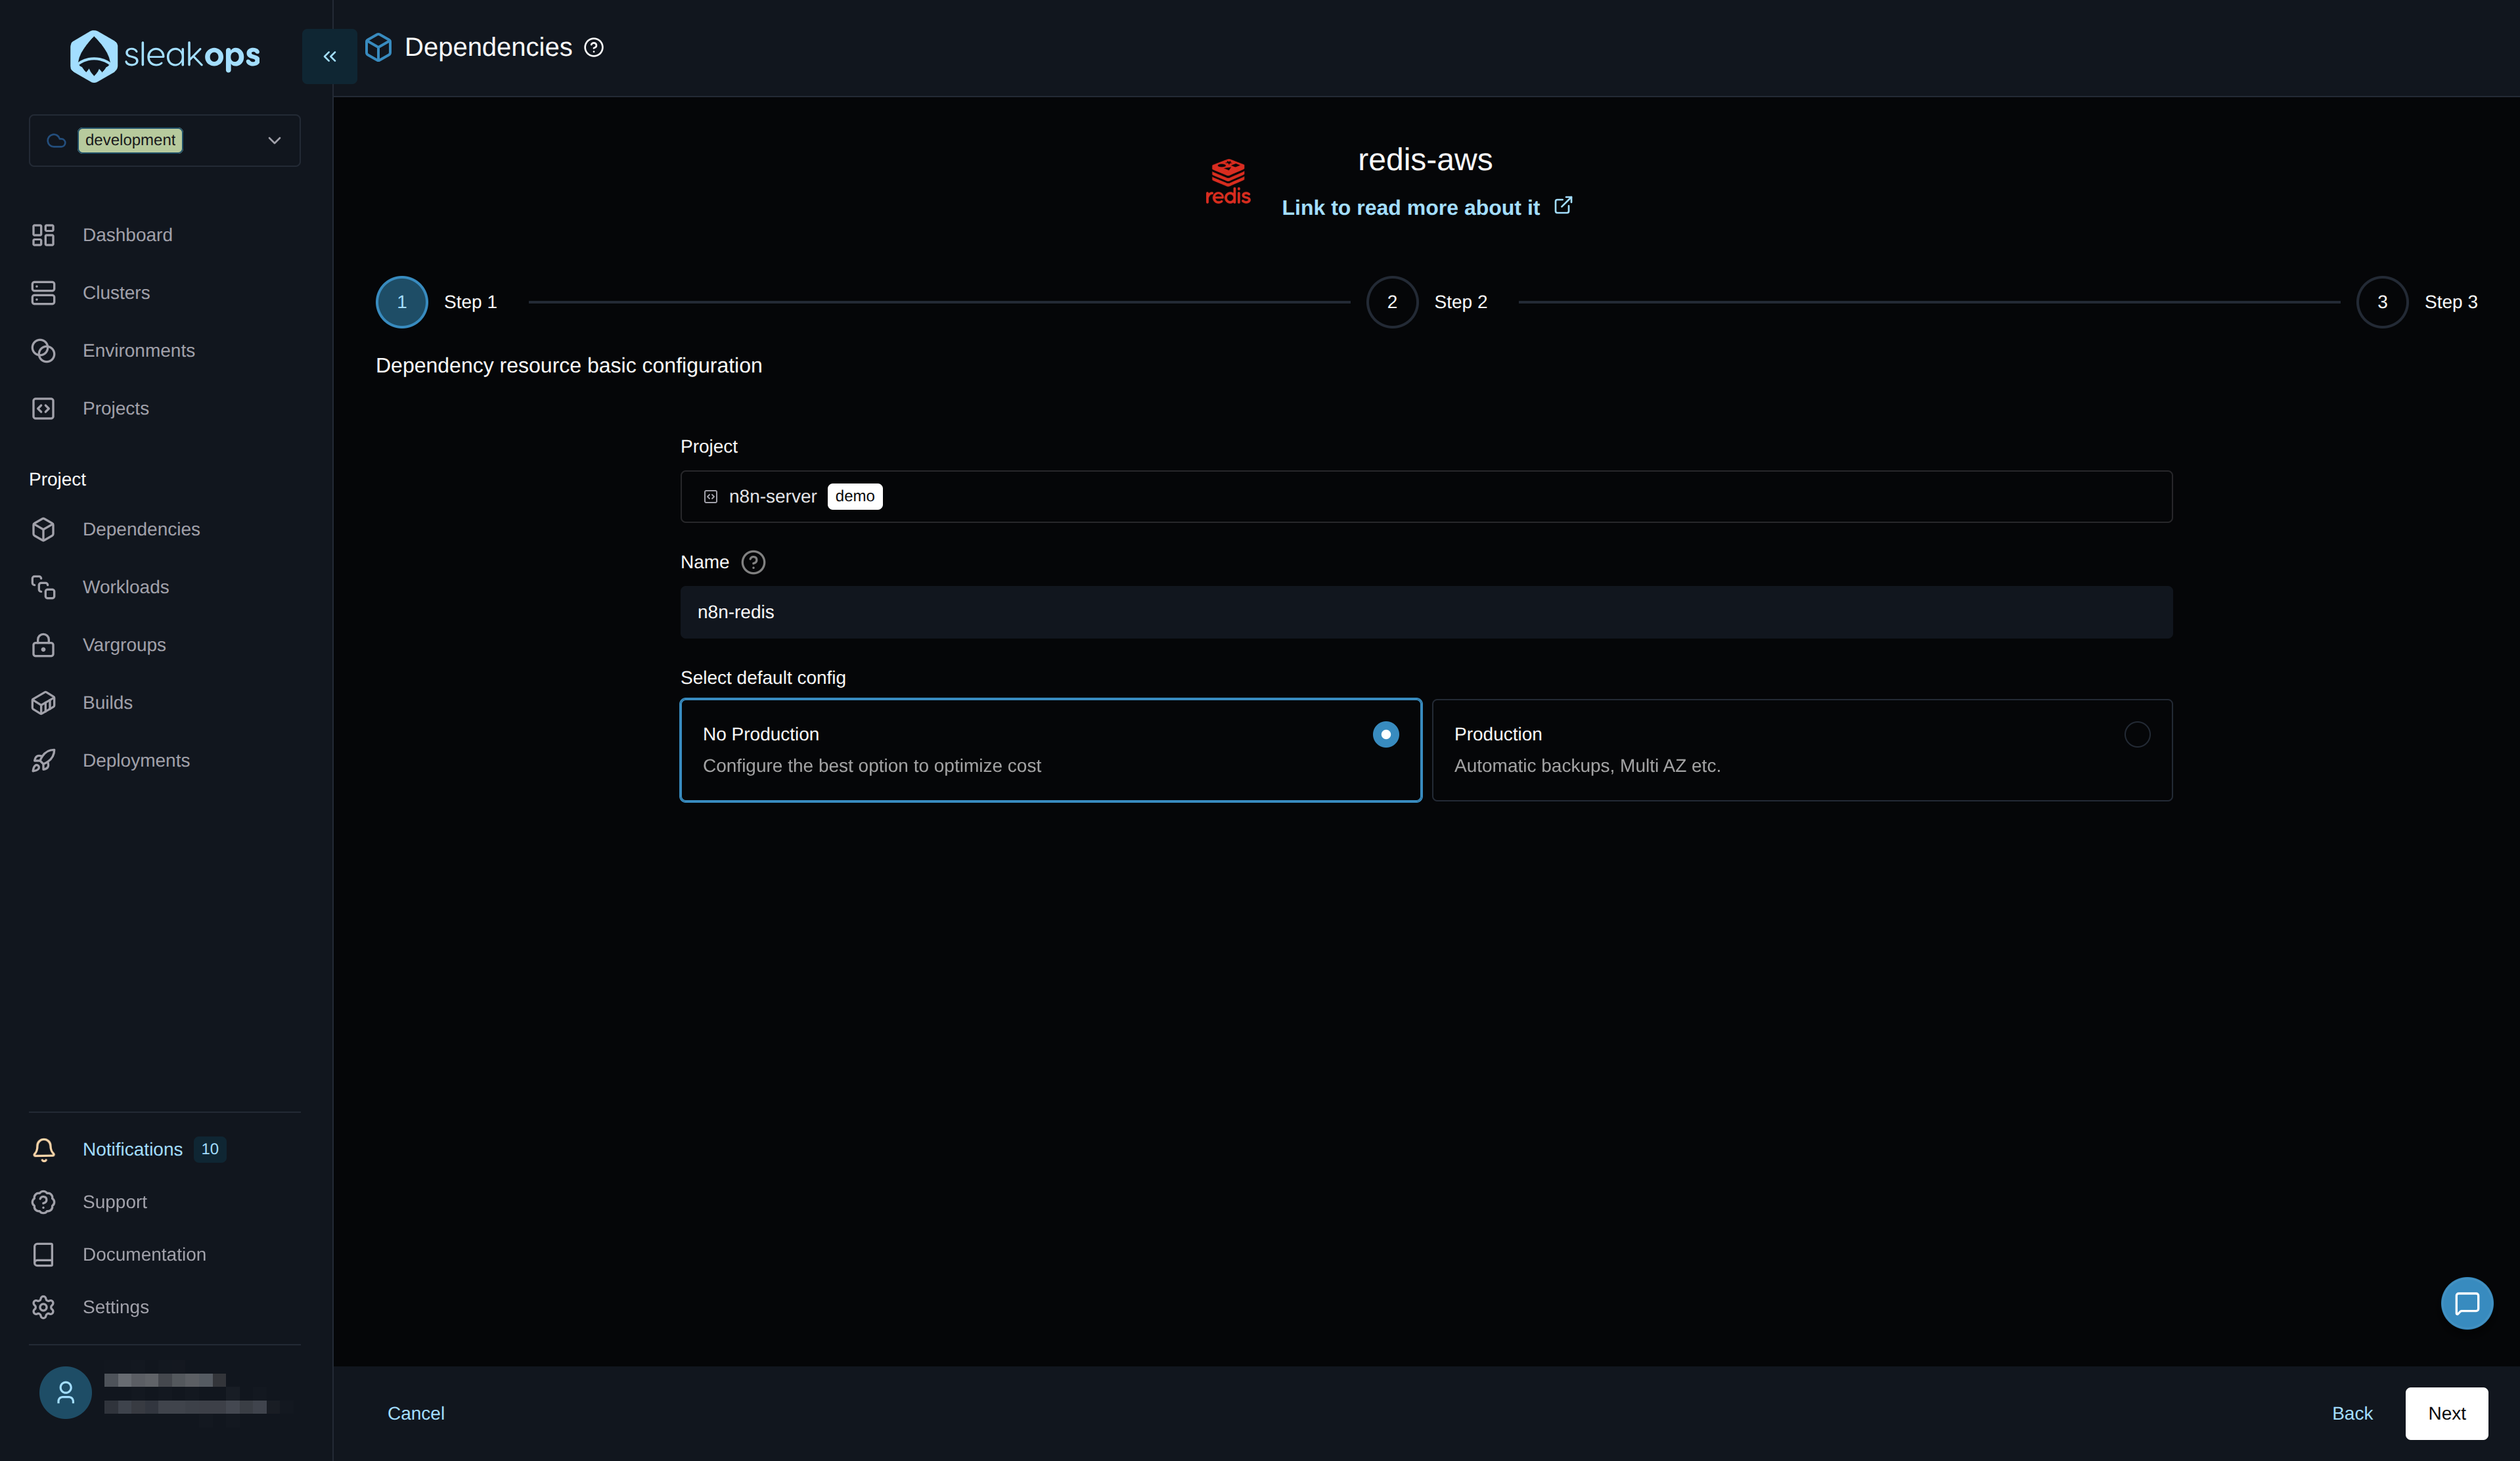
With these fields completed, we'll click the "Next" button in the bottom right corner. In the last step, before clicking "Submit," we'll change the environment variable names to match what n8n expects.
We need to configure the Redis connection variables to match what n8n expects:
| Variable | Value |
|---|---|
| QUEUE_BULL_REDIS_HOST | (Redis Host of the dependency) |
| QUEUE_BULL_REDIS_PORT | 6379 |
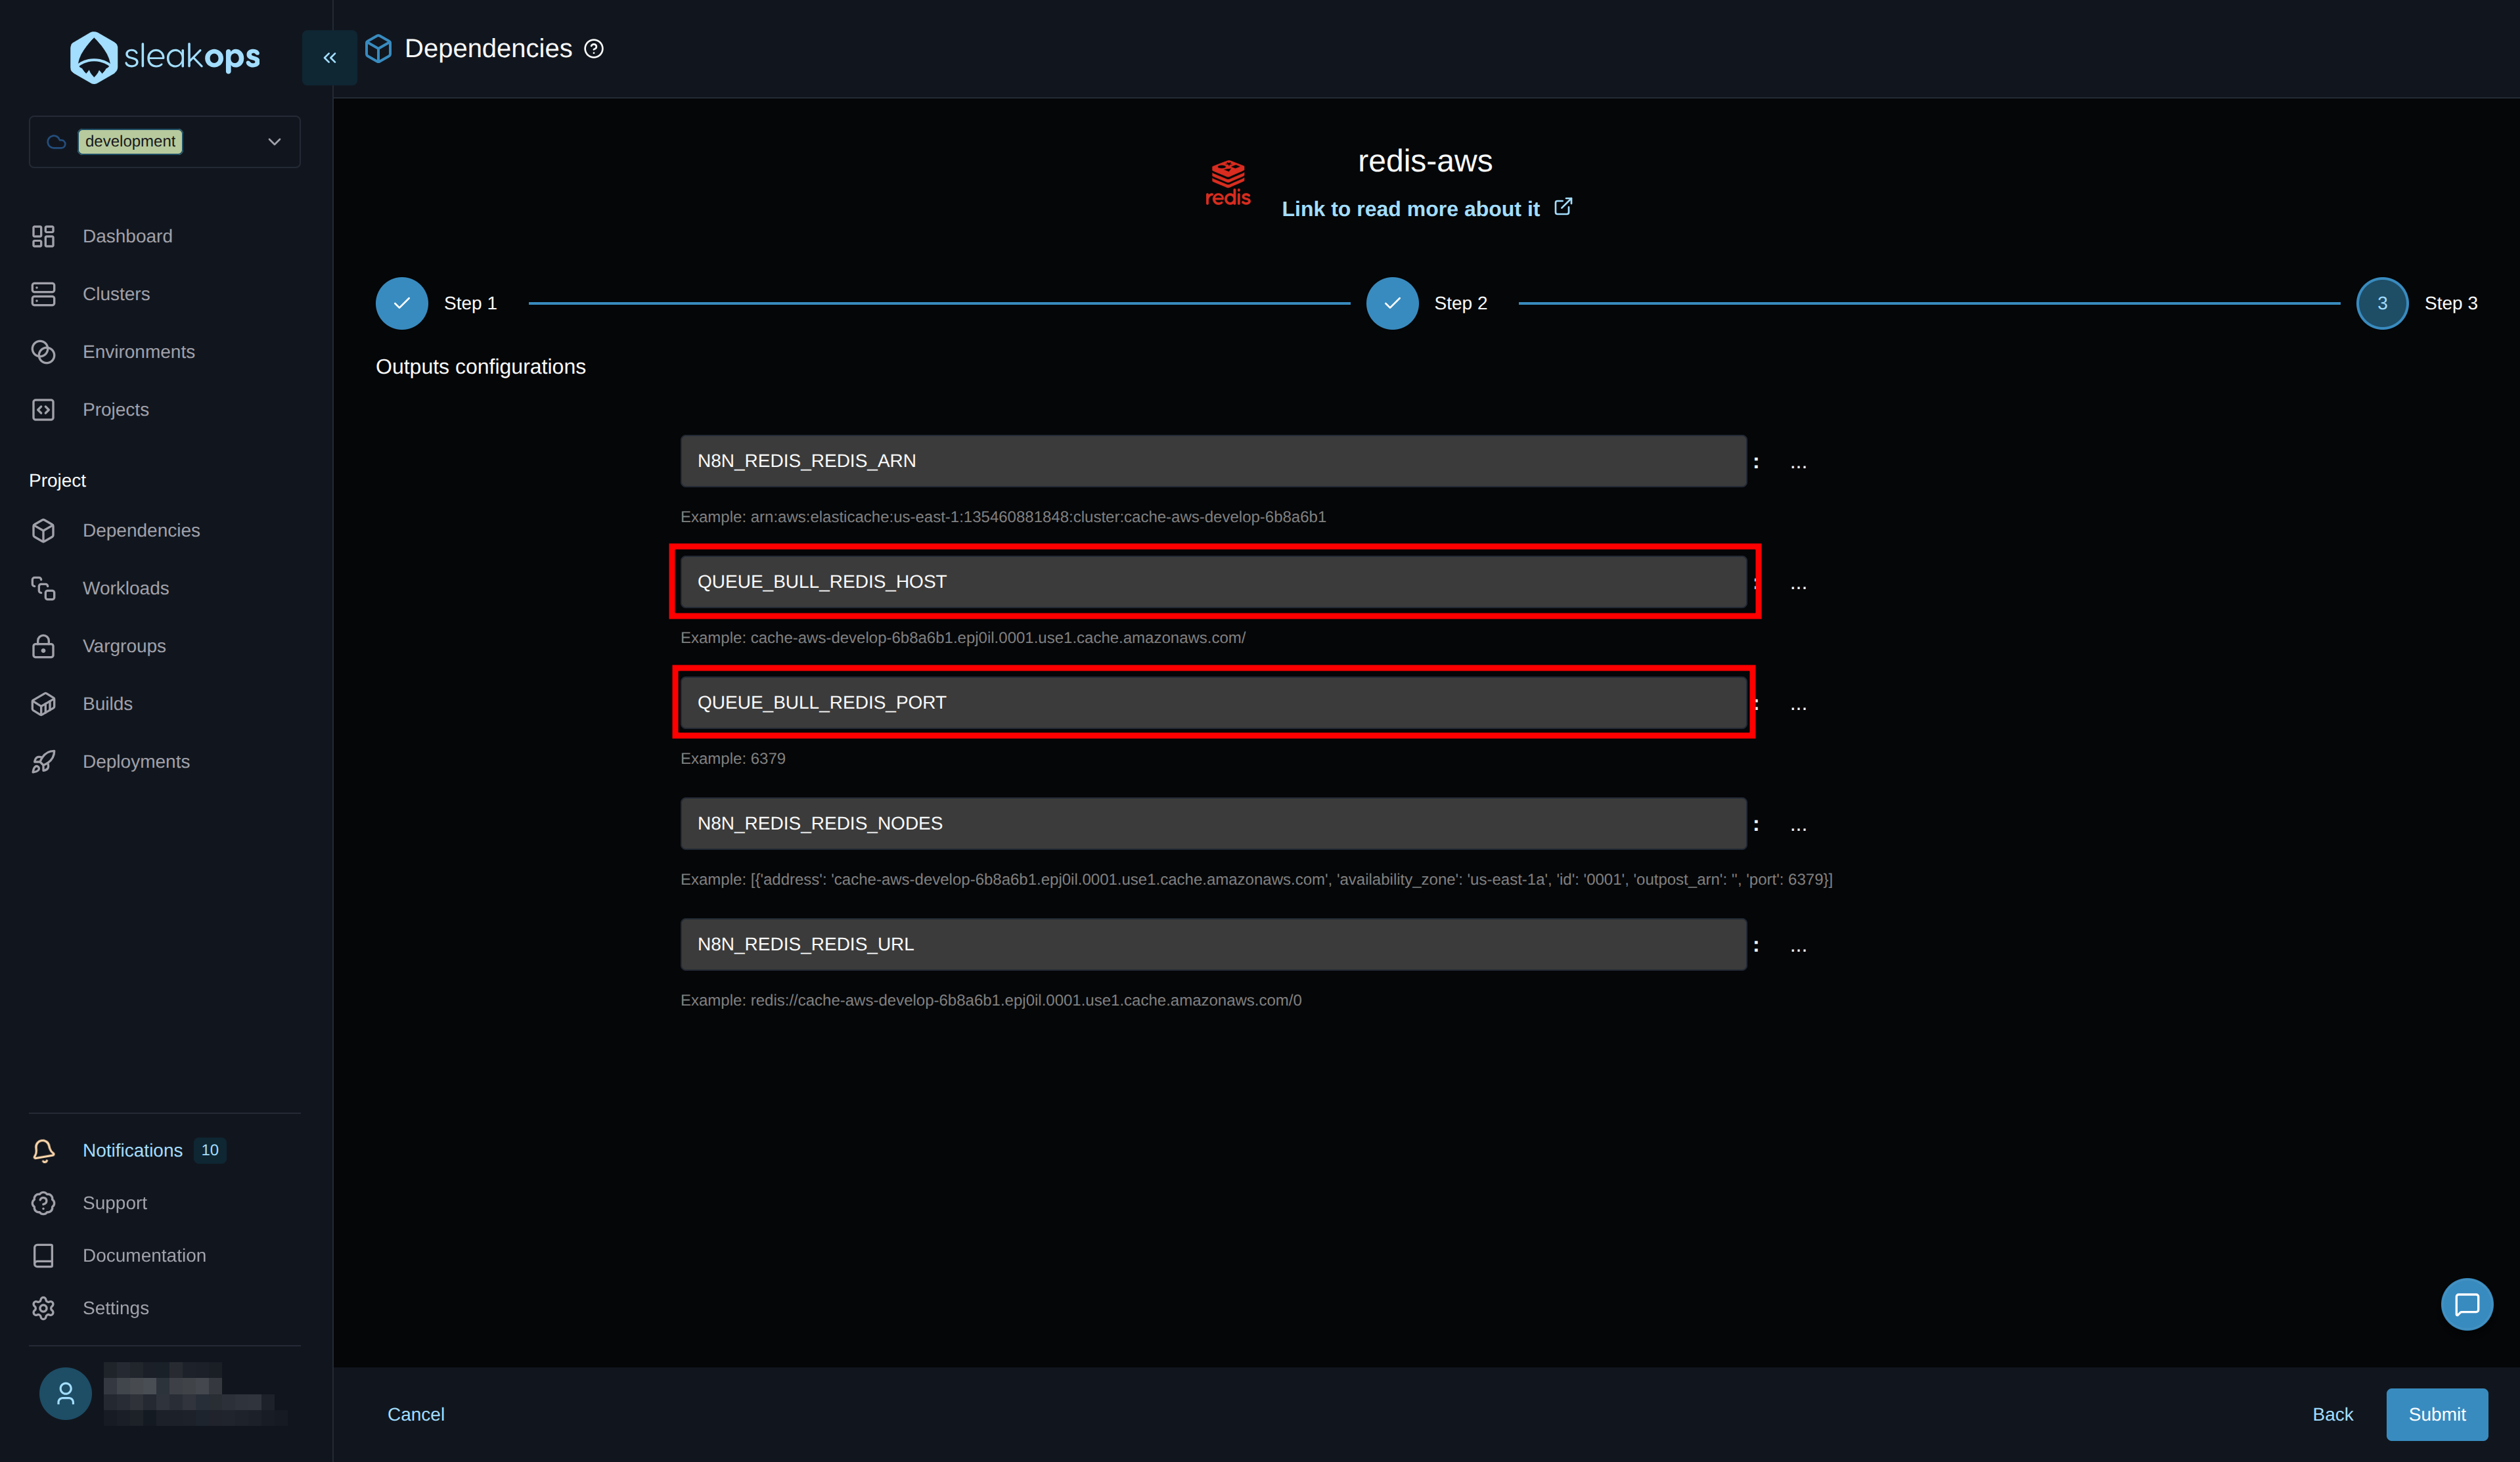
This tells Sleakops what name we want it to use to publish the variables generated by the "Redis" dependency.
Make sure the variable names match what your n8n configuration expects.
Create PostgreSQL Database
Now we proceed to create the PostgreSQL database for n8n data storage:
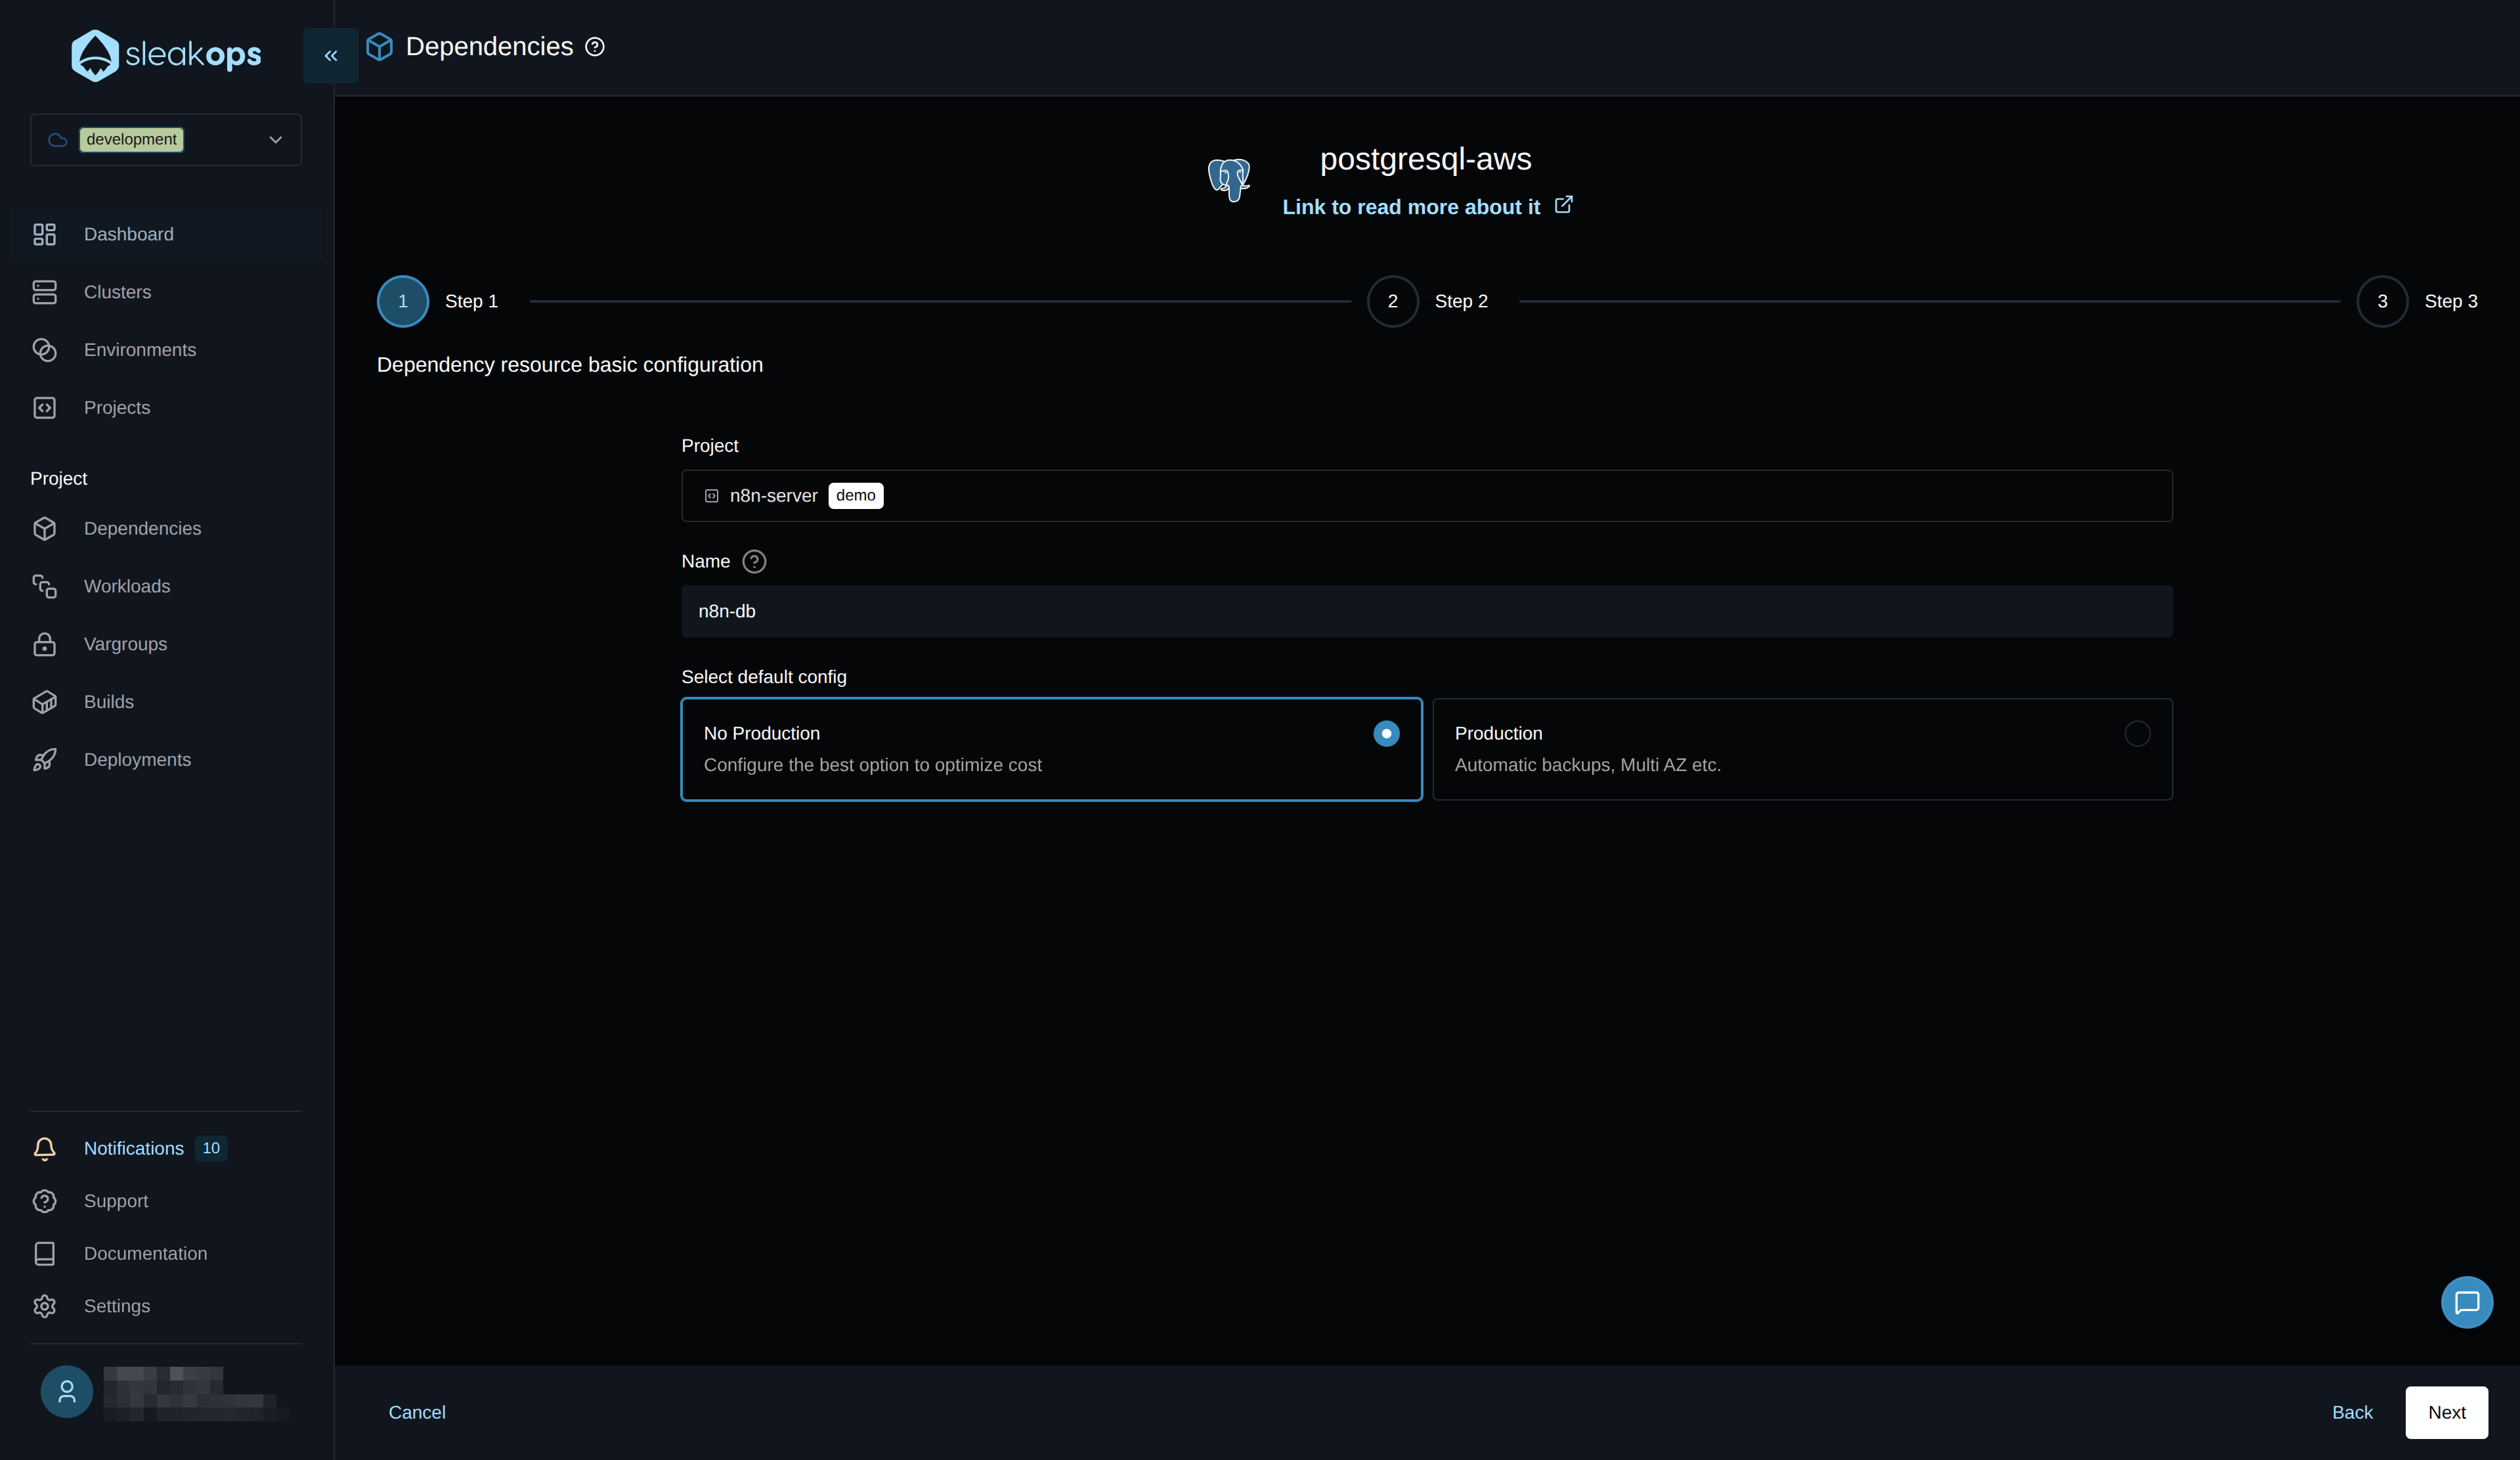
You can switch between "production" and "non-production" environments. This gives you default configuration values in the next step for each environment. For example, in a production environment, it enables multi-A-Z, automatic backups, etc. As an example in this guide, we'll leave it as "non-production."
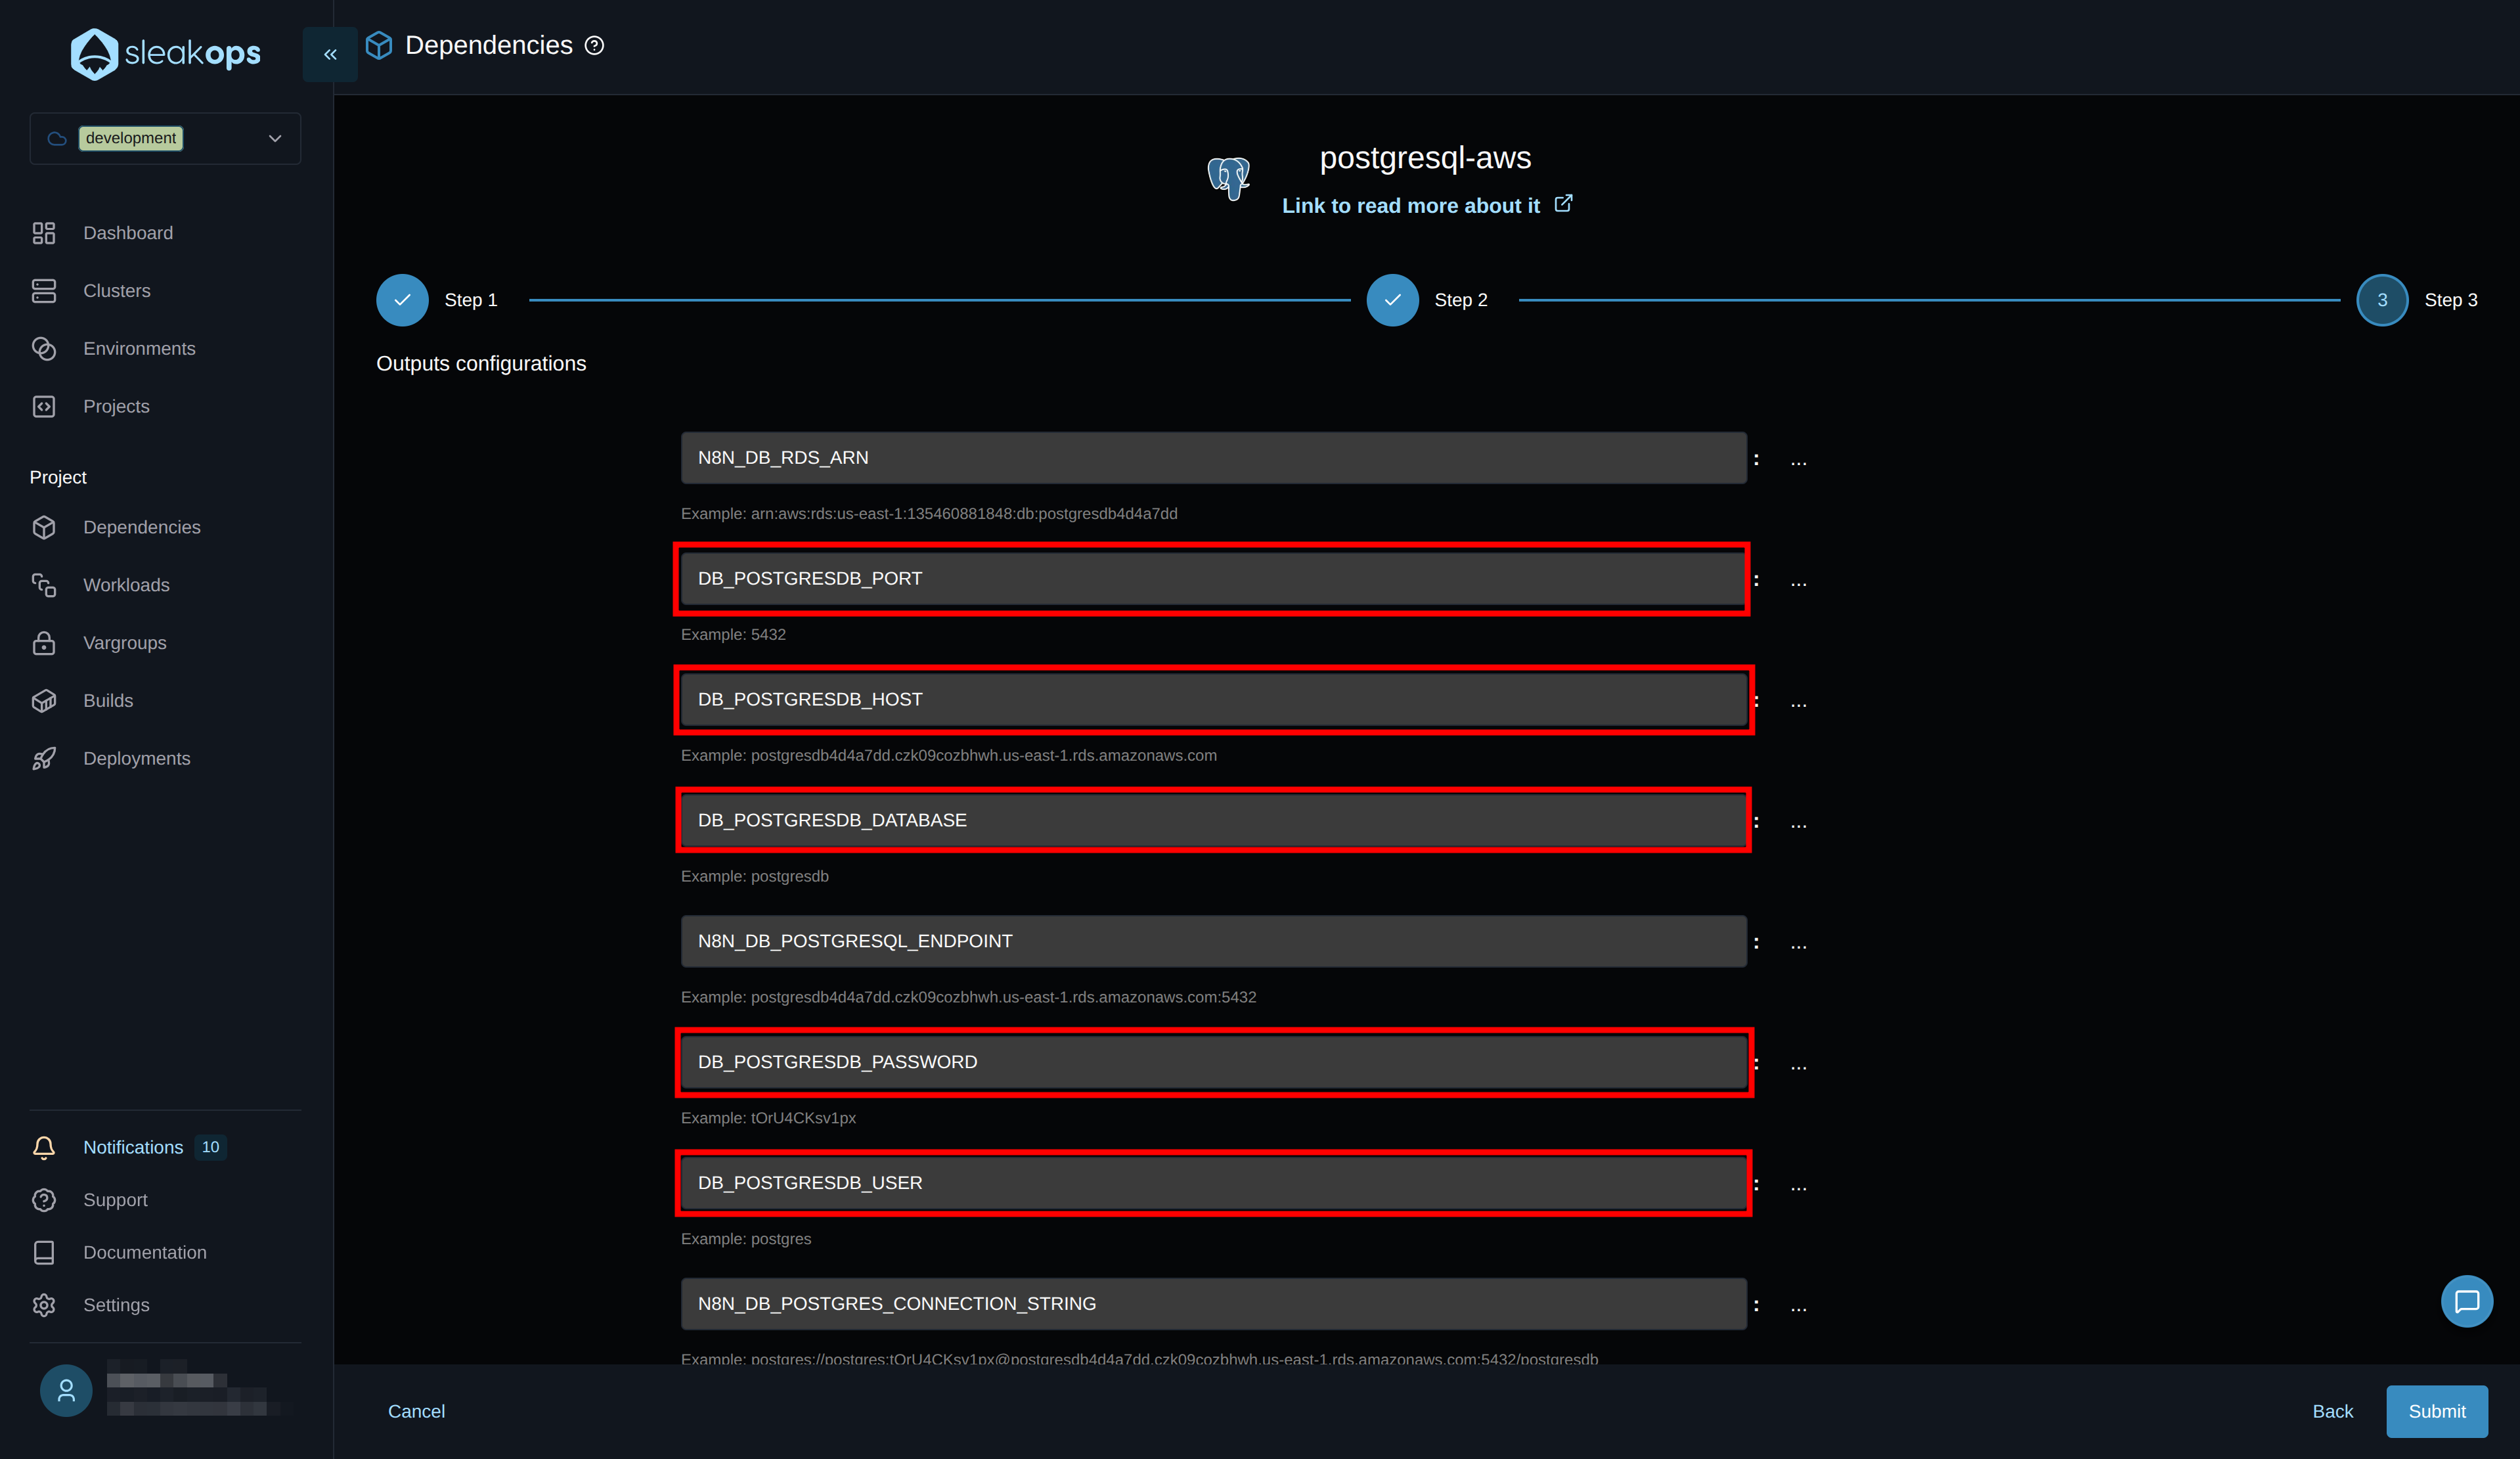
Just like with Redis, we need to configure the environment variable names as n8n expects. Go to the last step and before clicking submit, change the names to the following:
| Before | After |
|---|---|
| *_POSTGRESQL_NAME | DB_POSTGRESDB_DATABASE |
| *_POSTGRESQL_USERNAME | DB_POSTGRESDB_USER |
| *_POSTGRESQL_PASSWORD | DB_POSTGRESDB_PASSWORD |
| *_POSTGRESQL_ADDRESS | DB_POSTGRESDB_HOST |
| *_POSTGRESQL_PORT | DB_POSTGRESDB_PORT |
It should look something like the image below. Then click the "Submit" button and your database should be created:
Configuring Environment Variables
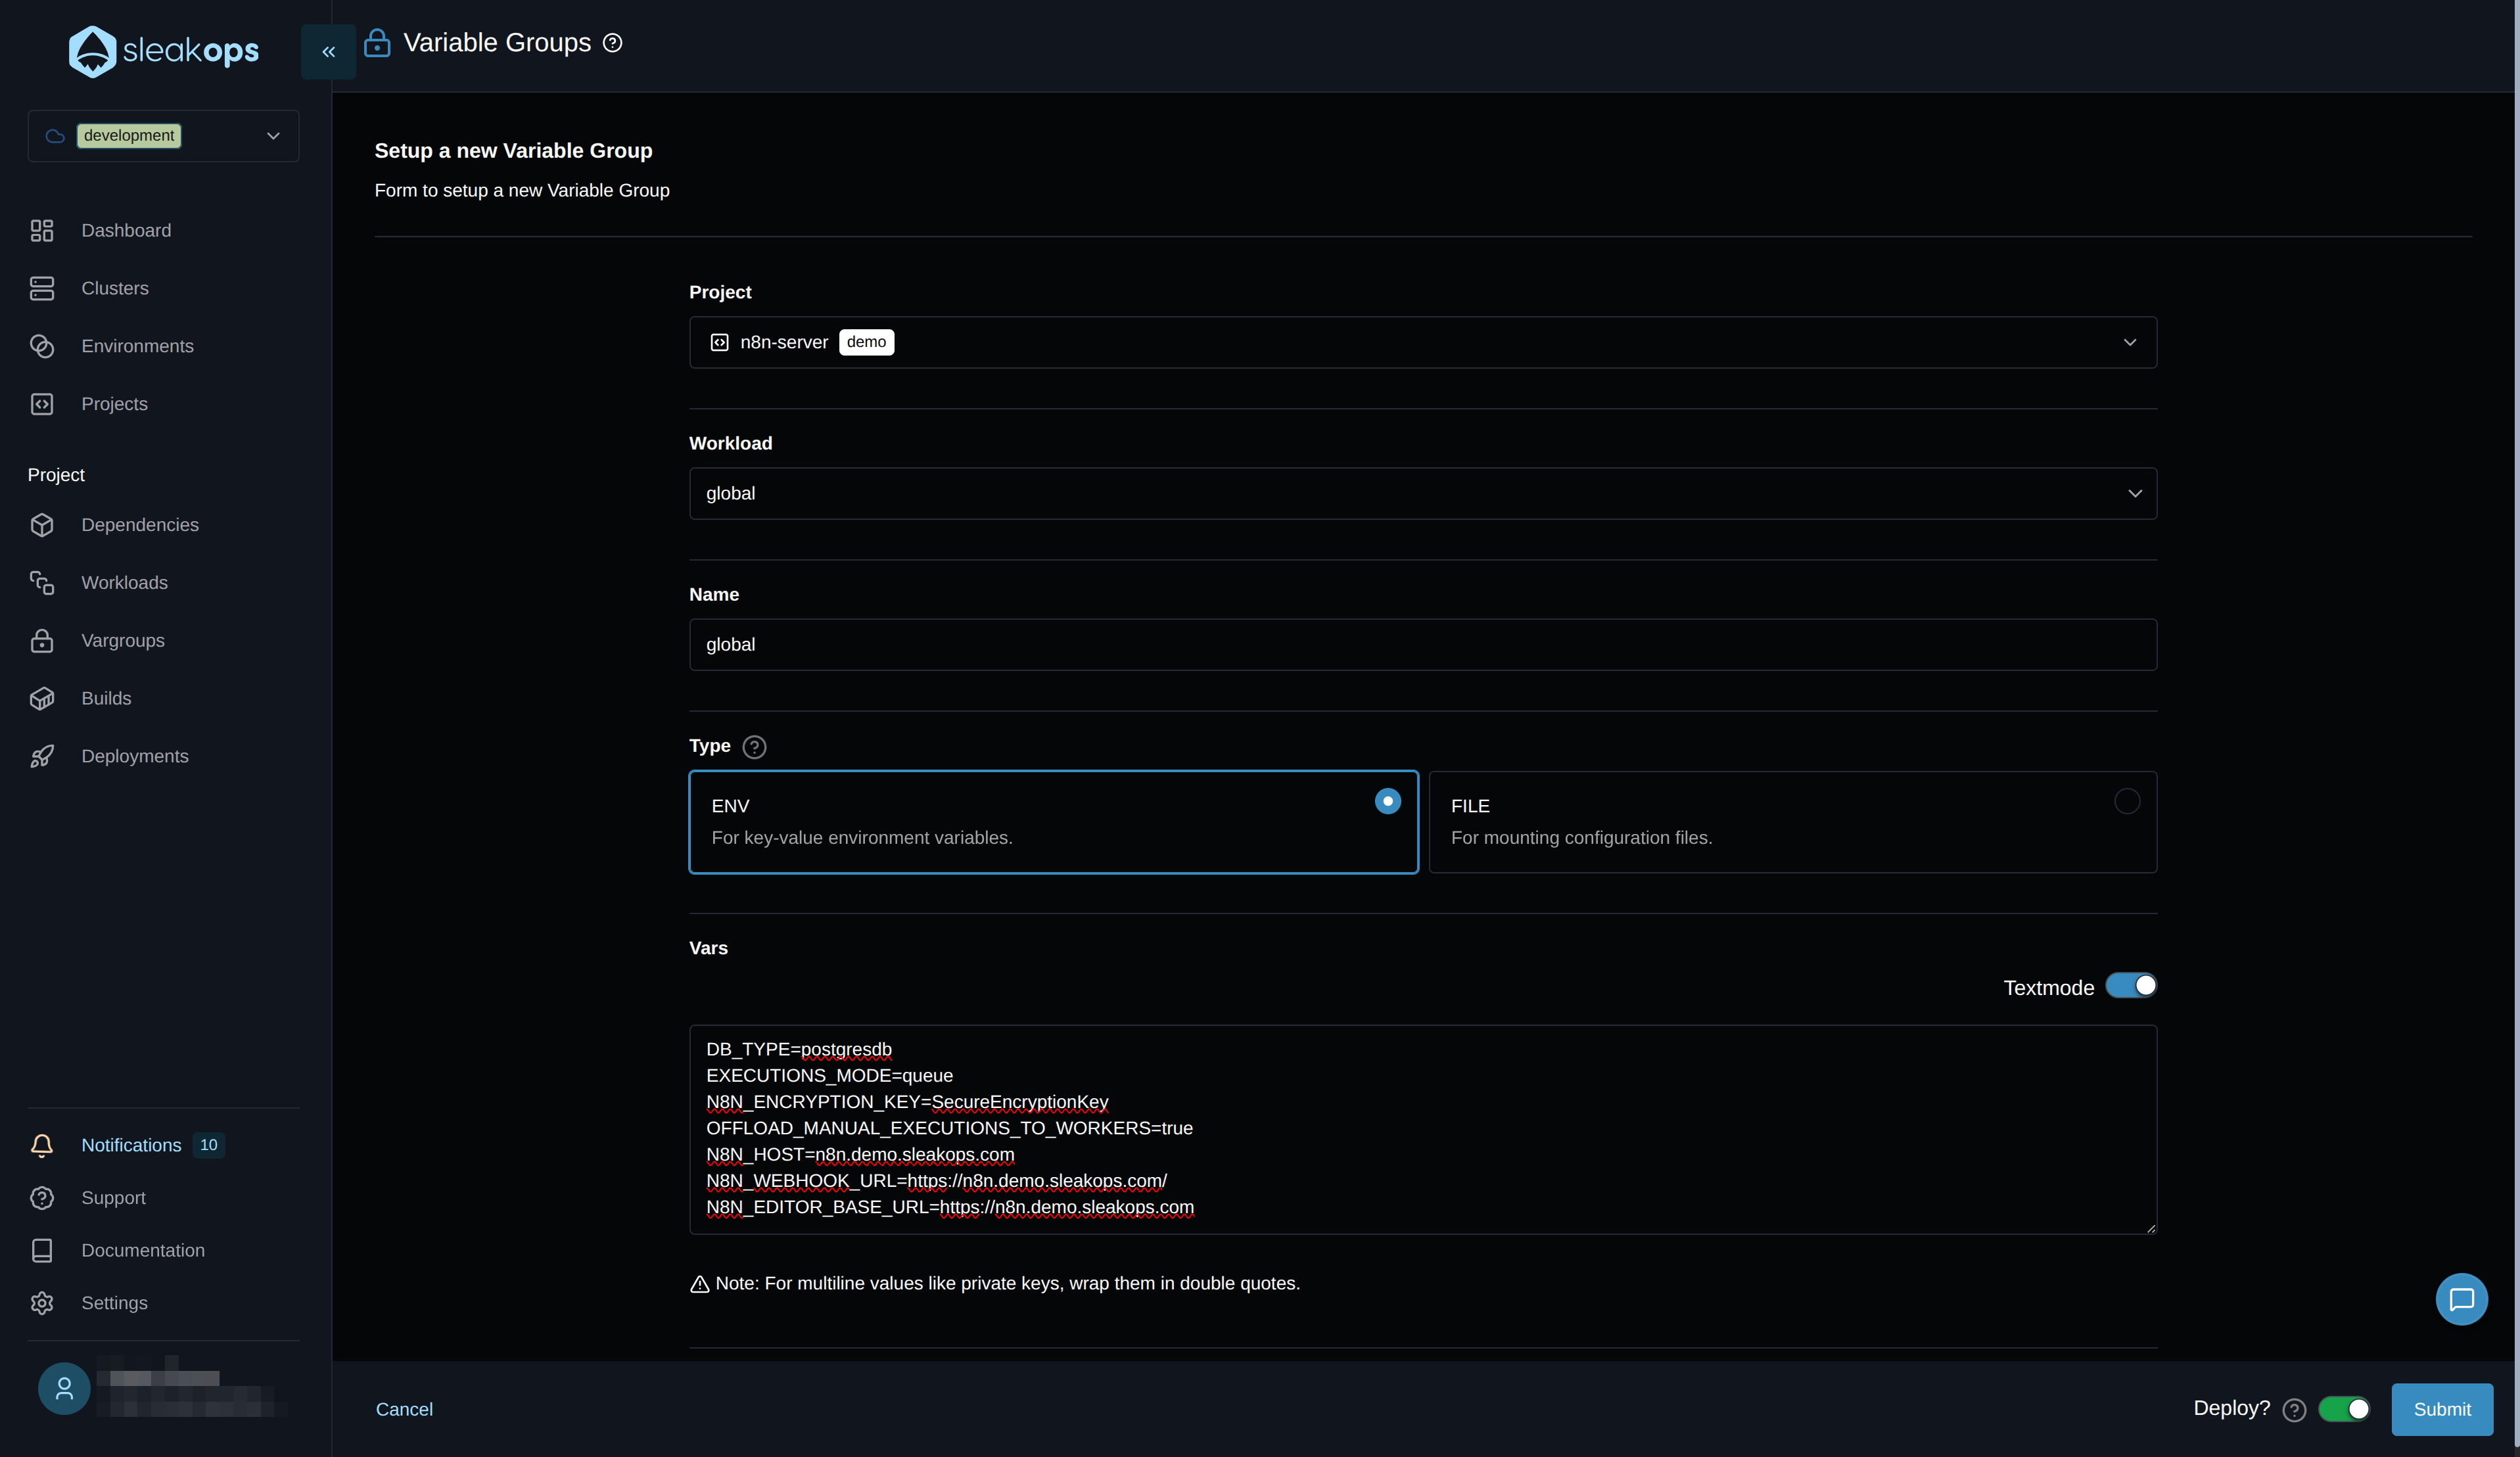
Now we need to create the remaining environment variables. We can see the variables we have in .env.example in the code repository. Some variables have already been configured in each dependency, but others still need to be defined. To do this, we go to the "Variablegroups" section.
We're going to create a new variable group. We'll switch to text mode to copy the missing variables from the .env.example file and adjust the values accordingly.
This form has the following fields:
- Project: Select the project we created earlier.
- Workload: Select "global," which means it will be used by all our workloads.
- Name: Define a name for this variable group.
- Type: Choose whether to load it by file or by variable.
- Vars: Here, enable text mode and copy the following environment variables:
| Variable | Description |
|---|---|
| DB_TYPE | Set to "postgresdb" |
| EXECUTIONS_MODE | Set to "queue" for worker mode |
| N8N_ENCRYPTION_KEY | Generate a secure encryption key |
| OFFLOAD_MANUAL_EXECUTIONS_TO_WORKERS | Set to "true" |
| N8N_HOST | Define the host you configured in your web service; for this example, it would be n8n.demo.sleakops.com |
| N8N_WEBHOOK_URL | This variable is not strictly necessary to define; if you add a separate web service instance to handle webhooks with a different URL, you must specify which URL will handle the webhooks. https://n8n.demo.sleakops.com/ |
| N8N_EDITOR_BASE_URL | https://n8n.demo.sleakops.com |
If you want to see all the environment variables available to configure n8n, you can go to the following page of n8n documentation
Deployments
As a final step, let's view our deployed project. To do this, go to the "Deployments" section in the left panel:
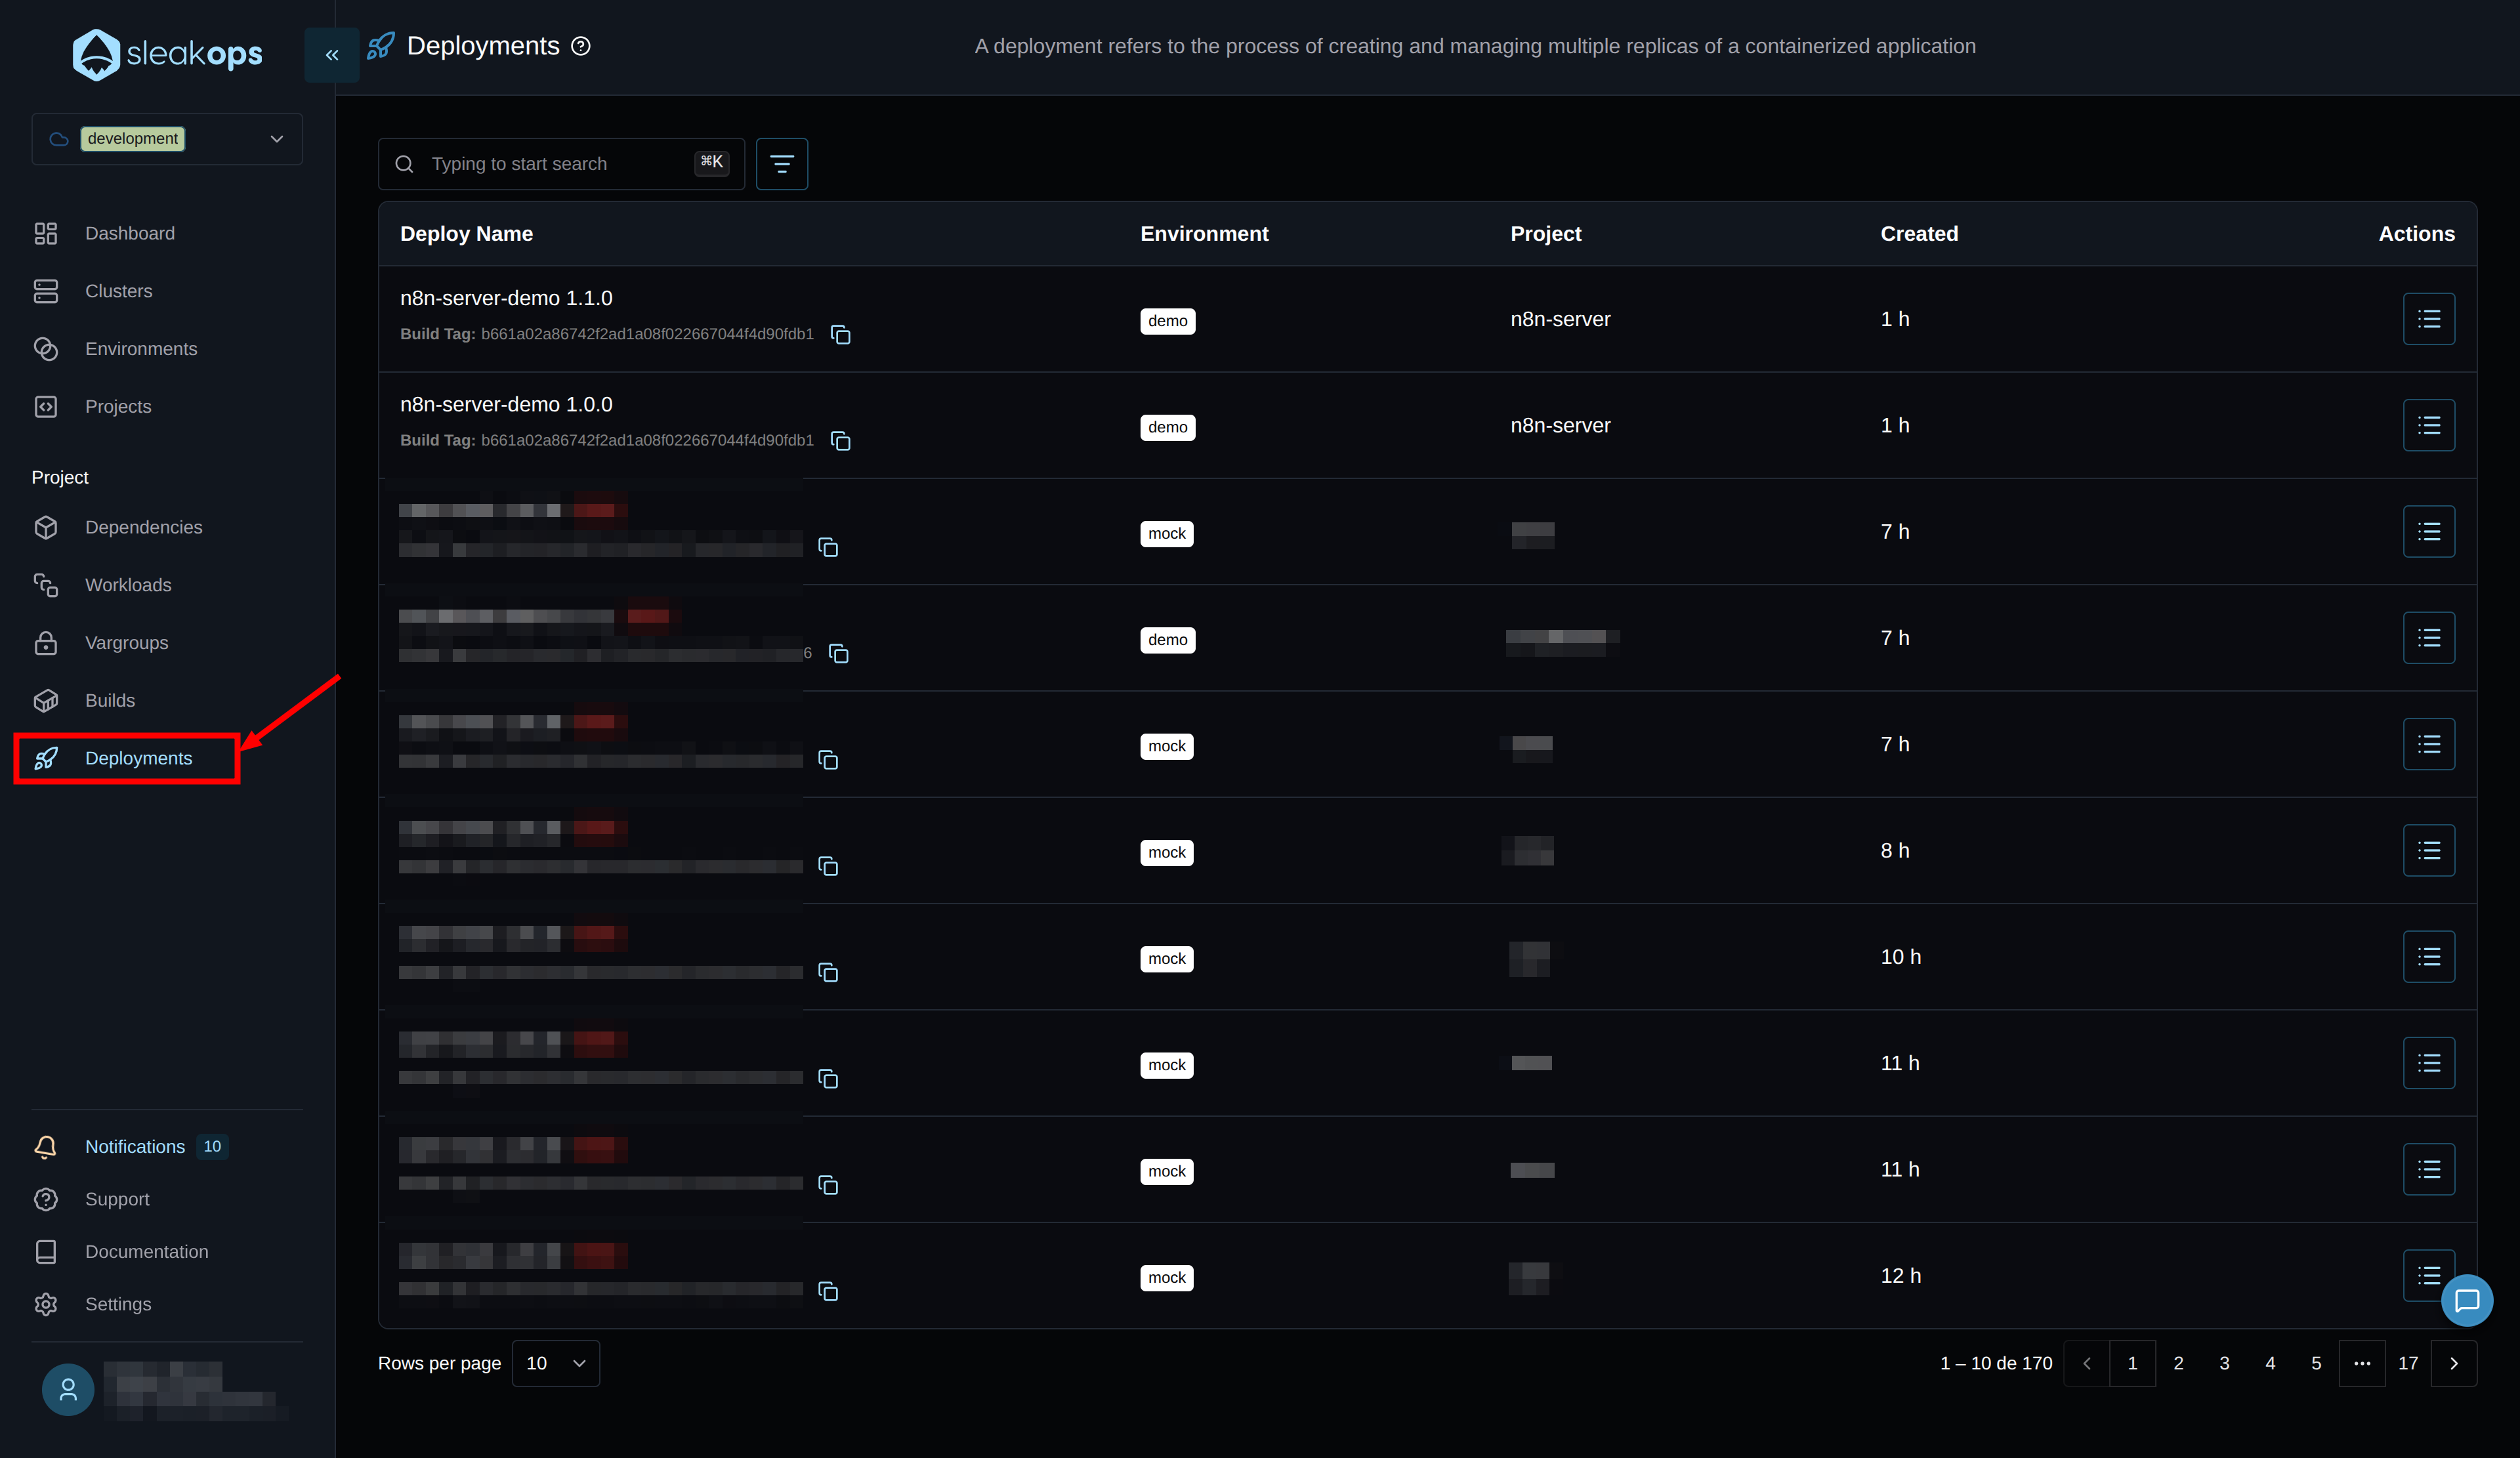
Here we'll see all the deployments we perform. In our case, it's the first one, and we can see that it was created successfully. If you see any errors, clicking on "error" will show you a description.
If we don't see any errors, then the project is already deployed, and we can start using it from the URL provided by the web service.
This concludes our project deployment process. We've included an optional step: configuring CI/CD with GitHub.
CI/CD Configuration (Optional but Recommended)
Why Configure CI/CD?
Without CI/CD, every change to your code requires:
- Manual build from SleakOps
- Manual deployment
- Manual verification
With CI/CD configured:
- ✅ Push to
main→ Automatic deployment - ✅ Automatic rollback in case of error
- ✅ Deployment status notifications
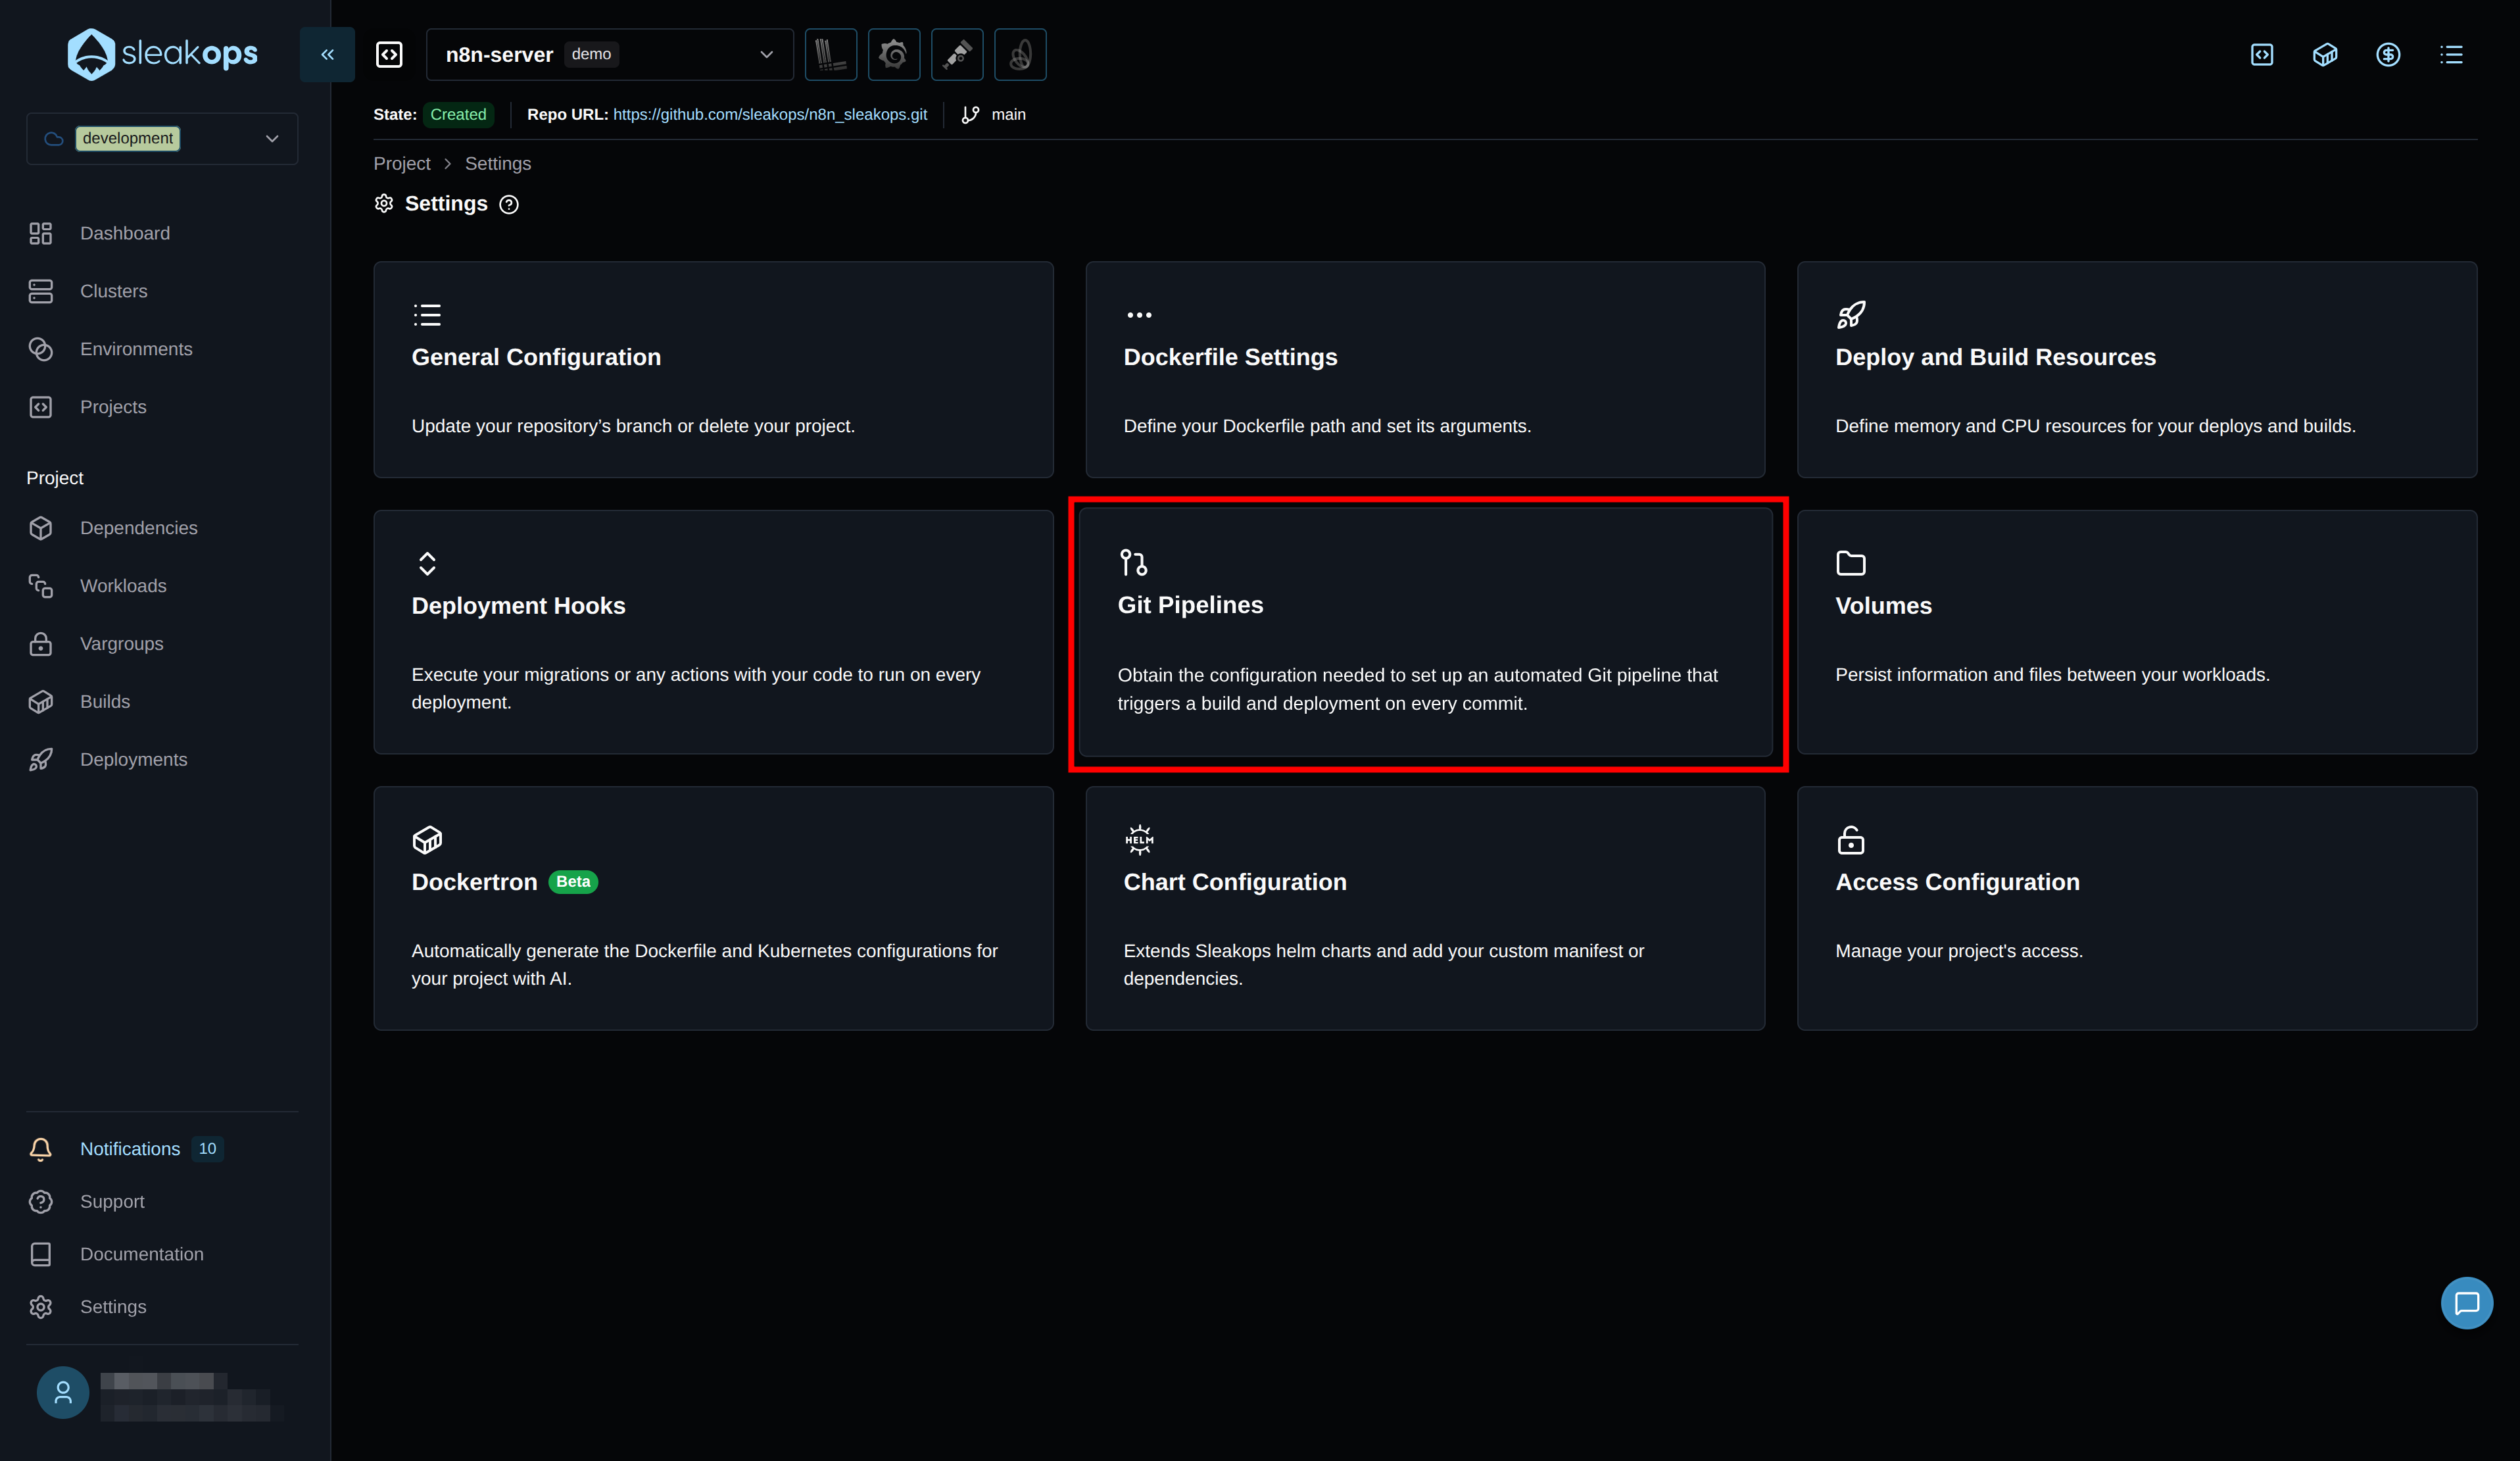
Setup steps:
- Go to your project in SleakOps
- Click the ⚙️ (settings)
- Select "Git pipelines"
- Copy the provided YAML file
- Add
SLEAKOPS_KEYto your GitHub secrets
This requires an environment variable called SLEAKOPS_KEY. If you don't have it, go to the link provided in Settings -> CLI, retrieve it, and save it as an environment variable.
With this configured and deployed, every time you push to your "main" branch, a new version of your application will be automatically released.
🎯 Next Steps
Once the installation is complete:
Initial n8n Configuration
- First Access: Use your web service URL
- Create Administrator User: n8n will prompt you to create the first user
- Configure Webhooks: If needed, configure the public URLs
Monitoring and Optimization
- Review Metrics: Use the integrated Grafana dashboard
- Adjust Resources: Modify CPU/memory based on actual usage
- Configure Alerts: Define performance thresholds
Backup and Security
- Automatic Backups: Configure PostgreSQL backups
- Secrets Management: Review credential management
- Updates: Schedule regular updates
Updating and Extending n8n
We now have our own n8n installed and running on the cluster. We have our n8n definition in a Dockerfile.
To update the version
This process is very simple. We'll modify the Dockerfile and change the image tag. You can see the available images in the official n8n repository on Docker Hub.
Note: Read the changelog in case there are any breaking changes or anything that might break between versions. Make backups of the database beforehand, just in case.
To add new dependencies to your nodes
As we did to update the version, in this case we'll take advantage of having our Dockerfile and install whatever we want inside it. This will be available for use on our n8n nodes.
You can see examples of this in the repository's README.
Scaling Best Practices (Bonus)
Once your n8n deployment is up and running, consider these scaling strategies:
🎯 Worker Optimization
- Queue Monitoring: Monitor the Redis queue depth to determine when to scale workers.
- Resource Allocation: Allocate sufficient CPU and memory based on workflow complexity.
- Concurrency Tuning: Tune worker concurrency based on workflow types (CPU-intensive vs. I/O-intensive).
- Dedicated Workers: Create pools of specialized workers for different workflow categories.
📈 Performance Monitoring
Adjust the memory and CPU of your workloads to what your processes actually need.
This is useful for avoiding oversized infrastructure and also for making decisions when scaling horizontally based on memory or CPU.
How do we do it from Sleakops?
Simple, go to the details of your worker or web service that we created earlier and click on the "Grafana" icon. This will open a dashboard within Grafana showing the historical consumption of your process. Be sure to look at a long time range to cover all your scenarios.

🔧 Database Optimization
- Connection Pooling: Configure PostgreSQL connection pools for high concurrency.
- Read Replicas: Use read replicas for reporting and analytics queries. (This can be done from Sleakops in the Postgres configuration.)
- Indexing: Optimize database indexes for workflow execution queries.
- Backup Strategies: Implement automated backups with point-in-time recovery. (This can be done from Sleakops in the Postgres configuration.)
🚀 Advanced Configurations
- Node Affinity: Schedule workers on appropriate node types (CPU vs. memory-optimized). (You can do this from Sleakops using Nodepools)
- Pod Disruption Budgets: Ensures minimum availability during cluster maintenance. (Sleakops already handles this)
- Resource Quotas: Sets appropriate limits to prevent resource exhaustion. (You can do this from Sleakops by defining limits on your Workloads and Nodepools)
- Network Policies: Ensures inter-pod communication. (Sleakops already handles this)